Software Review: OnOne Phototune 3
An easy to learn tool for editors who want an alternative to Photoshop.
We may earn revenue from the products available on this page and participate in affiliate programs. Learn more ›

Software Review: Onone Phototune 3
Some people have an eye for color, whether acquired through years of image-fixing or an innate gift for telling a magenta from a red color cast. But few find color correction so easy. And fixing a picture that has a color cast, especially when there are different casts in the shadows and highlights, can be challenging even for experienced photographers.
Sure, Adobe Photoshop and other image editors provide plenty of tools to fix some color issues, especially when you’re working with RAW files. But those that get the best results, such as Levels and Curves, take loads of practice.
Enter OnOne’s PhotoTune. Now in version 3, this $160 (direct) plug-in—available for recent versions of Photoshop, Elements, Lightroom, and Aperture— combines what used to be separate parts, PhotoTune and SkinTune, into a single module. It offers an effortless Wizard and a new Pro mode for more control.
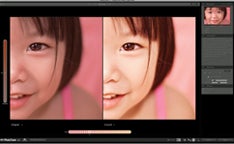
The Wizard mode is fun. It presents options the way an eye doctor does: You choose between a pair of auto-corrected previews shown side-by-side. The program steps you through color and tone adjustments, and offers quick ways to modify auto corrections.
Go for the Pro Mode
For some images and some photographers, the simple approach will be enough. But if you’re investing in a plug-in that costs more than Elements itself, my guess is you’ll check the box that always opens the software in the much more powerful Pro mode. As in the Wizard mode, it makes most sense to work through the Pro mode linearly, beginning by correcting brightness and contrast, then tweaking color and/or skin tone, and then possibly adding sharpness. But the Pro mode offers much more control and types of correction. In it, PhotoTune shows you “before” and “after” images at the left and right. Click and drag your image upward to make it brighter and downward to make it darker. Drag left for less contrast, right for more. (Using the mouse makes big changes—for more subtlety, use the arrow keys.)
This version of the software also includes options for adding fill light, recovering highlights, and adding clarity.
General color correction works similarly: Move your image toward the colored circle representing the tone your image needs more of, or away from the tone it needs less of. You can speed the process by starting with the Auto Cast Removal box; again, use the arrow keys for fine corrections.
The color correction mode really shines when it comes to neutralizing grays. Unlike most programs, which force you to find and click on just one gray spot to apply globally, PhotoTune lets you to click on several gray areas. Choose one each in the highlights, shadows, and midtones—the program will average them to make its correction. And if wide swaths you want gray still retain odd color casts (as often happens with pictures of water), the gray purity slider neutralizes them.
One of the bonuses of the color mode is its monochrome converter. To use it, simply move the switch from color to black-and-white. Then use your arrow keys to change the way the tones of your image are converted. If you like your conversion, you can save it as a preset and apply it quickly to other images.
Tools for Skin Tones
For years, SkinTune has offered one of the best ways to get skin color right. It’s even more useful now that it’s part of PhotoTune.
This system works like a gray dropper for skin. Click on a midtone (it won’t work well on highlights or shadows). If your subject fits into one of the ethnic categories listed, choose it. If not, just choose All, and the program takes an average. Then use the sliders for the skin hue and level of warmth you think works best.
By default, the software uses your correction to fix the rest of the image. But if your subject is lit by a different type of light than the background, check the box to correct only the skin. PhotoTune also offers a nice sharpening mechanism. Because PhotoTune is so good at recognizing skin, it allows you to ignore skin while sharpening. This can be helpful for subjects with less-than-perfect complexions.
But you should sharpen only after you’ve resized your image and are ready to print. So if you want to use PhotoTune’s sharpening, it’s best to exit the plug-in, save the file with your corrections, then resize before returning to PhotoTune to sharpen.
Frustrated with RAW?
If you do a lot of color correction, shoot mostly JPEGs, scan film, or are frustrated with the results from your RAW converter, you should consider PhotoTune. It’s easy to learn, appropriate for both beginners and more experienced image editors, and a neat alternative to Photoshop’s complicated method of getting equally good results.