Software Review: RealViz Stitcher 5.6 Panorama Maker
Find out why this inexpensive 3-D digital imaging software is considered the "Porsche of Stitchers."
We may earn revenue from the products available on this page and participate in affiliate programs. Learn more ›
When shopping for a car, sometimes reality steps in and forces you to buy a budget model over a performance vehicle. But in the case of panorama stitching software, go ahead and splurge on the Porsche. With clean lines in its workflow, a supercharged, 3D engine for panoramic rendering, and enough output options to satisfy even the most demanding professionals — all at an affordable starting price — your computer’s hard drive will beckon for you to take Stitcher 5.6 out for a spin.
Stitcher 5.6 is one of a handful of titles from RealViz, a European company specializing in powerful 3-D digital imaging software geared toward professional photographers, graphic artists, Web designers, and film producers. While their software is designed for high-end users, fortunate for enthusiasts is the fact that RealViz offers several versions of the relatively easy-to-use Stitcher 5.6, the least expensive of which is $79.
The central concept behind RealViz’s approach to Stitcher 5.6 (as well as their other software packages) is visualization. In Stitcher, it is WYSIWYG (what you see is what you get). Visual artists can comfortably operate in an environment that is driven not by numerical parameters but by what is on-screen at any given moment.
At the core of Stitcher 5.6 is a simple, five-phase workflow, represented by icons superimposed over the upper, left portion of the imaging workspace:
1. Starting a panorama project
2. Stitching panorama images
3. Aligning the panorama, stencils, and hotspots
4. Equalizing tonalities within the panorama
5. Rendering the panorama into final output form.
These phases offer a number of sophisticated options, including different types of stitching methods, variable levels of image blending, and a large array of parameters for output formats, just to name a few.
Here is the five-phase workflow in detail:
PHASE 1: STARTING A PANAROMA PROJECT
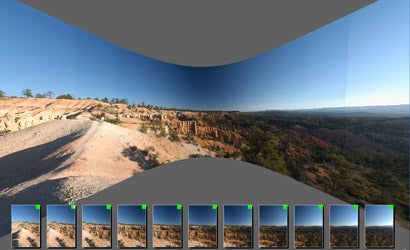
You may stitch together any number of images. In some cases I stitch just a few images for super-wide snapshots; other times, however, I utilize a dozen or more images to create complete 360° panoramas. The manual outlines typical shooting scenarios using different lenses. If you capture images with a recent “chipped” lens, Stitcher recognizes the focal length via EXIF data; for film scans, you need to input lens info. This information is used in Stitcher’s advanced algorithms for eliminating distortion. Once the source images of your panorama are loaded, all of the images appear as thumbnails at the bottom of the screen. Beyond starting brand new panoramas, you may also open previously-saved Stitcher projects.
PHASE 2: STITCHING PANORAMA IMAGES
By far the easiest way to put your panoramics together is with the auto stitch option. All you do is click the icon, and Stitcher begins positioning the images together, automatically determining where each image fits in the final panorama. Stitcher even recognizes and correctly places images in 3D panoramas that consist of multiple rows. Previous versions required that you drag and drop each image into its approximate location. Not so with 5.6. Now you just click and watch it work its magic.
Stitching is where the visual fun begins. It is as if you are sitting in an OMNIMAX theater, watching your images fill the screen before you. You see, Stitcher is a true 3D rendering program, so, as your panorama is pieced together, it is projected onto a virtual sphere right before your eyes. Pressing Alt + click changes the pointer to the pan icon, allowing you to move the stitched image left and right and up and down inside the virtual globe. Ctrl + Alt + click (Windows) or Command + Click (Mac) changes the pointer to a zoom icon, allowing you to zoom in on parts of your image. Once you get the hang of panning and zooming, you may begin moving back and forth, in and out, as if you are really on-location again. The graphical interface is quite similar to playing a 3D video game… except you’re moving around in a space created from your own photographs!
If you have particularly difficult images to stitch — such as images containing almost nothing but sky — you may need to use one of the manual stitch options. You may position the whole panorama by dragging and dropping all of the images into their approximate places and then clicking the semi-automatic “Stitch” option. Or you may enter the “manual stitch” mode, where you place one image in the work area, Ctrl + click the next image in the film strip, and click the “Manual Stitch” icon. Stitcher enters a side-by-side viewer, where you use a magnifier to place two or three control points at similar locations in the two photos. Then you click “Stitch,” and the two images are instantaneously put together. You repeat this for as many frames as you need to manually stitch. I have to say that this is the coolest and easiest-to-use control point interface I’ve experienced in any stitching program.
Bryce Canyon virtual tour
PHASE 3: ALIGNING THE PANORAMA, STENCILS, AND HOTSPOTS
If you’ve shot with a carefully-leveled panoramic rig on a tripod, you may be able to align your image using the Auto Align function. However, I prefer using the manual Align option, where you draw two vertical lines next to buildings, poles, trees, or other objects you know are vertical. Stitcher then recalibrates the horizontal alignment of the scene, using the two vertical lines as reference points. Or you can draw one horizontal line to do the same along the other axis
The third phase also offers a Stencil mode, where subjects that moved in the original scene captures (and, therefore, appear in more than one image) can be removed from one or more frames. Yes, this is like using layer masks in Photoshop. In the Stencil mode, you select a frame and then draw a polygon around whatever you would like to have masked out. When Stitcher combines frames in the final rendering, the stenciled areas are ignored and image data is gathered from the unstenciled portions of other frames. Imagine shooting a street scene where the same person happens to appear in two spots of the panorama. You simply stencil her out in one frame, and — voila! — upon rendering she appears in only one location.
Phase three also offers you the opportunity to add hotspots for QuickTime VR movies. When hotspots are placed in panoramas, viewers can click on that portion of the image in order to follow a predefined URL, often an entrance to another panorama. Realtors, for example, use hotspots in their virtual tours of houses so that customers can navigate from room to room. Defining hotspots is as simple as stenciling. You just draw polygons, define the URLs associated with the hotspots, and create captions that appear at the bottom of the QuickTime viewer. Handily, on mouse rollover, the QuickTime VR navigator arrow changes to a hand to indicate a hotspot jump-to zone.
PHASE 4: EQUALIZING TONALITIES WITHIN THE PANORAMA
Light intensities and color may vary from image to image, sometimes due to properties of your equipment and sometimes due to changing conditions at a scene. Whatever the case, Stitcher blends each image with the next, equalizing them so that you don’t see lines where they overlap. This is done quickly and automatically. This really goes a long way towards making your panoramas look slick, professional, and publishable.
PHASE 5: RENDERING THE PANORAMA INTO FINAL OUTPUT FORM
The last step in the Stitcher process is the most important. Here you determine what the final output will look like. Your options include a variety of panorama formats as well as producing movies. First of all, you can convert your stitched images by “rendering” them into cylindrical, cubic, and spherical images as well as flat “snapshots.” Most interactive panoramas, such as QuickTime virtual tours, either simulate being inside a cylinder or an entire sphere. Cubic projections are used in more limited applications, such as creating 3D backgrounds. Cylindrical, cubic, and spherical images may be output for third-party players, namely QuickTime VR and Pure Player formats. Snapshots are standard, two-dimensional files that look like regular photographs and are suitable for printing.
The movie option allows you to produce .mov and .avi files, created as you direct movement within the panorama. For example, you can set a “key point” with a wide view, zoom in and set a second key point, pan left while zoomed and set the third key point, and zoom back out to set a final key point. Stitcher then processes the panning and zooming movements to produce a file that looks as if you were on location with a video camera. It’s really quite cool and very easy to produce.
Here are a few pointers about Stitcher 5.6:
• As you progress through the five phases, the tonalities on the screen may not match exactly and the image may seem overly pixelated. This is normal, as the 3D projection of your panorama is a “draft,” only approximating the final output. But, don’t worry, the final output image will be rendered with much greater precision.
• If your final output format will be a “snapshot,” i.e., a 2D image (as opposed to, say, a cylindrical output for a QuickTime VR movie), after loading your images you may need to select Edit > Properties and change the focal length to “Flat” if you used a long lens (e.g., 200mm or greater). The flat stitch is intended for when the camera or subject moves parallel relative to the other — e.g., moving a document under a camera on a copy stand — but, in my experience, panoramas shot from one location using longer lenses also may require the “Flat” focal length setting.
• The number of images you stitch is really only limited by your time shooting and how much memory and speed your computer has. I recently photographed fall foliage from a hilltop, creating a panorama of colorful tree tops using a 300 mm lens and stitching together 36 vertical images for one very l-o-o-o-o-o-o-o-n-g panorama ! Even with much overlap, the image is approximately 6.5 times longer than it is high, or a 1:6.5 aspect ratio!
• You may want to play with the Equalization Factor setting (Edit > Preferences > Rendering), experimenting with different values between 0 and 1. While the default is .7, a value that often will blend tonalities and colors well, you may find some images become overexposed. If so, try lowering the Equalization Factor and comparing rendered results.
• If you are in a special mode, e.g., Stencil or manual Align, exiting the function requires that you click the same icon you used to enter the mode. For example, you click on the manual Align, and the background turns blue to indicate the special function. After drawing two vertical lines, the panorama adjusts to the two reference lines. You then need to click the icon again to exit this mode.
• Some option windows, such as Properties, do not have an “Apply” or “OK” button, causing you to have to click the “x” in the corner to close them. While you might think that any values you changed would be lost, this is not the case. RealViz would do well to add “OK” or “Apply” buttons in places when they make their next iteration of Stitcher.
• The Preferences Dialog box allows for changing many parameters, such as workspace colors, preview options, and memory management. Although I found most of Stitcher 5.6’s defaults to be quite good, I did change the thumbnail magnification setting. Go to Edit > Preferences > Thumbnails and set the “Thumbnail zoom” to “small.” Otherwise, the images in the strip get larger as you mouse over them, which I found to be quite distracting.
• While it is possible to shoot panoramas handheld, the best results come from using a tripod and a specialized panoramic head, which will allow you to pivot the lens horizontally — and with some rigs vertically, too — around the lens’s nodal point. This eliminates parallax from one image to the next. The Stitcher manual does a nice job of describing best shooting techniques.
• Speaking of the manual, it’s good and bad. It’s 146 pages long and has lots of information. Unfortunately, in many places key steps are mentioned too briefly and in others important information is completely left out. To fully explain all operations of Stitcher 5.6 would require a manual twice as long.
• Every performance machine has its hiccups, and my PC version of Stitcher 5.6 Unlimited DS is no exception. Occasional glitches, especially with movie production, sometimes slowed this otherwise dream-like 3D ride.
• Final panoramas rendered by Stitcher 5.6 are seamless; you really can’t tell where any of the frames overlapped. Moreover, Stitcher 5.6 handles complex patterns with aplomb. In short, Stitcher 5.6 is by far best stitching program I’ve ever used.
• While Stitcher 5.6 offers a couple of user-selectable image adjustments, namely exposure and sharpening, I prefer to use PhotoShop to fine tune photographs before stitching.
• Stitcher 5.6 can handle most RAW formats, along with 32-bit HDR files.
IN CONCLUSION
Anyone looking for a versatile, high-performance stitching engine will find even RealViz’s entry level Express invigorating. Beyond this $79 baseline, Stitcher 5.6 is also available in three other souped-up versions: Pro $349, Unlimited $580, and Unlimited DS $800. To compare versions, download a trial version, or purchase Stitcher 5.6, visit stitcher.realviz.com.
What are the differences between the versions? What do you not get for the $79 version? In short, the Express version is quite capable for most users but does limit some options; most significantly, Express will only work with 8 bit files; it cannot load or save PSD files, and will not work with circular fisheye images.
OTHER STITCHING SOFTWARE TITLES
Besides RealViz’s Stitcher 5.6, here are some other recommendations:
• Photoshop CS3 ($649 new; $199 upgrade: adobe.com)
• Photoshop Elements 5 or 6 ($99 new; $79 upgrade: adobe.com)
• Autopano Pro 1.4.0 ($140: autopano.net)
• PanoStitcher ($29.95: pixtra.com)
• Autostitch (Free: autostitch.net)
Photoshop CS3 and Elements 5 and 6 use the same super-fast algorithm for their Photomerge function and leave you with a layered file, whose masks can be tweaked for better blending (although Photoshop’s automatic masking has always been excellent for me). If you already have one of these top-selling Adobe titles, you may not need a separate stitching program; none of the Photoshop packages, however, has options for creating interactive panoramas such as QuickTime movies. The sophistication of controls in Autopano Pro for planar or “snapshot” panoramas is quite good — with many adjustments offered in photo-editing programs like Photoshop — but Autopano does not offer interactive movie options. PanoStitcher, while limited in its controls, creates nice planar images and cylindrical QuickTime movies. You can save money with Autostitch, a no-frills program that does a decent job with some “snapshot” panoramas but is not suited for serious panorama photography.
David FitzSimmons is a freelance photographer and writer as well as an Assistant Professor of English at Ashland University in Ashland, Ohio. He previously wrote about Helicon Focus and its ability to create images with extreme depth of field. His photos have appeared on regional postcards, in international calendars, and in a variety of periodicals. Check out more of David’s work at fitzsimmonsphotography.com.