HDRI Tutorial: Master Moving Objects With FDRTools
FDRTools' powerful de-ghosting features open up a whole lot more of the world to high dynamic range imaging.
There are only a handful of useful cross-platform high dynamic range (HDR) programs available, and we’re happy to report that after our testing, we’ll gladly add FDRTools (www.fdrtools.com) to this short list. This program has a serious-looking Graphical User Interface (GUI), and a workflow that is quite different from its main cross-platform competitors, Photomatix Pro and Adobe Photoshop CS2. But the bottom line is that it works, and it offers some powerful features and functions behind that intimidating interface.
After some practice and familiarization with the workflow and interface, we think you will also be impressed with what the economical FDRTools Advanced ($52, street) has to offer.
HDR Generation and Tonemapping isn’t a two-step process in FDRTools. Instead, it’s all part of one flowing process that allows for adjustments to both the 32-bit source file and the tonemapped output file in real time. It accomplishes this with floating math: only rendering a small whole-image preview in the Navigator window and a small section of the image at 100% in another window on the fly. Move the cursor box to view a different section of the preview at 100% and it scraps the previous preview’s numbers and re-renders the active slice of the scene at actual size for an accurate view of what’s happening at the pixel level.
| HDR Imaging?If you are brand-new to HDR imaging, read the first few pages of this article to get up to speed on terminologies and processes.You can also post your HDR images and trade tips in our new HDR forum. |
What’s so cool about this, you ask? Why should you want to adjust the input images and output images at the same time? Ghostbusting, that’s why!
FDRTools Advanced employs an interesting 32-bit HDR Generation function: Separation. For images without moving elements, it might not be necessary, but if you’ve ever had an otherwise awesome HDR image marred by an errant moving element — a tourist, or a wind-blown branch, you’ll appreciate this. If you’re willing to take a chance to capture a bracketed city street scene with moving traffic and pedestrians, FDRTools Separator very well may be able to clean it up and get rid of those HDR ghost artifacts — which opens a whole lot more of the world to HDR imaging.
FDRTools Advanced applies settings that should minimize the moving objects, but if it’s not dead-on with its interpretation, the de-ghosting settings are adjustable. This program packs a lot of functionality into its pennywise programming. And that scary-looking interface is actually quite elegant once you get the hang of it. De-ghosting is not guaranteed to work every time, but FDRTools has a number of tricks up its programming sleeves to up the odds considerably.
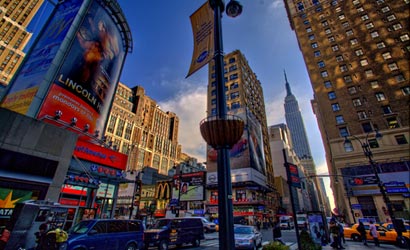
Manhattan provides a challenging backdrop for putting FDRTools’ auto-alignment and ghost removers to the test. There are always pedestrians, street traffic, flapping flags, and dramatic Exposure Value differences between the skyscraper-cast shadows and the streaming sunshine, along with neon, traffic lights, and well. We’ve skipped the tripod and are relying on FDRTools to compensate for slight camera movement between the burst of bracketed images.
First, we’re going to work on a three-image series captured with a Canon EOS 5D and Canon 17-35mm f/2.8L in Auto Exposure Bracketing mode with burst drive. After this, we’re going to briefly look at the advanced de-ghosting techniques, starting with a five-image series captured with the Pentax K10D and SMC Pentax 10-17mm f/3.5-4.5 Fisheye.
CLICK ON THE SLIDESHOWS TO LAUNCH TUTORIAL
Slideshow 1: FDRTools Advanced basic step-by-step tutorial.
Slideshow 2: Advanced De-Ghosting with FDRTools Advanced.