Adobe Lightroom Put to the Test
Is Adobe Lightroom the future of image processing?
We may earn revenue from the products available on this page and participate in affiliate programs. Learn more ›
With the widespread adoption of digital cameras, professional photographers have come to rely on a variety of imaging programs for specific tasks. Beyond basic pixel editing in Photoshop, these include RAW file processing and conversion, image organizing and archiving, and printing. Wouldn’t it be less cumbersome if such functions were available in a single, integrated program? And wouldn’t it be even better if Photoshop’s copious features and capabilities were streamlined, reducing your need for books, videos, and workshops to master them?
That’s the thought behind Adobe Lightroom, an all-new pro-oriented program that Adobe recently released in a public beta version. Very different from industry mainstay Photoshop, Lightroom takes a completely fresh approach to image processing. It is user friendly yet comprehensive, with features including file import from memory cards and cameras, RAW conversion, image processing, slide shows, and printing, not to mention keywording, indexing, cataloguing, and archiving.
Don’t get too excited: Lightroom isn’t ready for prime time, and won’t be available for purchase until late 2006. So why did Adobe release the beta now? Because Apple’s conceptually similar Aperture software, released at the end of last year, beat it to market. (See our review in the March/April 2006 issue.)
Adobe’s clever but uncharacteristic move made a good thing out of a bad situation: The download site, found at labs.macromedia.com/technologies/lightroom, includes an online forum in which users can provide feedback on bugs and suggest other features they would like to see included. As a result, Lightroom will be a better product for photographers when it finally rolls out. Note that the original Lightroom beta is Mac-only but that a Windows version is coming; both will expire when the retail product arrives.
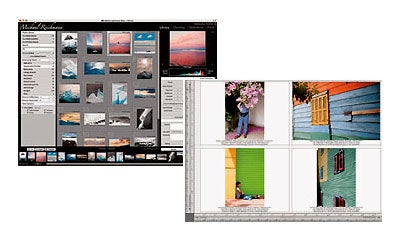
Even at this early stage of development, Lightroom is impressive. It’s more modest in its aims than Aperture, at least for now, and I find it a good deal easier to use. This simplicity is reflected in its basic structure of four separate Modules, each dedicated to a different imaging task yet instantly accessible within a single workspace. Switching modules requires a single mouse-click; this changes the view in the main image window, along with menus, control panels, and information displays. A strip-style image browser remains at the bottom of the screen at all times.
The first Module you’re likely to use in Lightroom is called Library, and it reflects the core of the program itself. Unlike Apple’s Aperture, which requires you to physically store your images within its own proprietary library database, Lightroom gives you a choice. You can import files into the Library itself, or you can have the program catalog them wherever they currently reside. This makes the database much smaller and allows you to store your images on internal or external hard drives.
Lightroom uses the concept of Shoots as named directories within the Library. A Shoot can contain files from a number of different places and times, on any drive attached to the computer. But files can also be placed into Collections — essentially ad-hoc groupings of files. When you import files into Lightroom, you can add your copyright information and keywords as IPTC metadata. Keywords automatically register in the program’s Keyword Search function, enabling you to find any files in the library containing those words with a single mouse click. You can designate these as a Collection, creating a new grouping of files. But the Collection is virtual — just a database entry. It takes up no additional disk space yet is instantly accessible.
Module number two, called Develop, is for adjusting and manipulating individual images. Unlike any other programs except Apple’s Aperture, Lightroom handles both RAW files and other formats — JPEG, TIFF, and Photoshop’s own PSD — in virtually the same way, using the same tools and adjustments. This transparent approach differs from the workflow in Photoshop, which requires you to first process and convert RAW files in Adobe Camera Raw. And since Lightroom’s RAW processing engine is based closely on Camera Raw itself, it supports the RAW formats of nearly all digital cameras ever produced. It also includes all the tools we’re used to seeing in Camera Raw, but organizes them better.
One of the Develop module’s biggest advantages is that it lets you adjust color, sharpness, white balance, and other settings without altering the original file. Most RAW processing programs provide this capability, since it’s intrinsic to the format, but only Lightroom and Aperture do so with other file types, including JPEG, TIFF, and PSD, in the same way as RAW. The program does so by creating a metadata instruction list (a “recipe” of settings) rather than altering actual pixels. This conveniently eliminates proliferation of multiple versions and saves space on your hard drive.
Develop adds some terrific features not available in Camera Raw. The Grayscale Mixer affords much more control over converting color images to monochrome, allowing you to individually adjust any or all of the six primary and secondary colors while preserving overall luminance values. Split Toning lets you apply separate tints to highlight and shadow areas in both black-and-white and color images. With the Presets Browser you can apply a variety of ready-made and custom settings to your photos. Also noteworthy is the Quick Develop feature, which offers a simplified set of adjustment tools for batch-processing multiple images.
Slideshow, the third Module in Lightroom, contains an array of tools for preparing and displaying on-screen presentations. A finished show can be saved as a PDF file (Adobe Acrobat format), a Flash animation, or a Web-ready HTML page. You can select a group of images for a slide show from a Shoot or Collection, or choose individual shots from the thumbnail picture browser.
The fourth module in Lightroom is Print, which easily surpasses the printing options found in most other general-purpose imaging programs. What’s special about the Print Module is that, unlike Photoshop, it’s designed to handle images in groups, not one at a time. To print a series of individual photos, all with the same page layout, simply add them to a Quick Collection (an ad-hoc grouping of files) and the pages will automatically queue up for printing. You can also print an entire Shoot or Collection (or any group of multiple shots) as contact sheets. Lightroom’s Template Browser gives you preset printing layouts for both single and multi-image pages, and you can create and save custom layouts of your own.
The Lightroom beta is very much a work in progress, and Adobe doesn’t know which features will ultimately be incorporated. But the final product is sure to reflect the opinions of photographers like you and me.