The $199 Photoshop Killer?
Adobe's new Lightroom software may tempt you to abandon the big guy for good.
We may earn revenue from the products available on this page and participate in affiliate programs. Learn more ›
How many times have you heard photographers complain about Adobe Photoshop’s unwieldy toolsets and masses of menus? How many times have you complained yourself when Adobe introduced yet another, even more complex, $650 behemoth? Maybe it’s time for the grumbling to stop, because this time the imaging übercompany has introduced a product thought up, vetted by, and made for, photographers — Lightroom. The cost: $199, direct, through April; $299 thereafter (www.adobe.com).
Like Apple’s Aperture (Lightroom’s beta version was announced at the same time as Aperture’s first incarnation, in 2005), this program is meant to be a total workflow tool that organizes, processes, fixes, prints, and shares — all the while treating RAW images like any other kind of file. As with the new generation of photo tools (Aperture, LightCraft’s LightZone, and Nikon’s Capture NX among them), this software does all its fixing nondestructively, allowing you to go back and rework your pictures ad infinitum.
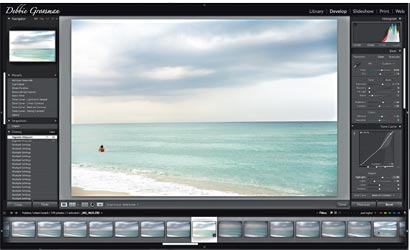
Lightroom organizes its interface simply, putting all the tools that most photographers use regularly in Photoshop where they’re most useful — right in your face. It has a tabbed interface, so you can choose between organizing, processing, printing, and creating a web gallery. You’ll most likely spend most of your time in the Develop tab, adjusting color and contrast, or converting color images to black-and-white.
What makes this program a whole-workflow tool is the array of features that help you do what is sometimes the hardest part of the job — picking your best picture. As in Adobe Bridge, you can star and color-code your choices, but now there’s a three-flag system to keep, consider, or reject. You can also compare and zoom in on multiple images, hold onto several variations of one image, and stack up photos shot within the same time frame.
Thankfully, Lightroom simplifies color management: Every image that’s imported is automatically converted into the wide-gamut ProPhoto RGB color space, and only if you export will you need to make another choice. When you’re printing, choosing the right paper profile for your printer is simpler, too. The program knows which profiles have to do with printers, and pares down that long list you see when you try to do the same thing in Photoshop.
So is the company that brought us one of the most-used imaging tools about to quash its own invention? Perhaps for some photographers, it will. If you rarely dodge, burn, or composite — if you’re not the kind of image fixer who regularly works on small areas of your picture at a time — you may never need Photoshop again. And if you’ve never used Photoshop before, Lightroom, rather than Photoshop’s little sister, Photoshop Elements, may now be the best program for those who are new to shooting digital or working with RAW images. Lightroom is a simple and sophisticated tool for the kind of people we know best: the ones who really love photography.
1 Dim the lights: It may seem simple, but with all the tools and sliders surrounding your picture, the feature that lets you hit the L key once to dim the interface and twice to completely darken it will change the way you fix your photos: It’s like looking at your picture in a frame while you’re working on it.
2 Awesome Curves: Photoshop’s Curves is probably one of the most important, least understood, and easiest-to-goof-up tools. Lightroom’s innovations are twofold. First, the Curves have limits, so the tool won’t let you totally blow out your highlights or damage your shadows beyond repair. Second, to tweak a specific area on the Curve, just mouse over the part of your photo you want to brighten or dim, and tap the arrow keys up or down. Do this with the lights-out interface, and you’re in picture-fixing heaven.
3 Specific saturation: The same little tool (called Targeted Adjustment) that you can wave over your photo to adjust the Curve can be used on the HSL/Color/Grayscale. Want to saturate or desaturate a certain hue? Just touch it with your mouse and use the keyboard to tweak. If you want to go black-and-white, the same tool will add more or less intensity to the range of colors you indicate. (No more Channel Mixer for you!)
4 Split toning: Made a super b&w? Head to Split Toning to add whatever tint you want, separately, to highlights and shadows. You decide which hues to use and how saturated they’ll be. What required a workaround in Photoshop is at your fingertips.
5 We can’t pick just five! There’s a History Palette for multiple undos (A), tone curve and effect presets (B), and a navigator for easy zooming (C). You have an everpresent, adjustable histogram (D). You can also turn fixes on and off (E), get rid of redeye and dust spots (F, G), do a split-screen comparison (H), rate photos (I), and switch to another image (J). Plus, you can customize the interface with your name or logo (K).