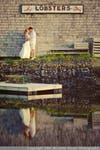
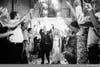
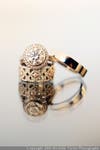
Michelle Turner Thumb
SHARE
1.jpg
In her career as a high-end wedding photographer, Michelle Turner has learned a thing or a thousand about making couples look good in front of the camera. You can see more of her work at MichelleTurner.com or check out her book, The Wedding Photography Field Guide, from Focal Press. Try something different with your lighting and exposure. In this scenario, I also got the safe shot with the flash, but this lighting “experiment” proved to be my favorite shot of the series. It had just stopped raining here, so I took a few shots during the fireworks display with the ambient light. The moisture in the air provided enough bounce for the light in the fireworks, and wrapped softly around the couple. I photographed this at 14mm at 1/8 of a second. Michelle Turner
2.jpg
Look for interesting light sources Darkness was falling when we walked by this wall, but the headlights from oncoming traffic provided the light on the side of the bride’s face and the interesting shadow under the groom’s hat. I could have set up an off-camera cash, but I liked the temperature and unpredictability of the light from the headlights. I photographed this with my 50mm lens at 1/60 of a second.
3.jpg
Use motion blur to your advantage This was the bride and groom’s last dance at the reception, and I wanted to convey the movement of their guests with the sparklers behind them. I photographed this using the available light in the scene at 1/20 of a second with my 24mm lens.
4.jpg
Use reflections to strengthen your composition I was photographing this couple in Kennebunkport, and I loved the look of the lobster sign against the cedar shingles. I positioned the couple on the left side of the frame to balance the composition, and I got low enough to incorporate their entire reflection in the shot. This was photographed at 150mm at ISO 400.
7.jpg
Look for interesting backdrops, but don’t let them overpower your subjects I love the colors that you can find in urban wall murals and graffiti, and I fell in love with this one that I came across in Mexico. I moved the couple away from the mural so that they wouldn’t overlap with it (which would have resulted in a busy composition). I photographed this with my 35mm lens. Michelle Turner
8.jpg
Use leading lines to enhance your compositions I love the leading lines of this photograph- everything draws you right into the couple, including the intense backlighting. Since they were both wearing white I had them leave a bit of space between them (to prevent them from blending into one another), and I centered them in the doorway. I photographed this at 14mm and overexposed the couple to retain detail in the very dark passage. Michelle Turner
9.jpg
Look for interesting silhouettes Normally I will try to put almost all of my couple into the horizon (by elevating them or getting low myself) for my silhouette shots, but I like the ripple of the water reflecting the beautiful light and colors from the sky in this photograph. I separated my couple to keep them as distinct shapes (rather than the big blob of darkness that they would have been if they had been embracing). I shot this with my 35mm lens at ISO 800. Michelle Turner
10.jpg
Be prepared for a variety of lighting situations There were four videographers at this wedding, each with a light that they would turn on and off. Because of the dramatically different lighting from shot to shot, I kept one camera set without a flash and one set to trigger an off-camera light when needed. As a result, I was prepared to capture this shot with all ambient light. I photographed this at 1/125 of a second and pushed my ISO to 5000. [Editor’s Note: While this tip seems specific to wedding shoots, it’s really good advice for portrait shooting in general. You never know when a great interaction or expression is going to happen, so you should always be ready for it. –SH] Michelle Turner
11.jpg
Frame the couple for stronger composition I love using doors and windows — they make wonderful framing devices! I centered my couple and left them to their own devices while I pulled back enough in this shot to include the interesting overhang. I photographed this with my 24mm lens. Michelle Turner
5.jpg
BONUS WEDDING PHOTO TIP #1 Use reflective surfaces when photographing small details I’m constantly looking for reflective surfaces when I have small details to photograph. There was a desk in this hotel room that had a piece of glass on it, and even thought the wood of the desk was quite dark, I got low enough so that the white wall was reflecting off of the glass. I photographed this with my 60mm macro. Michelle Turner
6.jpg
BONUS WEDDING PHOTO TIP #2 If you have interesting details, try to photograph them in an interesting way I knew that the groom had asked all of the groomsmen to wear their favorite belt buckle to the ceremony. Rather than photographing all of the buckles on a table together, I waited until they had them on to snap the shot. I intentionally refrained from asking them to straighten their ties and shirts as it gives an accurate picture of the casual elegance of this wedding combined with the chaos pre-ceremony. I took this shot with my 35mm lens. Michelle Turner