Software Workshop: Creating a Fake Reflection
Use Photoshop to add an interesting new dimension to your photos.

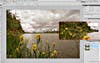
Step 1:
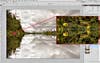
Step 2:
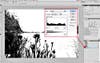
Step 3:
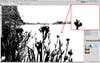
Step 4:
Final Step:
Use Photoshop to add an interesting new dimension to your photos.
Step 1:
Step 2:
Step 3:
Step 4:
Final Step: