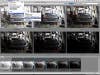
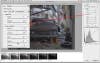
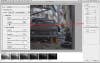
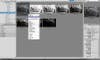
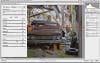
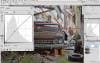
Intro: High-Dynamic-Range imaging—merging multiple exposures into a single picture with more tones than a digital camera can ordinarily capture—has never been more popular. It’s great for getting detail in highlights and shadows when your scene has extreme lights and darks. Adobe Photoshop’s method for HDR used to be clunky and confusing, and you had to buy a plug-in to do it easily. But CS5’s new HDR Pro makes it easier. Still, HDR Pro will only take you so far. The trick to getting great HDR images with Photoshop alone is to go easy during the conversion process, then take your base image into Adobe Camera Raw and use those subtler (and simpler) tools to make your picture shine. FYI: Good HDR images start with good base photos, and you’ll need at least three of them to capture the full range of tones in many scenes. It’s best to use a tripod, though Photoshop can correct for subtle camera-position shifts when it merges. When shooting, set your camera to aperture-priority mode. Use auto-exposure bracketing and shoot in bursts, if possible, or adjust exposure compensation between each frame to capture all the detail in both highlights and shadows. unknownStep 1: To get started, locate your bracketed images in Bridge. Select the ones you want to merge together, then go to Tools > Photoshop > Merge to HDR Pro. You’ll see Photoshop automatically align the images and then open them in the new HDR dialogue.Step 2: To use the new process, switch to Mode: 16 Bit and leave it at Local Adaptation. The first preview you see won’t look so great—start making it better by adjusting it to get the widest dynamic range you can. Go to the Curve tab and brighten the midtones and shadows. Make sure the highlights don’t get blown out. To bring out even more shadow detail, move the Shadow slider to the right; for more highlight detail, move the Highlights slider to the left.Step 3: Next, address edges and details. Move the Detail slider to the right to bring out the edges. This works in concert with Edge Glow—if Details is set too low, the Radius and Strength sliders won’t have much effect. For soft, glowing edges, increase the Radius. For lots of edge contrast, increase Strength. Want a more realistic look? Go easy on both.Step 4: Click OK to open your file in Photoshop. Once there, save the file as a TIFF, close it, and head back to Bridge. Now you can use the power of Camera Raw to add some drama to the image. Right-click (Ctrl + click on a Mac) on the TIFF’s thumbnail, and choose Open in Camera Raw.Step 5: ACR is a great tool for adjusting your nascent HDR image. Continue to tweak your photo by using the sliders as if you were working on a RAW file. Fix the white balance, use the Exposure sliders to add contrast without sacrificing shadow and highlight detail, and take advantage of the Clarity slider to add even more midtone contrast. Go into the Lens Correction tab to get rid of any chromatic aberration or lens distortion. Then click Open Image to head back into Photoshop.Step 6: This image could still use more contrast in the mid-tones, so create a Curves Adjustment Layer to add it. Last, duplicate your Background Layer and, if needed, use Smart Sharpen to make it crisper.