Software Workshop: Creating a Composite
How To combine multiple shots into a seamless whole


Photo: Dario Acosta. For more of Dario Acosta’s “3 A.M. Moto” project, visit his website at www.DarioaCosta.com.
In 2009, Dario Acosta, a New York photographer of opera singers, wanted to diversify his portfolio with a series of hard-edged portraits, which he titled “3 A.M. Moto.” Its subjects: bad-news bikers in sinister, after-dark settings. “It was fun, but I couldn’t work at night and get the sharpness I wanted,” he says. “I had to shoot the models and backgrounds separately and combine them in Adobe Photoshop.”
Acosta started with shadowy, rain-soaked streets on the city’s outskirts. Then, he took models and motorcycles into the studio and shot them separately. To sync lighting and scale between biker and bike, he shot both under the same lighting at about the same focal length, subject distance, and exposure settings. Also, because his subjects wore black, he rim-lit them so their figures would separate from the film-noir-inflected backgrounds.
Acosta’s assistant did the meticulous work of digitally extracting his subjects from the studio backgrounds—a topic, possibly, for a future Software Workshop. His compositing techniques, however, are so effective that many viewers are fooled into thinking the pictures are straight location portraits.
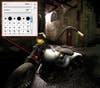
Step 1: Bring the Images into Photoshop

After you’ve extracted your subjects and placed them on transparent backgrounds, bring all the elements to be composited into Adobe Photoshop. Size the windows so you can view all images simultaneously. Using Adjustment Layers, apply Color Balance, Hue/Saturation, and Curve changes to each image so that overall color balance and exposure match.
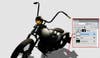
Step 2: Merge Images and Background
When you’re using the Transform command, make sure to hold down the Shift key to maintain your object’s proportions.
Use the Move tool (V on your keyboard) to drag the first object (here, a motorcycle) onto the background layer. Go to Edit > Transform > Scale. Drag a corner handle and resize the object until its scale jibes with the background. (You’ll fine-tune later.) Then select the Burn tool (O), choose a brush of appropriate size and hardness, and burn darker edges to blend with background. Repeat with all composited objects.
Step 3: Position and Link the Objects

When the composited objects are correctly scaled, use the Move tool (V) to position them properly relative to one another. Next, link the objects by selecting the appropriate layers and clicking on the chain icon in the Layers panel. Now, move the grouped objects to the correct position over the background.
Step 4: Mask Traces of Compositing
If any of the objects in your composite float oddly above the background instead of blending in with it (as Acosta’s motorcycle did at first), it may help to “ground” the object by creating a shadow beneath it. Duplicate the object’s layer, flip the image vertically, rotate it if necessary, and reduce the layer’s opacity. Again, use the Move tool (V) to place the object’s shadow correctly below it.
Final Step: Flatten Image and Make Final Fixes

Study the image for areas that reveal the compositing, and burn in (O) appropriate edges to hide telltale edges. When you’re satisfied, flatten the image to a single layer, and apply a Noise filter to unify the visual texture of the separate images. Make final tweaks to overall exposure, color balance, and sharpness. For a scene like this, you will probably discover that the darker the image is, the simpler it is to make it appear real.