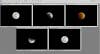
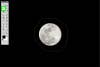
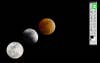
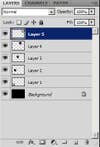
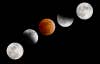
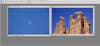
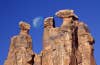
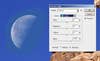
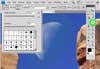
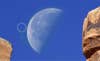
Creating composite images from two photographs-one of the moon and the other of a landscape or wildlife scene-is a time-honored (although sometimes controversial) nature photography technique. During the film days, photographers would often dupe a moon into their images by exposing a single piece of film twice, or by physically combining two pieces of slide film into one mount (creating what was known as a slide sandwich). Today, digital cameras offer a more elegant solution: multiple exposures can be combined on the computer to create seamless images. Moon composites are easiest to create when the backgrounds of the composite images are identical. Let’s start with a very simple example: a full eclipse of the moon, photographed in a series of five images of the moon entering and exiting the eclipse, combined to show a sequence of the moon’s transition. Because it was a dark night, each exposure has the same, completely black background. ABOVE: Five images taken during a full eclipse of the moon.With the five images open in a recent version of Adobe Photoshop, create a new file with a black background by going to the toolbar and selecting File/New. With the New window open, create a file of sufficient size to hold all the moons .With the new document open, select the Paint Bucket tool (keyboard shortcut: B) from the Tools palette, and make sure that black is selected as the foreground color. Then click once on the new document to paint the document entirely black.Go to the image of the first moon, and select the Lasso Tool from the Tools palette (Keyboard shortcut: L).Using the Lasso Tool, Draw a selection around the moon. It doesn’t have to be exceptionally neat or pretty, just relatively close to the moon without cutting off any portion of it. With the lasso selection drawn, go to Edit/Copy. Return to the newly created document, and select Edit/Paste. This pastes the copy of the first moon onto the composite document as a new layer. Selecting the Move Tool (Keyboard shortcut: V) from the Tools palette, position the moon exactly where you want it to be in the document. In this example, the first moon was placed in the lower left hand corner. Now repeat the process with the other moon photos, copying and pasting them one by one into the composite image.After pasting the final image, play around with the positioning of the moons until you get the composite to look the way you want. Because each moon is pasted as a separate layer, make sure you select the correct layer in the Layers palette when moving a particular moon.After getting everything moved where you want it, the composite is now complete. That is an easy example because the background for each image is exactly the same color, so simple copying and pasting creates a seamless blend. Creating a composite becomes more difficult when the backgrounds of the composite images are not uniform.This time let’s create a composite from the two images shown above, both taken in Arches National Park in Utah. Both were taken with a longer telephoto lens.There is a mismatch between the color of the sky in the moon image, and the color of the sky in the sandstone image, which is noticeable when the moon is copied and pasted into the second image. Such mismatches can occur when the moon is in a different part of the sky as the landscape scene, when the composite images are photographed with different lenses, or if your exposure settings vary between photographs.First, match the color of the sky behind the moon as close as possible to the color of the sky behind the formations. Making sure that you have selected the moon layer in the Layers palette, go to Image/Adjustments/Selective Color. The Selective Color window opens, with options to alter color and luminosity by color channel. In a situation like this, choose the Cyan channel, as it is the color that seems closest to the sky behind the moon (the Blue channel would work as well). Adjust the brightness of the sky using the Black slider, making it darker by sliding to the right or lighter by sliding to the left. You can also adjust color and hue, if necessary, using the Cyan, Magenta, and Yellow sliders. This sky needs to go darker, so sliding the Black slider to the right does the trick.You may not quite achieve a perfect match, but getting most of the way there will help you in the next step using a Layer Mask, which will allow you to eliminate-to mask out-certain portions of the moon layer. Create a mask by choosing Layer/Layer Mask/Reveal All. This creates a layer mask that now appears in the Layers palette next to the moon layer. Note that you can also create a mask within the Layers palette by clicking on the Add Layer Mask button.A brief tutorial about layer masks: These allow you to define areas of a layer that you want to reveal, hide, or partially hide. This is accomplished by painting black on the layer mask to hide the layer, or white on the layer mask to reveal (protect) the layer. Any shade of gray in between white and black will serve to partially hide a layer-for example, 50% gray will reduce the opacity of the layer by 50%. Masks are powerful tools because they can reveal or hide specific parts of a layer, allowing you to make targeted, local adjustments, rather than adjustments that affect the whole image. When you create a layer mask, it is set to white by default, which protects (reveals) the layer. To hide portions of the layer and to show the layer beneath it, paint black onto the mask. Select the Paintbrush Tool from the Tools palette and a set of options for the tool is activated beneath the main toolbar. Opacity and Flow allow you to reduce the opacity of the color you are painting; for example, if you are painting black at 100% opacity, it will appear black, but if you paint black at 50% opacity, it will appear gray. Leave Opacity and Flow at 100% for now. Brush is a drop-down menu that allows you to set the brush size and hardness (it also lets you choose pre-set brushes of different size and shape). Choose a relatively small, soft-edge brush by setting Hardness to 0% and Master Diameter to 100 pixels. A soft-edge brush is preferable because it feathers the edges of the brush, allowing for more seamless masking. You can increase or decrease the size of the brush as necessary depending on how large of an area you are painting; for this example, a smaller brush is optimal because of the small size of the sky around the moon.First, make sure you have black selected as the foreground color in the Tools palette. Then, click on the layer mask icon in the Layers palette to make sure that the mask, and not the layer, is activated. Then, using the Brush Tool (keyboard shortcut: B), paint the edges of the blue sky behind the moon. You will notice that black does not appear on the image; instead, you’ll see black appear on the layer mask icon. Also notice that the hard edges of the moon layer begin to disappear where you paint with the Paintbrush ToolGet as close as you can to the moon to remove the blue sky around it, being careful to avoid masking out any of the moon itself. Remember, a soft-edged brush feathers the effect beyond the size of the brush depicted on our screen. If you make a mistake, no problem: just switch from black to white in the Tools palette, and paint over the mistake with white, revealing the moon again. To further feather the paintbrush’s effect, reduce the Opacity of the brush. Keep painting until you achieve a seamless blend.