Eight DIY lighting accessories you can make
Welcome to the DIY photo studio.
We may earn revenue from the products available on this page and participate in affiliate programs. Learn more ›
Think you need thousands of dollars for a great lighting setup? You don’t. Get that gaffer tape ready, it’s time to create your own DIY photo studio.
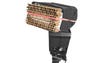
Make a snoot out of a Pringles can and straws
Much like a theatrical spotlight, a grid spot can draw attention to a small, significant area within a larger scene. This grid spot for shoe-mount flashes, devised by petapixel.com‘s prolific D.I.Y.-er Michael Zwang, is cool because you can adjust the effect of the snoot by changing its grid—plastic straws. Black straws will focus light output to maximum effect, while gray and clear straws produce moderate or minimal focusing, respectively. To produce the snoot, cut the can’s base to the size of your flash head using metal snips. Be careful not to cut yourself while doing this, and file down or tape over any sharp metal edges.
Approximate cost: Less than $8
Materials: A Pringles can ($3), gaffer tape ($3), plastic drinking straws ($2)
Tools required: Metal snips or scissors
Make a DIY light table with a cardboard box
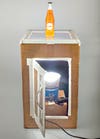
This floor-lit light table costs next to nothing and produces very dramatic lighting effects, especially with bottom-lit glassware. To see some like-in-a-magazine shots of beer bottles made by the table’s creator, Nick Wheeler, do a search under his name at diyphotography.net. One of the best things about this adaptable design? It’s easy to adjust the distance between the light and light table, a very important consideration.
APPROXIMATE COST Less than $10
MATERIALS: Two cardboard boxes (free), glass plate (under $10), tape ($5)
TOOL REQUIRED: Box cutter
We found this shockingly simple, yet very effective, light focusing device from Flickr user Gut Mann via David Hobby of the blog Strobist. Like most grid spots, its main job is to funnel light to a center-frame subject, while allowing the image edges to fade to near black. One of the advantages of this particular design is that its light focusing power can be increased by cutting thicker cardboard wedges, or decreased by making them shallower. You can also give yours a more finished look with a coat of black spray paint, and by rimming its edges with black tape. A popular variation on the idea uses corrugated black plastic instead of cardboard. It’s more rugged and much longer-lasting, though more expensive.
(If video does not load, re-load page)
APPROXIMATE COST: Less than $5
MATERIALS: Cardboard, rubber band, craft glue (under $5)
TOOLS REQUIRED: Box cutter, straight edge
How To: Make a Salad-Bowl Beauty Dish
Softer than a naked strobe, but higher contrast than a softbox, the beauty dish is a popular light modifier among glamour photographers. We found this one, by Todd and Chris Owyoung, on diyphotography.net. It requires basic metal working skills, including drilling, cutting, and grinding. While there are commerically-available dishes for about the same price, the cost of this one drops if you have any of the materials on hand or are willing to use a plastic salad bowl
Click here for step-by-step instructions
APPROXIMATE COST: Less than $60
MATERIALS: A 16-quart stainless-steel salad bowl ($19), 8-inch aluminum pizza pan ($2), bolts ($2), softbox bracket (from $9), spray paint ($10)
TOOLS REQUIRED: Power drill, Dremel cutwheel, grinding stone, sandpaper
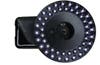
Here’s a first: a ring light for smartphones made from a simple camping lantern (they usually hang from tent poles). Devised by the clever Simon Ellingworth—that’s his light saber on the right, too—it can produce the ring light’s hallmark characteristics: shadow-free lighting and circular catchlights in the eyes of portrait subjects. It can also produce the usual ring light disadvantages: its light falls off very quickly, forcing you to work with very tight subject distances. The good news is this D.I.Y. project is very easy to pull off. If you can attach Velcro tape, you’re halfway home. In addition to concocting DIY photo projects, Ellingworth runs a great photo tutorial website, lightism.co.uk.
Click here for step-by-step instructions
APPROXIMATE COST: Less than $20
MATERIALS: Camping tent lantern ($10), plastic smartphone case ($5), Velcro ($5)
TOOLS REQUIRED: Scissors
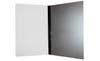
Essentially, Tyson Waggener’s reflector is two foamcore boards taped together, with each side spray-painted either black, silver, or gold, and one side left white. While it’s possible to find collapsible four-way reflectors for about the same price, if you already own black, silver, and/or gold spray paint (or have other uses for them), this project can make practical sense. In addition to its simplicity, this four-in-one reflector is infinitely adaptable. And as the boards get nicked and scuffed with use, it’s easy to repaint them.
Click here for step-by-step instructions
APPROXIMATE COST: Less than $40
MATERIALS: Two foamcore boards (price varies by size and thickness), black, silver, and gold spray paint (less than $10 each), duct tape (less than $5)
TOOLS: None

Ed Zawadzki, the Philadelphia-based people and fashion pro trumped numerous D.I.Y. accessory-flash snoots with this one made of a 9×12-inch sheet of craft foam (a.k.a. foamies). Its primary plus is that it’s adjustable. You can narrow its beam to the size of a pencil point, or spread the foam sheet out (as shown) until it’s broad enough to serve as a bounce card. Another plus? Zawadzki claims you can make one in a matter of a few seconds!
Click here for step-by-step instructions
APPROXIMATE COST: Less than $6
MATERIALS: Craft foam ($2), Velcro wrap ($3)
TOOLS REQUIRED: Scissors
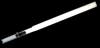
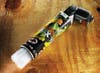
Light sabers have been likened to magic wands for lighting. Hand-held, they can add fill light to portraits or product shots. This one requires minimal shop skills. Its inventor, Simon Ellingworth, is known for his “Lollipod” tripod, monopod, and boom (lollipod.co.uk).
Click here for step-by-step instructions
APPROXIMATE COST: Less than $20
MATERIALS: PVC piping ($4), bright LED flash light (from $10), zip tie ($3)
TOOLS REQUIRED: Saw, drill