An introduction to microscope photography
How to use a microscope and digital camera to reveal details too small to see with the naked eye.
This post has been updated. It was originally published on Aug. 26, 2015.
Michael Peres loves photographing the tiny details of our natural world. A professor of biomedical photographic communications at Rochester Institute of Technology, Peres specializes in capturing these intricate details through microscope photography. Here, he explains how he does it.
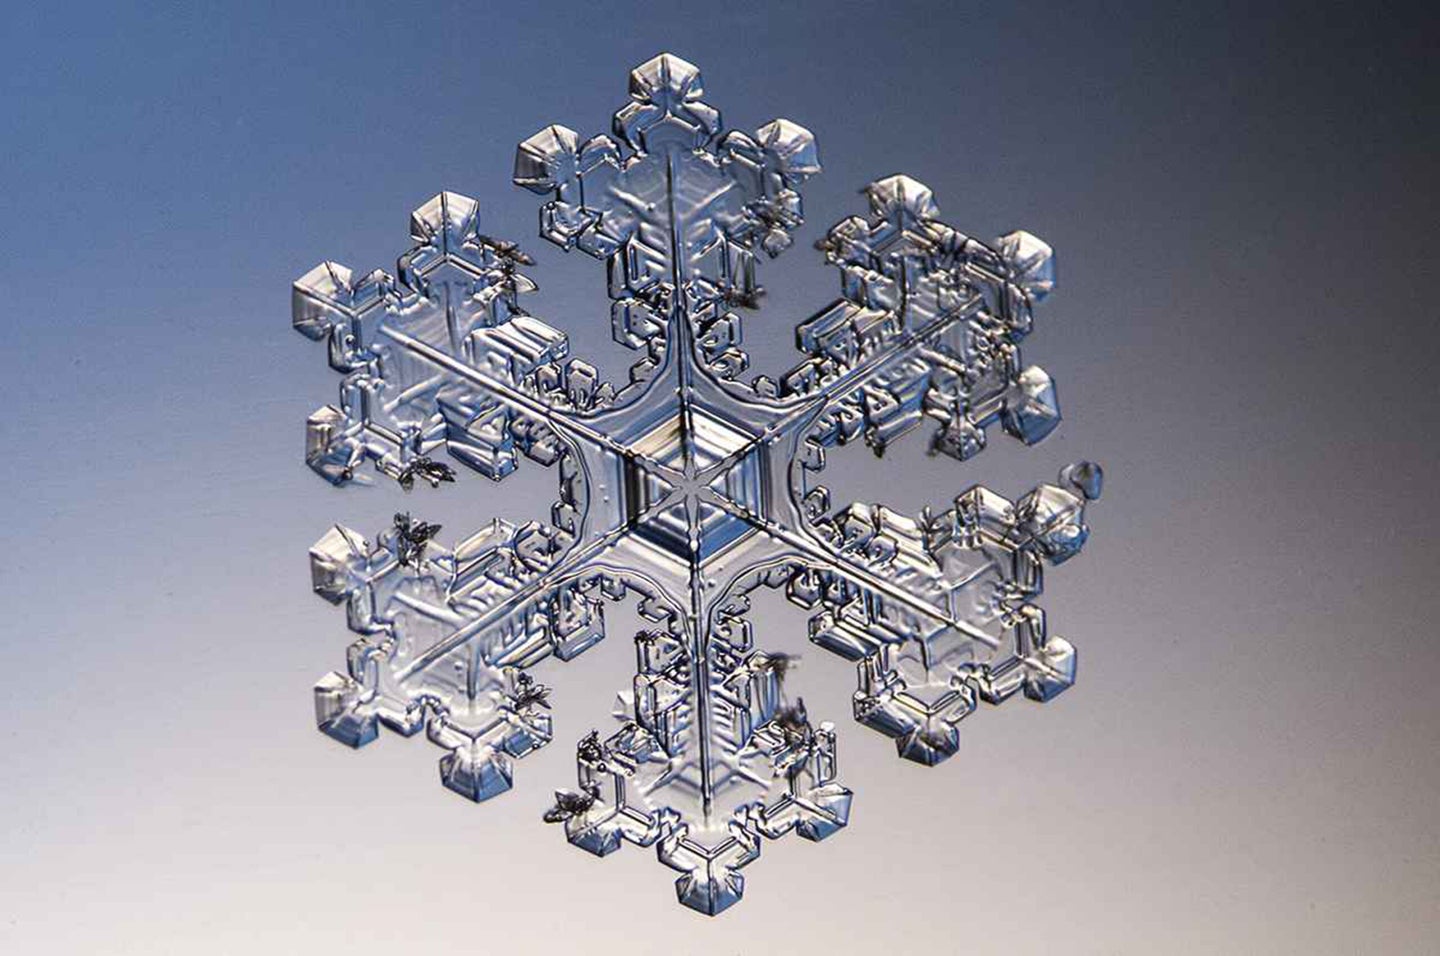
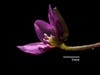
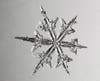
I became interested in taking pictures of tiny things over 40 years ago while I was studying pre-med in college. I was exposed to this fascinating and invisible world while learning how to delineate muscle tissue from connective tissue using a light microscope. I was drawn to each new subject that I was asked to study and it still amazes me how things are organized. I love photographing snowflakes, flowers, and other natural objects. I started sharing my work on Instagram in March 2014 and have been fascinated by the worldwide followers who are drawn to my images captured through microscope photography.
Finding a subject for microscope photography
Finding a good subject starts with staying curious about the world. I find it is really important to be open-minded about potential samples. The other day, on a walk with my dog, he came home loaded with burrs. After removing as many as I could, I decided to examine one under the microscope. It was just a weed, but under the microscope, it became elegant and complex.
Locating and handling small objects is a big part of the process’s success. Damaged samples or those with artifacts will have a different visual presentation than excellent samples and it’s important not to let the damage become the focus of the photography. Finding a sample without blemishes is the first priority for the type of pictures I want to make. That is not to say that the subjects of my photography are perfect—they are not.
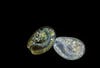
There are two different things that I am thinking about when I prepare a sample to photograph—dissection and isolation, which of these takes precedent depends on the subject and its magnification. When photographing flowers, I typically use dissection scissors to remove petals to improve the visibility of its structural elements. When I photograph aquatic organisms, I try to isolate them in a drop of water under a cover glass. Less is always more in this case. Each subject brings unique problems and requires different methods to make the sample small enough, flat enough, or thin enough to photograph.
I also purchase prepared biological slides such as cross-sections of plants or animal tissue—it is very difficult to prepare these types of slides without precision equipment. Wards Natural Science and Carolina Biological Supply Company sell thousands of subjects that are prepared for microscopic examination.
Gear needed for microscope photography
When shooting microscope photography my crucial pieces of gear are microscopes, a fiber optic light, a digital camera body, a macro lens, extension tubes, bellows, and a tripod. When I’m photographing snowflakes, flowers, or other subjects found in nature I’m often in my garage and I keep a ready supply of clean microscope slides and a piece of black velvet fabric for use as a background. I also have many needles, tiny brushes, and cotton-tipped sticks that I use for moving the samples and tidying up the area around them.
I typically use a compound light microscope for my photography. Light microscopes are quite common and easy to find. They can be expensive or relatively cheap, a student microscope might cost as little as $250 while a high-end research-grade microscope might cost $200,000. A fairly good low-end research-grade used microscope can be found for $5000.
Microscopes magnify subjects using two lenses. The first stage of magnification is produced by the objective lens and the second stage of magnification is the eyepiece. An objective lens has a focal length just like traditional photographic lenses that are used on a camera. Working distances are very small for this type of photography—a typical range of objective magnifications for a light microscope might include a 2x, 4x, 10x, 20x, 40, 60x, or 100x. I pick my lens on the microscope based on the sample’s magnification requirements. Magnification influences the image’s depth of field, so a big thick sample (.5cm) benefits from low magnification, while very flat subjects need more magnification.
When using a light microscope it is possible to make pictures using a smartphone. The lens should be placed at the eye point of the microscope, which can be located by holding a piece of paper approximately 1 cm from the eyepiece of the microscope. A very small dot of light will be visible on the paper, this is the eye point and where the lens should be directed. A small tripod can be helpful to hold the camera in place. Gaffer’s tape is often my best friend as a technical photographer because it lets me secure the phone of other elements of the system during my shoots.
Although using a smartphone works, I like to use a DSLR with the lens removed and the body hung over the microscope’s eyepiece using a vertical copy stand or tripod. I also use extension tubes or bellows on my camera to manage the ambient light—which can create flare and lower contrast. Whether using a DSLR or mirrorless camera, you need to align the camera’s sensor over the small dot of light from the eye point. To make a microscopic image I will align the sensor of my camera over the eyepiece at a distance where the circle of illumination produced by the microscope is large enough to cover the sensor without seeing the circle. Confirm that the light point has covered the sensor by checking the camera’s LCD screen. Be cautious when setting up though: it is very important to be aware of the distance between the eyepiece and the unprotected sensor.
Lighting your microscopic subject
I primarily use the microscope’s built-in light and supplement it with fiber-optic lighting. When I look at a sample for the first time, I envision what I want the image to look like and work to get there. I make many tiny adjustments to the light’s position, which makes a large difference in the results. Some of the subjects I am photographing might be one or two millimeters in size or smaller. How much fill light is needed or what makes the light’s angle just right are the decisions that I make before shooting. My strategy is based largely on how the light is working with the sample itself. The three styles of lighting I use most regularly are Kohler, Darkfield, and Polarized.
How I use Kohler lighting when shooting microscopic subjects
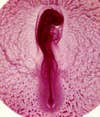
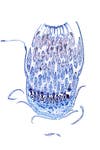
When I photograph a prepared “thin-section,” I am trying to create neutral and uniform backlighting called Kohler illumination. This allows the microscopist to maximize the contrast and resolution in the image. I continue to use it because it creates portrait-like treatments of the things I photograph.
How I use Darkfield lighting when shooting microscopic subjects
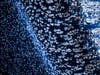
I will also use darkfield, which makes an object glow against a black background, creating an astronomical-type look. Darkfield lighting comes from behind a transparent subject and is shined through the sample at oblique angles. This style of lighting produces a very dramatic look, the downside is that everything will be lit when using darkfield including the things you do not want to have lit—like dirt, scratches, or air bubbles.
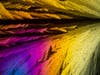
How I use Polarized lighting when shooting microscopic subjects
I use polarized light when I am photographing samples that exhibit birefringence, which is a technical term that describes how a sample may or may not “show” rainbow-like colors when placed into a polarized light microscope. Samples that include hairs, fibers, chemicals, minerals, some insect wings, and many synthetic objects will look as though they are made of rainbows when examined using polarized light. Polarized light is used to reveal internal information in these samples that otherwise may not be visible.
Focusing while shooting microscope photography
To focus the magnified image I remove the camera’s lens and project the image directly into the camera’s body. The microscope focus controls are then used to focus the image in the camera’s viewfinder. Making a crisp image can be challenging. The viewfinder does not pick up the same amount of fine detail that the microscope can create, so things often look a little rougher in the viewfinder than they end up looking in the RAW files. It takes some practice to be able to predict how the image will appear once it is recorded.
If you are using a smartphone that has been carefully positioned over the eyepiece, you will still want to focus on the image displayed on the phone’s display by manipulating the microscope’s focus knob.
Processing your microscopic images
One of the biggest challenges when shooting microscope photography is creating contrast and structural delineation of internal parts and I try and do the hard work during the shoots. When I am photographing, I work slowly to inch my way towards making an interesting result using lenses and light.
I am very cautious about too much image processing. In post-processing I am most interested in tone management, setting white or black points, and removing irrelevant dirt. I shoot RAW, open the RAW file in Photoshop, and then I preprocess the structural details that are present in the file, but often not very visible. I also perform a minor amount of clarifying or sharpening at this stage. After making minor tone changes in Photoshop, I will sharpen the file using the high band pass filter.
I think it is important for the images to not be totally flawless. Nothing is perfect in life and I think if the images are too perfect they might seem computer-generated. My goal for this work is to make scientific photographs that operate in non-scientific environments and enable people to learn something new about the world they live in. My pictures feature real things and life also has blemishes and areas that are out of focus.