How-To: Create Dreamy Portrait Photos With a Tilt-Shift Lens
Photographer Heidi Browne shares her tilt-shift technique for creating surreal portraits
When we think of a “portrait lens,” it’s usually something like an 85mm F/1.4 or the 135mm F/2. But the fact is, you can shoot portraits with any lens, and opening up your options to include tilt-shift can make for some truly unique photographic opportunities. Heidi Browne of Forged in the North Photography has honed that skill and offers some helpful tips for getting started with tilting and shifting.
What is a tilt-shift lens?
Tilt-shift lenses allow you to manipulate the optics relative to the film or digital sensor. You can read our introduction to tilt-shift lenses here for a basic primer.
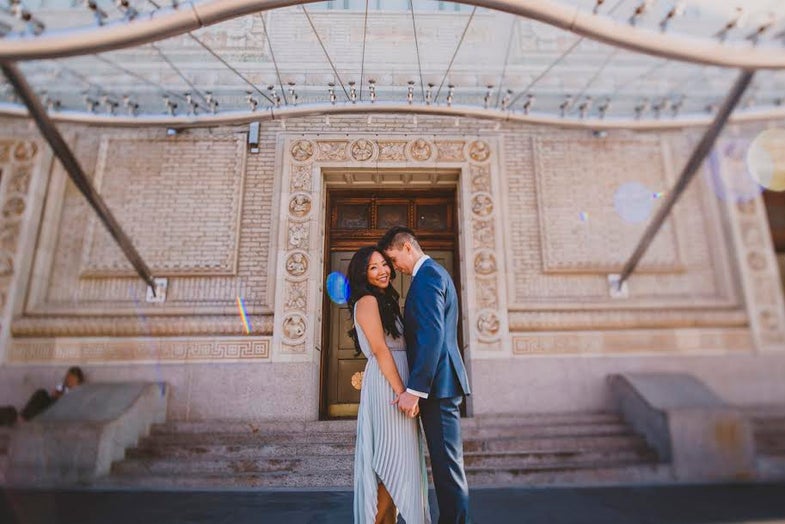
Most commonly for portraits we us the tilt movement, which skews the plane of focus. So, rather than having a flat wall of focus parallel to your sensor, you can now have two subjects in focus, even if they’re at different distances from the lens.
You can specify how wide the band of focus in the photo is by how much you tilt. A big tilt will appear to have a narrower band of focus running across the frame and a small tilt will give you the opposite. It provides a unique and dream like quality to the image by the way it captures focus and treats light.


When to choose a tilt-shift over a standard lens
As a photographer, lens selection is a big decision. Each lens has different properties and nuances, especially when you add the variables involved with tilt-shift.
A great application for a tilt-shift lens is a group shot where the subjects are closer and further away from the lens but all of their faces are at relatively the same height in the frame. It can be useful as well when trying to capture your subject while they are walking toward you or away from you. On a standard lens, a subject moving toward or away will fall out of focus immediately. With a tilt-shift lens, you can extend that plane of focus behind and in front of your subject so they stay in focus while changing distances from your lens.
One of my favorite reasons for selecting a tilt-shift lens vs. a standard lens is that you can create bokeh in wide, landscape type shots that you wouldn’t get otherwise.
Tilt-shift lenses can be expensive, so definitely consider renting one to work with before making the leap into purchasing one.

Choosing the right tilt-shift lens for the job
For the most part, the conventional lens-choosing wisdom still applies. If you have a larger scene, like a landscape or a cityscape, you’ll want to choose a wider lens. It helps to capture the environment surrounding your subjects. If you want a tighter portrait then a longer lens will be a better choice.
Lately, I’ve been experimenting with using a wider focal length and getting very close the subject. The image feels intimate with lots of separation between the subject and background. It makes for a more unique portrait.

Learn your lens
Getting to know the characteristics of your lenses is important, especially since tilt-shift glass can behave so differently than a normal options. For instance, our Rokinon 24mm TS has a beautiful, cinematic blue flare when the sun enters the side of the lens. The Canon 45mm TS will produce a rainbow flare in certain lighting conditions. The more you know the way your lens manipulates light the better you will be at selecting the right lens at the right time.
For example, when I am shooting backlit subjects with the Canon 45mm TS, the images are low-contrast and buttery. So when I want a dreamy, washed-out look, that’s the lens I go for.

Pick a location that maximizes the effect
Usually you want to shoot with a background that has a lot of texture. For instance, tree canopies produce really beautiful bokeh when you tilt the lens. Shooting with a lot of negative space as the background, like a blue sky or fully overcast sky, won’t utilize the qualities of the tilt because you won’t see the focus plane being manipulated.

Focusing
Once you have your lens selected, figure out how wide of a plane of focus you would like. I tend to tilt my 45mm lens up about half way to its maximum tilted position. When you tilt up, you will not be able to focus toward the top edge of the frame. And when you tilt down, you will not be able to focus toward the bottom edge. Knowing your focus limitations with your specific tilt-shift lens just takes practice.
I shoot on Canon 5D III bodies and use the AF indicator light in the viewfinder to know that my focus plane is exactly where I want it to be. Shooting in live view mode can also be helpful since you can zoom in and check focus more precisely than just looking through the viewfinder.
It is also not a bad idea to do some focus bracketing. When you think your subject is in focus, try grabbing a couple additional shots with the focus a little lower and a little higher from where you think it should be. You’d be surprised as to how often you accidentally miss focus, and you’ll thank yourself later for doing it.
Normally you shoot with your focal plane horizontal in the frame (the lens is tilted up or down). However, you can opt to shoot with the focal plane being vertical (by swinging left or right). It provides a very different look where the image to the left and right of the subject is out of focus.

Metering
I use the camera’s meter for the first shot to get it as close as possible and then review the histogram on that image. Because of the tilting and the way the lenses deal with direct light it’s a bit of a trial and error. It can help to work in manual and don’t be surprised if you get some truly wacky readings that can be off by two or three full stops.
Processing
When I shoot with certain tilt-shift lenses into the sun, I find that the image is too washed out because of the flare, so I treat those images with a bit more contrast than others. Otherwise, my processing for tilt-shift photos are the same for any other shots.

Things to Avoid
When shooting a group of subjects where you really want to nail the focus, avoid making the focus plane too narrow, always err on the side of a wider plane.
Another thing to be mindful of, is the lens flare washing out the image too much. Like with any new gear, make sure you have a grasp on it before bringing it into any kind of commissioned job scenario.
Don’t overdo it
Like any specialty lens, you don’t want to saturate a series of photos with tilt-shift. It just depends on the overall look you’re going for. Some clients love the softer, more ethereal look of the tilt-shift, while others may want a sharper finished product. I always shoot with two bodies. One always has a tilt-shift on it and the other one always has a standard prime. This way when I am shooting a particular scene, it’s simple to shoot it on both and decide later what worked best.

Tricks and bonuses
A trick a lot of photographers like to use the tilt-shift for is to simulate a miniature scene of a city or landscape from above. This is because it gives the appearance of a shallow depth of field like something that you shoot close up, vs. a city skyline that would not have a shallow depth of field on a standard lens. If you can get up really high during a wedding ceremony or even during a portrait session, it can be a very powerful effect.
Check out Heidi’s official website here: Forged in the North Photography