Tips For Shooting Fascinating Close-up Photos
Bring the hidden details of ordinary objects to life with macro photography
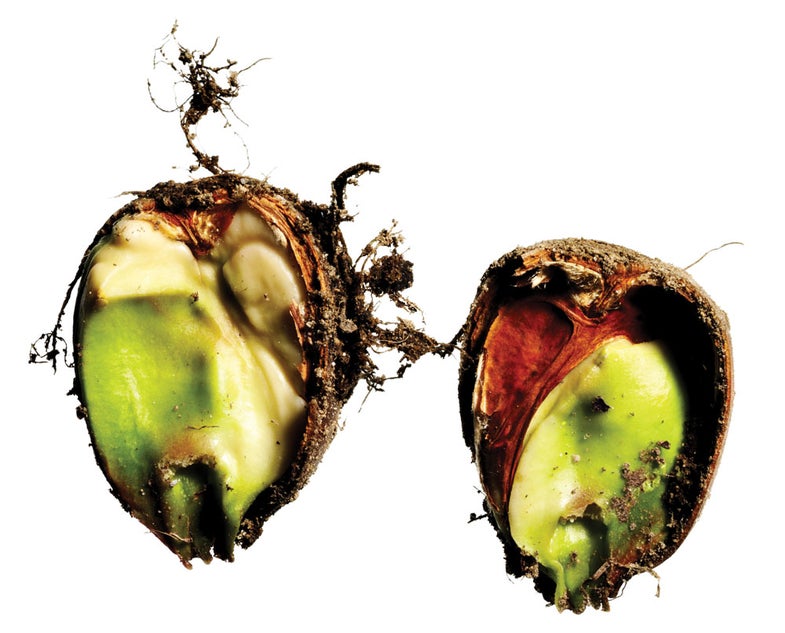
The wonderful thing about really close close-up photography is that it lets you examine a world of fascinating detail that surrounds us 24/7—detail of which we’re largely unaware. Boston-based photographer Bruce Peterson was reminded of this while doing, of all things, yard work.
While Peterson shoots products and advertisements for nationally known clients during the work week, he also regularly takes on personal projects. Such as acorns. “I live north of Boston in a house that sits under a canopy of oak trees, and every few years we get bombarded by acorns. If you don’t pick them up in fall, they sprout in the spring. One day, I was collecting acorns, suddenly noticed how interesting and beautiful they were.”
He took the best specimens into his studio, and, between jobs, focused in close on them with the help of a powerful macro rig. The resulting series of otherworldly photos—strange in an alien-space-pod way—is showcased at brucepeterson.com.
Peterson offers a number of tips for killer close-up photos. First, start with a great macro lens that focuses close and offers strong subject magnification—preferably 1:1 (lifesize). To get even closer, try an extension tube. These are inexpensive, easy to use, and will reward you with much greater magnification.
To really showcase your subjects, shoot them against a blindingly bright background. And to obtain maximum white back there without producing flare that can blow out edge detail, Peterson recommends shooting a second exposure that will serve as a mask for Adobe Photoshop. He does this by making a back-lit exposure of the subject with the front light turned off. He then uses this crisp silhouette as a layer mask that allows him to easily remove the background in his front-lit image and replace it with an edge-to-edge, evenly bright white.
Finally, Peterson says, “a tip for lighting close-ups is to use the edge of the light—meaning don’t point it right at the subject, but use its edge and not the hottest part of the light. You’ll have much more control and get a better shape.”
Step 1
Find a subject. The best are often small-scale, quirky objects that we tend to take for granted and rarely really look at. You want objects with color, texture, detail, and character.
Step 2
Gather your gear. Use a sharp, high-magnifying macro lens and a tripod that will allow you to aim your macro rig straight down. Because you’ll need great depth of field, your light should be bright enough for small-aperture shooting. Peterson likes to feather hard light on the front of his subject for its ability to record detail precisely.
Step 3
Build your set. Peterson’s backlight was a Broncolor strobe diffused through a sheet of white acrylic. To prevent backlight flare from washing out the acorn’s edges, he placed his subject on a sheet of clear glass that he suspended about a foot above the acrylic sheet. To minimize lens flare, he surrounded the acorn with black cards.
Step 4
Make your exposures. Use a cable release, self-timer, or electronic remote release to prevent camera shake. Bracket exposure extensively, and experiment with mainlight placement to create the best shape-defining shadows across the subject surfaces.
Final Step
Fine-tune in software. For larger subjects, Peterson recommends focus stacking using Helicon Focus. This program lets you bracket your focus and combines the sharpest parts of the brackets to produce a single uniformly crisp image.