From Shutter Press to Finished Image: Mat Baker
Three top professionals share their best tips and tricks for retouching
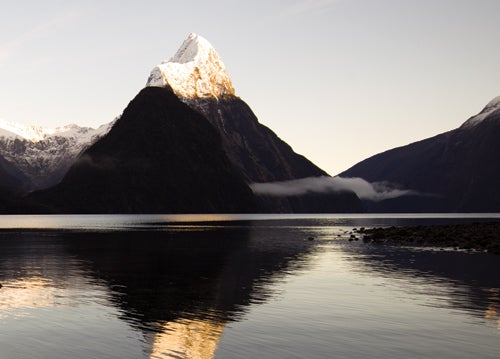
Shooting a champagne commercial near the Milford Sound in New Zealand’s South Island, Mat Baker and his brother and digital collaborator, Carl, had a day off. They asked a boat captain to take them to a great spot to shoot the iconic Mitre peak, but soon realized he had dropped them at the wrong place. After a hike through freezing-cold, waist-deep water with only headlamps for light, they found the location and spent the next 6 hours with shoes full of water and nothing to eat but a “little bag of nuts.” Still, they knew it would be worth it for the picture.
Once they set up, the brothers decided a panoramic HDR would be the best solution, given the near 5-stop difference between the brightest and the darkest areas in the composition. The six frames that make up this panorama were shot on the Phase One 645DF body with a Phase One P40+ digital back and Phase One 28mm lens. Mat photographed the scene in two sections of three exposures each. Even when far from civilization, Mat always shoots tethered. The brothers swear by a 17-inch laptop so they can quickly see exactly what they’re capturing in the moment—a must for commercial jobs, where there’s no time for surprises in postproduction.
Back at the studio, they would normally convert their RAW images in Phase One’s Capture One software. But in this case, because they were shooting an HDR, Carl brought the RAW images directly into Photoshop CS5’s HDR Pro tool. They processed each half of the image separately and tonemapped with an eye toward a photo-realistic look.
Carl prefers to merge panoramas together manually because, he says, he always ends up manually adjusting the automated merges anyway. To bring the two halves together, he created a new document large enough to accommodate both frames, then dragged them both in. Next he switched the blend mode of one side to Difference, which turns a layer black when it aligns exactly with the layer below. He used a combination of masks and transformations to create a seamless blend between the left and right sides.
After trying a few options, the Bakers found the color grade they liked, but it still wasn’t quite right. Says Mat, “I wanted people to look at it and see unicorns dancing over rainbows.” In other words, something more ethereal.
Checking shots from earlier in the day, they noticed a little mist and decided to add some. Carl cloned it in and used the blending mode Screen and some opacity adjustments to composite. He also painted some in with a white-loaded brush on a separate layer.
Though some may see an image like this as highly manipulated, Mat Baker views it as fairly photographic. Makes sense, given the brothers’ stylized advertising work: Next to an image of a giraffe up a tree that had “2,000 components and took three months to do,” he says, “this is light-handed.”
About the Photographer:
New Zealand-based Mat Baker has been making images for 17 years or so. Despite his passion, talent, and drive, he attributes his success to being in the right place at the right time. He began in straight photography, shooting for newspapers, then moved to fashion, then to advertising, which he loves for the freedom to do anything with his pictures that he can imagine. From the beginning, his brother Carl has done all his retouching and acted as his creative partner. You can see some of their commercial work in the March/April 2012 issue of American Photo and at matbaker.com.
Page 1: Romain Laurent
Page 2: Raïssa Venables