Tips From a Pro: Shooting Still-Life Photos With a Two-Light Setup
Pro photographer Teru Onishi shares his secrets for making still lives glow
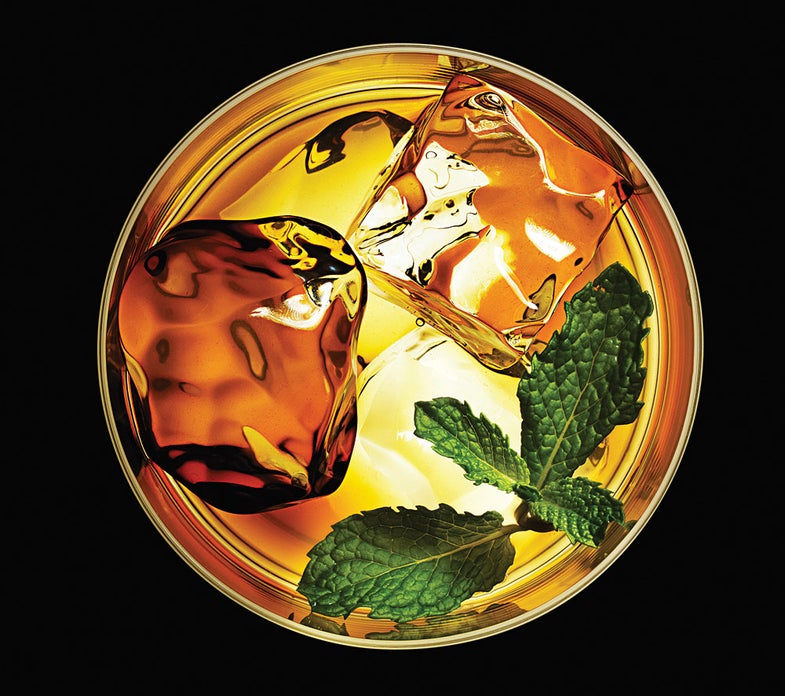
In the fall of 2010,_ Boston Magazine_ hired Teru Onishi, a talented jewelry, cosmetics, and liquids specialist, to shoot 25 different drinks in his Manhattan studio. The photos were to illustrate one of the magazine’s cocktail roundups–the image shown here is a whiskey smash. All had to be styled and shot in less than five hours, leaving about seven minutes for each drink.
Because the magazine would present them together, the photos had to match in image quality, color temperature, contrast, and exposure, with little or no editing tweaks to do afterward. The lighting had to be perfect for the liquid, ice cube reflections, glass, and garnishes, and identical from shot to shot.
Adding to Onishi’s challenge, each drink needed an appetizing presence and appealing glow.
Several lighting strategies helped him to ace the job:
Two-light simplicity.
The glowing liquid started with a backlight (here, on the bottom), while Onishi’s top light created the reflections in the ice, brought out color and detail in the garnish, and defined the circular outer rim of the glass. The fewer lights he used, the more easily these effects could be controlled. No reflectors or softboxes—just flat acrylic diffusers set between the two strobes and his subject.
Precision light placement.
Careful relative positioning of the lights coaxed Onishi’s liquid to glow. He brought the following variables into sync:
• The distance between the bottom light and cocktail. The bottom light had to be close—almost touching the acrylic glass table—in order to produce a bright liquid.
• The angle of the backlight. By angling the bottom light, Onishi created the glowing gradation from bright yellow to dim amber.
• The distance between the cocktail and the diffusion panel above it. This determined the size and placement of the reflections in the ice cubes.
• The distance between the top light and its diffusion panel. This set the intensity and hardness of the light on the cocktail.
• The top light’s angle. To create a harder light for stronger reflec-tions in the ice cubes, this was less angled than the bottom light.
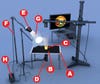
Controlling flare.
Onishi minimized the flare created by the bottom light by blocking most of its output with a sheet of black cardboard (see diagram). Using an Xacto knife, he cut a circle in the cardboard, approximately the size of the base of the tumbler. Dimming down the backlight also helped reduce its ability to produce flare.
Want to try all of this yourself? Watch how a light’s position reads in your subject, and approach the project methodically and patiently. Rewards will follow.
Kris Holland/Mafic Studios
The glow in this whiskey smash didn’t happen because of its alcohol content. It resulted from the photographer observing the effects of the lighting, and adjusting the relative position of the lights and diffusers. To start, Onishi used a table made of a translucent sheet of acrylic (A) on which he placed a black sheet of cardboard (B) with a center hole cut slightly larger than the glass (C). He backlit the glass with a Broncolor PicoLite accent strobe (D), angling its head to produce a yellow-to-amber tonal gradation. The Broncolor Pulso head (E) on a Matthews C stand (F) was diffused through a second acrylic sheet (G) and illuminated the ice cubes, mint leaves, and the rim of the glass. To minimize flare and produce the shortest flash duration, he dialed in the lowest output possible on his Broncolor Grafit A2 Plus power pack (H)—now replaced in the Broncolor catalogue by the Scoro A2s.