How To: Use a Split Neutral Density Filter
Split ND filters can be extremely helpful, especially if you know how and when to employee them
We may earn revenue from the products available on this page and participate in affiliate programs. Learn more ›
Well Into the software age, a low-tech photo enhancement device still remains popular. It’s the split neutral-density (ND) filter; many landscape enthusiasts won’t leave home without it.
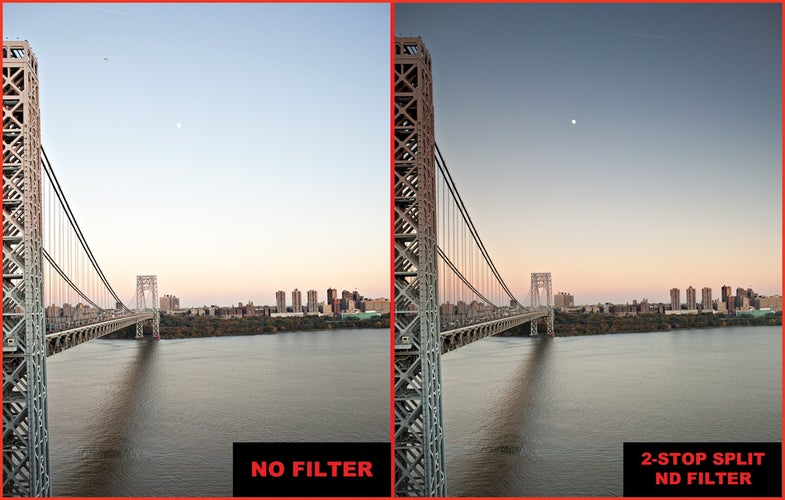
A brilliantly simple idea, the split ND helps solve (or mitigate) the problem of the sky/ground exposure mismatch. By position-ing the dark segment of the filter over the bright sky portion of the frame, you can set an exposure sufficient for detail in the darker part of the image without having the sky blow out in overexposure. Put another way, you can get the right exposure for the sky without the ground falling into shadow.
Many split ND users choose square or rectangular filters, which can be shifted or rotated for precise placement of the dividing edge. This can be hard-edge, for a fairly abrupt transition from plain to neutral density, or graduated, for a continuous transition from light to dark.
Some Pointers:
1. Know your density. Filter makers often state neutral density using a logarithmic scale: Just remember that every 0.3 on this scale is 1 stop less light transmitted, so 0.6 ND is 2-stop, a 0.9 is 3-stop, etc. Others use an exposure factor: A 1-stop ND is 2X, a 2-stop is 4X, a 3-stop is 8X, and so on.
2. Hard-edge is usually better. Since horizon lines are themselves hard-edged, it figures that these fit best. Grad filters work better for scenes where the horizon line is uneven. But with a very jagged division, the shot may look weird—you might want to do some touchup in an image editor.
3. Consider rectangular filters. The extra length gives you more leeway in positioning the horizon line high or low in the frame.
4. Be careful with color. It might be tempting to goose up a gray sky with a split blue filter, or warm up a cool sunset with a split amber, but it can look fake.
5. Meter twice. Determine a good exposure for the sky and ground separately, and figure the difference in stops. That’s the ND filter you should start with.
6. Split NDs can be stacked. The resulting density is additive—a 0.6 plus a 0.9 makes a 1.5, or five stops.
7. Quality counts. Cheap split ND filters may impact the clarity of your photos and may have their own color casts. It pays to buy high-quality filters from established manufacturers.
8. Use a tripod. Trying to use split NDs handheld will drive you mad.
Filter Fastening:
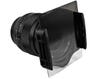
The Cokin brand of filter holders has become close to a universal standard. Name-brand filter makers like Lee, Schneider, Singh-Ray, and Tiffen all make filters to fit Cokin holders. (The lens at left is wearing a Tiffen filter in a Cokin P holder.)
Regardless of brand, make sure the filters you use will be large enough. The Cokin A size (66mm wide) is too small for many DSLR lenses; the P size (85mm wide) or Z-Pro size (100mm wide) may be better choices. Even if a filter is big enough to cover your glass, the holder may cause vignetting on wide-angle lenses.
But just so you know, you don’t really need a filter holder. Contributing Editor Tim Fitzharris uses bits of gaffer tape to position filters on his lenses. Don’t use duct tape—it will leave a gooey residue upon removal.