How To: Five Professional Lighting Techniques
Here's five lighting setups from simple to complex.

Nature’s Lighting Starter Kit: The Sun
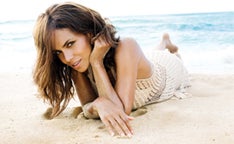
Photography’s most basic lighting option, the sun, is also one of the most versatile. It can be bright and hard or dim and soft. It can be warm and highly directional, casting long shadows. Or, behind clouds, its light can be blue, diffuse, and shadow-free. As it crosses the sky, the sun serves as a front-, side-, back-, and/or hair-light. It always looks natural (because it is), and it’s always free. Cheyenne Ellis, an L.A.-based celebrity portraitist and advertising pro, used only the sun and a reflector to light this shot of Halle Berry made to promote Berry’s fragrance, Halle. Images from the shoot have appeared in US Weekly, Harper’s Bazaar, and Shape magazines. You would think for such a high-profile project, Ellis would show up with more than a camera and a shiny $47 disk.
But, sunlight and a reflector are among her favorite lighting combinations. Her website, www.cheyenneellis.com, overflows with natural light. “I like the simplicity and flexibility of the reflector, and the shaping it brings out,” she says. “I rarely use a reflector aimed directly at a subject, though—too harsh. Instead, I feather it, making sure the reflection in the eyes is beautiful. It helped that the sand here acted as a giant fill card!”
Mixing Daylight And Strobe
Justin and Colleen Picciotti make up Dyad Photography, a Brooklyn, NY-based commercial and fine-art photography studio. For a personal project centered on food, the couple started with iconic images and took them in surprising directions. The result, on view at www.dyadphotography.com, is a series of images that at first seem to be conventional representations of food-in-motion, shot with stop action techniques. Then you look more closely and do a double take. What you see are sometimes alarming, sometimes humorous pictures of food that flout photographers’ usual attempts at suggesting the three-dimensionality of their subjects.
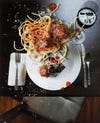
These images are flagrantly, almost transgressively two-dimensional. How do the Piciottis do it? As with most things studio, lighting played a crucial role. The painstakingly styled spaghetti and meatballs on the opposite page actually sits on top of a print of their photo of a table, chair, floor, and (clean) place setting. In order to fool your eye into seeing the scene as a single image, the lighting for the “room set” and the pasta had to almost match in color temperature and intensity— not necessarily easy because the table was lit by window light and the spaghetti by strobe.
Lighting, however, also helped clue viewers in to the fact that this picture wasn’t business as usual. For example, the Picciottis intentionally lit the pasta from the opposite direction of the window light falling on the table setting. “We chose the mixture of light sources with different orientations to help accentuate the play on perspective,” explains Colleen.
It took several hours to shoot and then print the base image. The photographers used white and silver reflectors and black flags to equalize light levels across the table, chair, and floor. They suspended their camera, a Hasselblad 501 with a Leaf Aptus 75 digital back and 50mm f/4 Carl Zeiss lens, over the table.
When printing the base image on an Epson Stylus Photo R2400, the Picciottis used matte paper to minimize the chance of glare resulting from the strobe’s output during the second exposure.
After styling the spaghetti, they lit the whole set with a white beauty dish whose broad, soft illumination simulated window light. “One of the tricks to lighting food is to use a more directional source so you can really see the different textures of each element,” Colleen says. “The beauty dish let us soften the light without taking away the direct shadow. We placed white and gray fill cards around the spaghetti to help deepen the shadows and underscore the lights’ direction.”

It also added dimension to the Parmesan cheese shavings, one of the most dramatic signs that this wasn’t a conventional food shot.
To Light their faux stop-action shot of spaghetti, the Picciottis used windowlight for the base print, and, for the spaghetti, a profoto Acute2 2400 WS strobe ($3,245, street) outfitted with a profoto white beauty dish ($352, street). They fired the strobe wirelessly with a pocketWizard radio trigger ($351, street). White and gray reflecting cards helped intensify shadows that added dimension and underscored the direction of the light.

A Location Pro Takes The Studio Outside
Perhaps one of the most daunting lighting challenges is the location shoot. You lug along lights, must find or bring power sources, and then seamlessly integrate ambient and artificial light sources.
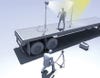
For that reason, New York City pro Laura Barisonzi (www.barisonzi.com) originally wanted to go with natural light and reflectors for this portrait of a professional fitness model. “It would have been much easier than setting up lights and getting a power source for them,” says the sports and lifestyle specialist.
But spotty clouds rolled in and the ambient light fluctuated between direct and diffused sun.
“For me, the trick to good location lighting is having enough power,” she says. With batteries, she doesn’t like the long recycle waits between pops. “And I end up rushing because I’m afraid the charge will die. So I power my strobes with a generator.”
For a neater set, she also likes working wirelessly with PocketWizard flash triggers.
Lights perched that high can easily blow over, so when the wind picked up, Barisonzi weighted her stands with sand bags and had an assistant spot the higher stand on the left.
Laura Barisonzi lit this shot with two AlienBees B1600 strobes ($360, direct, each) and one GS1 grid Spot ($36, direct). The strobes were powered by a Honda EU3200i generator. Her camera was a Nikon D3 with 24–70mm f/2.8 Nikkor lens.
ENTER MAY’S PHOTO CHALLENGE USING LAURA’S TECHNIQUES
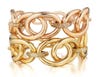
For Jewelry, It’s All About Sparkle
Reflective objects are often the hardest to light and, of these, jewelry is the most time-consuming. The challenge is to make inanimate objects shimmer and glow with vibrancy and life.
It’s a challenge that David Barowsky and Steven Devilbiss of Antfarm Photography (antfarmphotography.com) meet on a daily basis in their studio located in the heart of New York’s photo district.
“We give a lot of attention to every facet, especially with diamonds, since they are so expensive,” says Barowsky.
“For this shot, it’s all in the lighting, and we did very little image editing after. Of course, we also needed a very sharp macro lens to capture the diamonds’ facets and subtle variations in color.”
Lighting jewelry is done one light at a time, and one facet or surface at a time. Some pieces can require up to a dozen lights and reflecting cards. “You keep working the lights on one surface until you get them right. When it looks good, you move on to the next light and surface,” Barowsky explains. “Make your set tight, and don’t allow ambient light to spill onto the piece and affect color temperature.”
Reflections from the background can reproduce as black dead zones. To prevent them, build a de facto light tent around your subject by completely surrounding it with lights, diffusers, and reflectors.
The main lights used here were 3200 watt-second Broncolor Unilite strobe heads diffused through large Plexiglas panels placed to the left and right of the bracelets. The subjects sat on a reflective sheet of brushed sterling silver. Because the light heads are gridded, their output fell off across the Plexiglas (hot in the center, and dimmer toward the edges) which, in turn, created subtle gradations of tone in the gold.
A highly focused Broncolor Picolite at the camera position added shine and sparkle to the diamonds, while the box light behind assured a clean white background and helped create the reflection on the silver sheet.

Absolute exposure control is crucial, and to get it, the photographers relied on exposure histograms. While many shooters use histograms to ensure that they preserve detail in either highlights or shadows (or both), jewelry photographers also use them to monitor flare and keep the sparkly highlights from blowing out.
“One trick for reducing it is to slowly bring up the background light until it reads 255 on the historgram. If it pushes past 255, it will add unnecessary flare.”
Antfarm Photography’s team lit these two gold and diamond bracelets with a snooted and gridded Broncolor picolite ($720 street) and two Broncolor 3200 Ws unilite strobe heads ($1,510, street, each). Both were powered by Broncolor grafit powerpacks. The camera was a Sinar P2 4×5 view camera outfitted with a Sinar 54h digital back, and Schneider Digitar 120mm f/5.6 macro lens set to f/32.

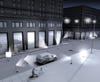
Lots Of Lights Keep It Dark
Effective lighting is a crucial element in advertising photography.
His main lights were Arri tungstens, without the Fresnel lenses that cinematographers often use as broad spots. “We didn’t use Fresnel lenses because we wanted the light to spill everywhere, like street lights,” Ludes says.
In fact, the existing lights were an important part of his lighting setup, and all the added background lights were gelled with a unique combination of color-correcting acetate filters so their output matched the color temperature of the street lights.
His ultimate goal was to add color and mood that would offer an emotional context for the car (upbeat, youthful, and urban chic). Of equal importance, however, was using lighting to sculpt the car physically: its shaping, line, color, and size. To make it stand out, he lit the car with a whiter light than the warm background, which helped its cool blue color stand out.
As the blue sky and its reflections in the windows hint, this shot was made at dusk. “The challenge for lighting a dusk scene like this is that the lights have to be set up during broad daylight, when you can’t really evaluate their placement and brightness levels,” says Ludes. “Then when the sun goes down, you have to work very quickly to fine-tune the final placement and shoot during that small window when the balance between artificial and daylight is perfect.”
If Ludes had used 2000-watt lights throughout this scene, the resulting exposures would have produced deep, black shadows in the unlit areas, which would have undermined the photographer’s vision for a vibrant, light-filled street scene. “When gels weren’t needed,” says Ludes, “we often used lights as small as 150 watts.”
He explains, “One thing people don’t realize about lighting after dark is that very small, dim lights are often preferable to larger, brighter lights. Anything too bright will only cause the shadows to darken.”
Other details? A water truck wet down the street to give life and sheen to those surfaces which otherwise would have been murky, featureless blacks. The photographer’s team also built the foreground sidewalk, so the composition wouldn’t imply that the Honda was stopped in the middle of the street (it was actually parked in front of a driveway).
Separate exposures were made for the car’s side, wheels, and back, for example. “When the lights sculpted the fender properly, they threw the wheel wells into dark shadow, which necessitated a separate exposure for the tires,” says Ludes.
Now that’s a production!
Jeff Ludes lit this scene with four 1,000-watt, four 650-watt, one 2,000- watt, and one 350-watt arri tungsten lights. Those illuminating the human models in the background were softened through Scrim Jim diffusion panels. While the arris threw a warm light, the car was lit by the cooler 8-foot Kino flo daylight fluorescent fixture. Shot with an alpa Max mediumformat camera, phase one p65+ digital back and rodenstock APO Sironar 35mm f/4.5 hr lens.