We may earn revenue from the products available on this page and participate in affiliate programs. Learn more ›
Diana-Neg-Development-Select-your-negative-in-Ad
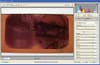
Select your negative in Adobe Bridge and double-click to open into Adobe Camera RAW.
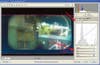
Diana-Neg-Development-Click-the-General-settings
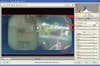
Click the General settings tab and cool the Kelvin temperature way down. Then pull the tint towards the green side until colors look near-normal.
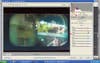
Diana-Neg-Development-Next-fine-tune-the-exposu
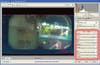
Next, fine tune the exposure settings. Keep in mind that many of these settings will have the reverse effect, since we inverted the curve. For instance, pushing the exposure into positive values will darken the image.
Diana-Neg-Development-Now-you-can-further-fine
Now, you can further fine-tune exposure using the Parametics curves adjustment settings. Use the force for this — it’s hard to explain how it works — until it feels right.
Diana-Neg-Development-For-this-image-we-played
For this image, we played with the saturation sliders a bit, too. Experiment a bit. It really can’t hurt.