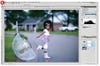
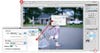
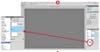
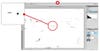
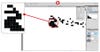
Last month, I explained a method for finding and setting your image’s black and white points. Using that procedure adds just the right amount of contrast to a flat image, and sometimes corrects color issues, too. Yet finding the black and white points is often just the first step. In plenty of photographs, a color cast still remains. For these, try the gray dropper. The concept is simple enough: Just click on a point that’s supposed to be neutral gray, and your whole image’s colors follow suit, automatically eliminating any visible color casts. But what if you can’t find a gray tone in your image, or have several areas that look like they could be neutral gray? Here’s a trick to help you find the best neutral point. As in last month’s Software Workshop, it uses a Threshold Adjustment Layer. And once again, it’s much easier to do in Adobe Photoshop CS4, though it will work with previous versions. F.Y.I._ This month’s software workshop begins with last month’s steps already applied. But if your image already has good contrast, or if you have a method for fixing contrast that you prefer, you can still use this tutorial to find a neutral and fix your color. Just add a threshold adjustment Layer between steps three and four._ Step 1: If you haven’t already, set the black and white points for your image according to the April 2010 Software Workshop: Create a Threshold Adjustment layer, slide it left to find and mark the black point, to the right to find and mark the white point, and then create a Levels Adjustment layer. Turn off the Threshold layer, then use the black dropper to click on your black target, and white to click on your white target. Full ExplanationStep 2: Now it’s time to find neutral gray. With your Levels Adjustment Layer selected, click the New Layer button (circled) to create a new blank layer. It should land on top of your Levels layer. If it doesn’t, drag it to move it there. Now, with your new layer selected, go to Edit > Fill. In the Contents box, choose Use: 50% Gray, and click OK.Step 3: To figure out where the neutral gray spots lie in this picture, set the blend mode of the new gray layer to Difference. Difference maps the differences between the pixels on the current layer from the pixels below. Since this layer is gray, any pixels on the layers below that match its gray tone will show up as black.Step 4: To see the black spots, use the Threshold Adjustment Layer. Click the eye to the left of the layer to show it, then drag the white arrow all the way to the left. Bring it slowly back to the right until black spots appear. Note: The black spots you see are the areas of your image which are closest to neutral gray.Step 5: Now, mark those neutral spots with the Color Sampler tool. Get it from the toolbar. The maximum number of samples is four, so click the Clear button in the Options Bar to clear the samples you made earlier for the black and white points. Zoom in, hit Caps Lock to get a target cursor, and click on four different black spots. Turn off the Threshold Adjustment Layer and the gray layer. Note: Mark the black areas for use in the final step.Final Step: Go back into your Levels Adjustment Layer, and grab the gray dropper. Make sure your Caps Lock key is still on, and zoom in on the first of your neutral point samples. Click on it, and watch your color cast vanish. If you don’t like the result, try the other points you marked. In this case, the fourth, a small spot on the inside of the little girl’s boot did the best job of correcting the color cast in this picture.Finished Product