Panning Tips for Better Action Shots
Panning on a moving subject makes for an action-packed shot

Animal,Animals,Wildlife,Vertebrate,Vertebrates,Chordate,Chordates,Mammal,Mammals,Carnivore,Carnivores,Felidae,Cat,Cats,Big cat,Big cats,Panthera tigris,Tiger,Tigers,Felis tigris,Tigris striatus,Tigris regalis,Running,Walking,Determination,Determined,Resol
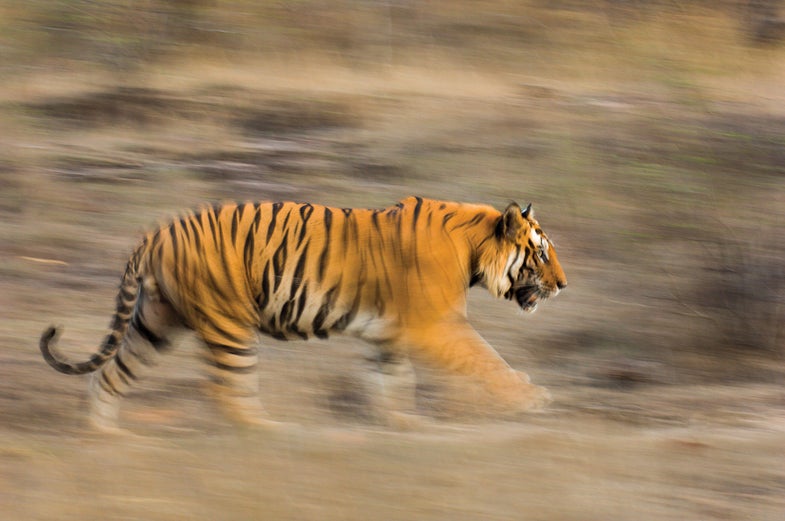
Say you’re photographing an animal—or a vehicle—on the move and you want to capture it sharply while also suggesting a powerful sense of motion. You’ll need to keep your feet planted and move the camera to follow your subject while the shutter is open. This technique, called panning, is what Devon, England-based wildlife specialist Nick Garbutt used for this tiger in Madhya Pradesh, India.
“I’d always wanted to convey the flow and grace of a moving tiger, but being in the right place at the right time, under the right conditions, took numerous visits to India stretching over several years,” says the pro, who has photographed tigers for the past 15 years.
“To get the best isolation of subject from the background, there needs to be some space behind the subject, and you want minimal contrast,” Garbutt says. “Cloudy, diffuse lighting is usually better than bright sunlight where highlights and shadows can be distracting.”
It’s crucial to find the right shutter speed for a given light level for panning. Too slow, and the subject won’t be sharp. Too fast, and your background won’t take on enough motion blur. “There’s no formula for determining the correct shutter speed,” says Garbutt. “It depends on how quickly the subject is moving and how much motion blur you want.” Here, he experimented with speeds between 1/4 and 1/15 sec and settled on 1/6 sec. He preset the ISO to 100 and adjusted the aperture in aperture-priority mode until he arrived at that 1/6 sec.

You’ll get smoother panning shots if you start your camera movement before firing the shutter and continue with a smooth follow-through even after the shutter has closed. It also helps if your subject is traveling at a constant speed across your line of vision instead of at an angle.
The great thing about panning? Even slow-moving subjects can take on a highly active appearance if the shutter speed and camera action are long enough. Garbutt’s tiger was simply walking through this scene, but thanks to his relatively long exposure and pan, it appears to be in mid-charge.
Step 1 Learn to take panning shots. “It takes practice. The secret is to pan at the same speed as the subject is moving, so that the static elements of the subject—the tiger’s head in this instance—are rendered sharply and its moving components and background are recorded in various states of blur,” says Garbutt. Twist from your hips, not your torso.
Step 2 Search for backgrounds. The best backdrops for panning have a color that contrasts with your subject. Darker backgrounds will cause lighter subjects to stand out, and vice versa. The background shouldn’t be too dark or light, though, or the motion blur will lose impact. Look for bright highlights within the background—they’ll show up as long streaks that will underscore the motion.
Step 3 Decide on your position. The relative distance between camera and subject makes a difference. Being close to your subject lets you use flash to render it more sharply. (If you do this, set the flash to rear curtain sync so the motion blur shows up behind your subject instead of in front of it.) If you’re having trouble getting a sharp subject without flash, especially with fast motion, move back and zoom in for easier follow focus.
Step 4 Test to find the right shutter speed. Panning shots are tricky balances between sharpness and blur. Fire off a handful of test shots before you start shooting in earnest to nail an acceptable balance. For most moving subjects in diffuse light, start with 1/30 or 1/15 sec; dial in slower speeds from there.
Final Step Shoot like crazy. Even veteran shooters rarely nail a pan on the first attempt. It requires finessing to perfectly match your panning speed with your subject’s velocity.
The Gear
Camera: Garbutt shot with a Nikon D2X, but you can use any camera that lets you set the shutter speed. It helps to have fast, accurate autofocus tracking, too.
Telephoto lens: Panning is easier when you’re farther from the subject—and you really want a long lens when photographing tigers. But make sure that it’s light enough to handhold and pan easily. Garbutt used a 70–200mm f/2.8G Nikon AF-S ED VR set to 150mm.