You Can Do It: Use Low-Tech Props For Better Portrait Photos Without Editing
Florida self-portraitist Alexis Mire creates clouds without the help of software

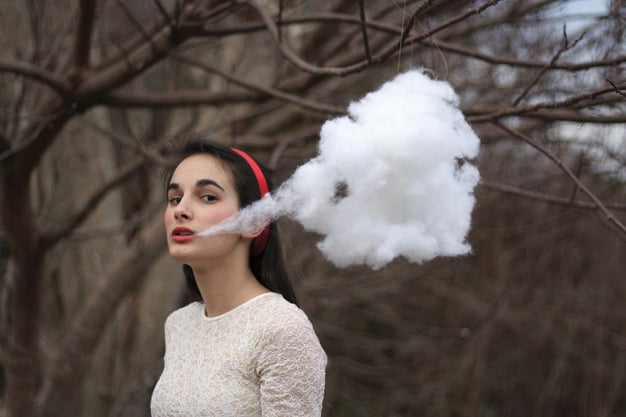
In these times of sophisticated digital retouching, making images with special effects that are created with old-fashioned, low-tech contrivances offers its own kind of of charm. The images come off as sweetly disingenuous, wickedly ironic, or a delectable blend of both. This low-tech/no-tech approach is championed by Florida self-portraitist Alexis Mire, whose special visual effects come without the help of software. (See the undisguised threads holding up her “cloud” in this photo?)
“I had always been inspired by claymation, and specifically the way cotton was used as smoke, explosions, and clouds,” Mire explains. “So when a friend gave me a bag of Poly-Fil synthetic cotton, I started using it as a prop.”
The result is her “Cotton Series,” a project she showcases on her website, alexismire.com. “My main goal was to create optical illusions using found materials. Poly-Fil was perfect,” she says. “It’s so versatile and easily available. I could form it into any shape, and it was actually fun to work with.”
If you’d like to make your own atmospheric magic with this fluffy stuff, Mire advises:
• Don’t light your cotton substitute with direct flash. It can blow out the highlights, and you lose the fluff factor.
• The larger your “cloud,” the more difficult Poly-Fil becomes to work with. Mire made several small, nebulous shapes and wrapped them together with nearly invisible, white thread.
• Avoid dropping the stuff—it picks up dirt and stray material very easily.
• Be prepared for it to become part of your life. “I still find wisps of it in my hair, clothing, car, even drifting across my front yard like tumble weeds,” Mire warns.
Step 1
Create your cloud. Mire determined the size and shape required for her composition, and then molded the Poly-Fil accordingly. When it was sufficiently cloudlike, she bound it together with thread to keep it from falling apart. Make sure you have a clean tablecloth or sheet where you can park the cloud as you work.
Step 2
Find the right background. “You want a whimsical location, like a scene from a fairy tale,” says Mire. “I looked for one with darker tones that would set off and not compete with the cloud. The little patch of woods I used had a threatening web of tangled branches and access to limbs that could support the cloud.”
Step 3
Get the right light and exposure. Mire wanted the lighting to be bright, yet indirect and diffused; conditions should not be windy, for the obvious reasons. Her exposure was important, too. To capture detail in the cotton, she was careful not to overexpose, and, in order to freeze the cloud and preserve its texture, she set the fastest shutter speed possible. Even on a windless day, the hanging cloud would sway.
Final Step
Experiment with composition and effect. “I played around with different perspectives before I made my final image,” says Mire. “I wanted mystery, and played with the Poly-Fil until I got it. When I pulled part of the cloud toward my mouth and it crossed my cheek, I knew I was close. I glanced over at the camera, as if to confront the viewers with this strange sight, and the move created exactly the illusion I was going for.”