You Can Do It: A DIY “Rig Shot” For Adding Motion To Photos
Former drag-racing photographer Rich Lavigne creates rig shots of a baby stroller in a supermarket for a twist on baby photos
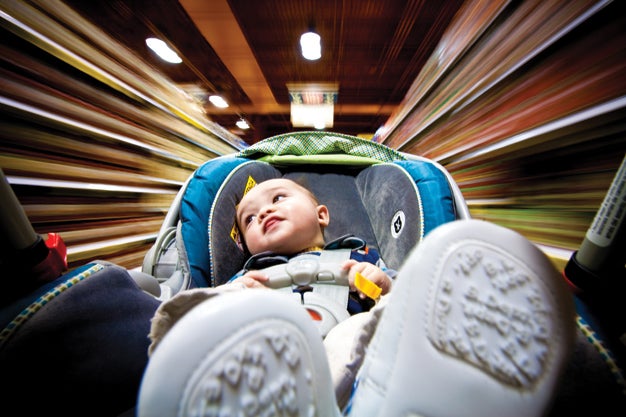
“It’s a classic rig shot,” says Rich Lavigne, a former drag-racing photographer in South Plainfield, NJ. He explains, “In automotive photography, a rig shot is when the camera is attached to the side of a car using an arm and clamp mechanism. You make the shot by dragging the shutter while the vehicle is in motion.”
But instead of a turbo-charged hot rod, the vehicle in this photo of his is a baby stroller, and the venue is no drag strip, but one of the aisles in his local Wegman’s supermarket. The passenger? Lavigne’s then six-month-old son, Tyler.
Rig shots result in a sharp car and blurred backgrounds. Lavigne made this as part of a 365-day shooting project and entered it in our monthly Your Best Shot competition. His advice for rig shots? Use an ultrawide lens to capture plenty of background—the blur there is what makes these images so compelling. If you’re shooting with an APS-C body, this means a 10 or 12mm.
And experiment: Changing the shutter or subject speed can have a dramatic impact. “If the effect works out, that’s great. If not, well, have at it again!” Lavigne says.
Follow the steps below to replicate Lavigne’s process:
Step 1
Practice at home. “Before heading out to the store, I fit the camera, lens, and mounting hardware to the stroller, and then made a few test shots to see what the composition would look like with Tyler in the frame,” explains Lavigne.
Step 2
Scout the backgrounds. The photographer looked for an aisle with dense shelving that would fill the sides of his composition from top to bottom. It also helped that the aisle had long, horizontal aluminum strips (for product prices) that added important structure to the motion blur.
Step 3
Find the exposure. “Most people see the photo and assume that I was pushing Tyler very fast, but it’s the slow shutter speed of 1 sec that gives the illusion of speed,” he says. An f/13 aperture gave him enough depth of field to make both the shoes and the face relatively sharp, and by shooting directly under an overhead light, Lavigne could set ISO 100 for a noise-free image.
Step 4
Experiment until you get it. Lavigne made multiple test shots, varying the speed of the stroller until he got a look he liked. He continued shooting until he was rewarded with a photo in which Tyler was motionless for the entire 1-sec exposure.
Final Step
Tweak in an image editor. Later, in Adobe Lightroom 3, Lavigne adjusted white balance, boosted color saturation, and upped the contrast a bit.