Tips From a Pro: Using Lens Flare to Your Advantage
Say farewell to sharpness and contrast
We photographers go to great lengths to minimize flare, a burst of detail-erasing light that can spill into the lens. We buy specially coated glass, mount lens shades, and invest in all kinds of studio modifiers and flags that prevent unwelcome light from pouring back into our cameras and wiping out all the potential sharpness and contrast in an image.
Unless, of course, we do the exact opposite.
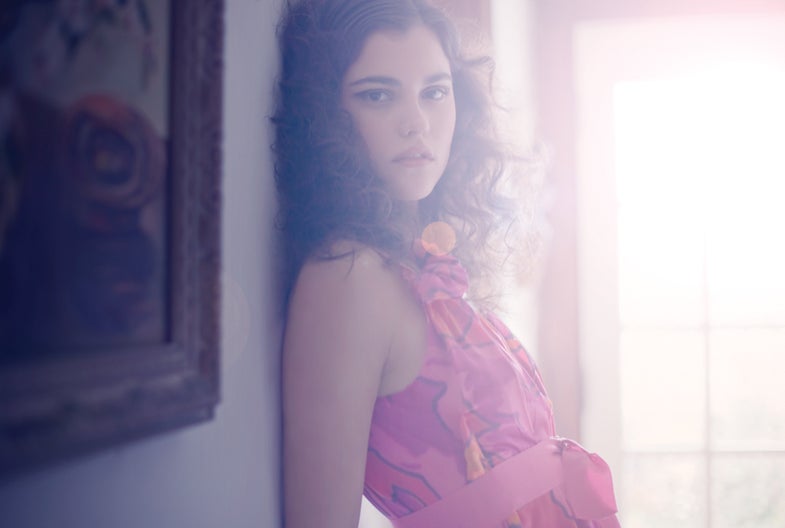
Take this photo by Nathan Schroder, a professional fashion and advertising photographer. He went out of his way to maximize flare for this portfolio shot.
Why? “I wanted to create an image where the model is lost in an otherworldly, ethereal place,” he says. Limited to the all-too-earthbound environment of the room in which he was shooting, Schroder relied on lighting to soften the reality of his setting.
“I knew that I wanted the sun to be my main light,” he explains. “I also knew that I needed the window light to flare in the lens.” To maximize the effect, he shot straight into the sunlight that poured into the room through a nearby French door.
Such brilliant backlighting, however, produced a little too much flare, washing out detail-defining contrast and essentially erasing the model’s beauty. Bringing back detail called for a bit of front fill. “I started with a Profoto strobe in a medium softbox, just off-camera and pointed directly at the model,” he says.
The quality of the direct strobe turned out to be too harsh. So to keep the ethereal look he was going for, Schroder moved the strobe away from the camera and aimed its output—no longer diffused by the softbox—at the long, white wall opposite the model. It produced just enough bounced fill light for additional detail in her face, without adding any mood-altering contrast.
By the way, you can also produce this sort of heavenly lighting with a purely natural source instead of a strobe. Simply place a large, inexpensive reflector in front of your model and bounce the sunlight that’s streaming through the windows back onto her face.

Kris Holland/Mafic Studios
For the ethereal look that he wanted for this portfolio piece (shot on location rather than in a studio), Nathan Schroder let indirect sunlight pour through the windowed door behind his model (A) and wash over her. Unfortunately, the flare produced by the unmodified backlight was too strong and washed out her facial features almost completely. To bring back some of the missing detail, Schroder set up Profoto Pro-7a 2400-Watt-second power pack (B), mounted a zoom reflector (C) on his strobe head, and bounced its light off the wall opposite the model (D). He shot with the Canon EOS 5D Mark II (E) and 50mm f/1.4 Canon EF lens. Later, in Adobe Photoshop CS5, the photographer touched up the skin slightly and then “to accentuate the flare and add a color cast,” he says, “I placed a lens flare filter layer on top of the image, along with a pink-to-purple gradient layer.” The result is a nice balance of flare and flair.