How To: Get Better Selections in Photoshop
Make Your photo better one piece at a time.

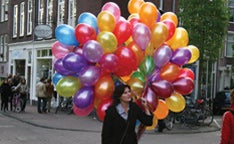
Want to really harness the power of Adobe Photoshop to improve your photos? You’ll need to make a good selection first. Whether you want to extract a subject and place it on a new background, or just modify a portion of your picture, you have to start by selecting the area correctly. Here are step-by-step instructions for great selections, and a way to save them for later use. With the image here, we’ll simply blur the background to make the woman and her balloons stand out. But you can use your selection to make other changes, from tweaking the Levels on an Adjustment Layer to distorting the subject’s size.
1. Duplicate the Background Layer, and work on the copy.
Type W for the Quick Selection tool. Pick the Add to Selection brush (circled), then paint along the woman and the balloons to make a selection- Photoshop will do most of the work.
2. Although your initial selection will be a bit rough, you can keep using the Quick Selection tool to perfect it.
(This step is not pictured.) How? Zoom into your photo for a close-up view of one of the more complicated edges of the selected area, then shrink your brush size. Switch to the Subtract brush (it’s to the right of the Add brush), and paint on your image to remove the selection from areas where it doesn’t belong. To add a little of your selection back, hold down the Shift key to temporarily return to the Add brush.
3. Sometimes the software can’t quite get a grip on what you want to keep in your selection and what you want to take out.
When that happens, type Q to go into Quick Mask mode and tweak your selection manually. In Quick Mask, the red tint represents your unselected area. Type B for the Brush tool, then D to make sure black and white are in your color palette. Start with a brush at 90% hardness, then paint with white where you want to add to your selection, or paint with black to remove it. Zoomed in close, check all the edges, making sure you’ve selected only what you need. Type Q again to exit Quick Mask mode.
4. To further perfect your selection, go to Select > Refine Edge.
Zoom in to 100%, and choose the On White preview (circled) so you can really see how your edge looks. Use the sliders to improve it. Your Radius and Feathering should usually remain low. This selection needs some contracting because we captured too much of what was slightly outside the balloons. Finally, turn up the Smooth slider to iron out the bumps introduced by the Quick Selection Tool. Click OK when you’ve got it right.
5. After all that work, save your selection.
Go to Select > Save Selection. Name it, and click OK. Then hit Ctrl (Command on a Mac) + D to deselect. Don’t worry that your selection disappears. Since it’s saved, you can always bring it back.
6. Now that we have a clean selection to work with, we’ll use it to blur the background, but keep the main subject sharp.
Start by blurring the Background Copy Layer. Go to Filter > Blur > Gaussian Blur.
7. To begin hiding the blur where you don’t want it, add a mask to your Background Copy Layer by clicking the Mask button in the Layers panel (it looks like a rectangle with a circle in the middle).
The blurring will look fake if there isn’t a bit of sharpness in the foreground, so hit G on your keyboard to get the Gradient tool, and draw a gradient to reveal some sharpness on the street. Then load your selection by going to Select > Load Selection. Choose your saved selection from the pulldown menu, and click OK.
8. Now fill the selection by going to Edit > Fill and choosing Use: Black.
This will fill your selection and reveal the sharpness beneath. Use the Brush tool to mask out sharpness where it doesn’t belong- this photo looks more polished with the distracting foreground details blurred out, too. If you want to keep editing (say, adding saturation to the balloons or brightening the figure), make those changes with Adjustment Layers and use your selection for more masks.