How To Improve A Photo In 6 Steps
A quick beginners guide to editing a photo with Adobe Photoshop Elements 7.
Adobe Photoshop Elements 7 is a great option for photographers who are just getting started with image editing. But even though it’s simpler than Photoshop itself, the Full Editor can be a bit much for folks used to sliders and automatic adjustments. For a little help, here are some tips and tricks that will let you improve a photograph from start to finish, using some of Elements’ most powerful tools. Before you get started, though, you should go to the Window menu and check Undo History. This will open a panel that lists your steps as you work, so you can go back in time if you make a mistake.
1. Crop First:
Type the C key to get the Crop tool. This picture has a lot of uninteresting junk on the right, and since the subject is turned away from it, we’ll crop it out. This image would look nicer as a square, too, so as you drag out your crop box, hold down the Shift key. This will keep the shape perfectly square. When you like the way it looks, double-click anywhere inside the box to make the crop.
2. Check Your Levels:
Now that your photo is the right shape, make sure you have as much dynamic range as possible. This image looks a little flat, so adjusting the levels will help us fix the contrast. To get the tool, go to Enhance > Adjust Lighting > Levels.
3. Add Some Contrast:
In the Levels dialogue, you’ll see an illustration of your picture’s histogram. Right below it, to the left and right, are black and white triangles. Move the black triangle inward toward the place on the left where your histogram begins, and do the same with the white. That will immediately add more contrast to your photo. This photo needs brightening, as well, so grab the gray triangle that’s in the center and move it to the left to brighten the midtones.
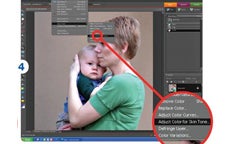
4. Fix the Color:
This picture has a blue color cast that needs curing. To get rid of it easily, without goofing up the all-important skin tones, return to the Enhance menu, and choose Adjust Color > Adjust Color for Skin tone.
5. Get A Better Tone:
Use the dropper to click on some skin to get started. Choose a spot that’s a midtone-if you click on a really bright area, the software can overdo the correction. You’ll see an immediate improvement, and that’s adjustable, too. The initial correction of this shot is a little too yellow, so move the Blush slider right to make it look more natural.
6. Add A Little Pop:
Since the background and the skin tone in this shot are such similar hues, the photo could use a bit more color. To add saturation without messing up the skin, go to Enhance > Adjust Color > Adjust Hue/Saturation. Instead of working on all the colors at once, use the pulldown menu to choose Edit: Greens. Then move the Saturation slider rightward until the mamma’s shirt pops. Do the same for the blues to brighten baby’s shirt, too.