You Can Do It: Ring of Fire
Play with fire without getting burned. All it takes is a camera, common household tools -- and uncommon ingenuity.
My pictures usually begin with “How would it look if…?” and take shape as I experiment with anything from old tools to odd forms of light. My approach comes from a childhood in a do-it-yourself household. These days, ideas for photos come to me as I walk through the garage or basement and imagine new ways of putting familiar materials to work.
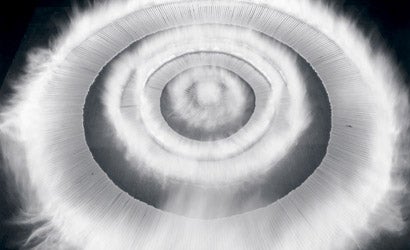
The idea behind “Circle with Matches” (at right) was to create a geometric subject that’s its own light source. Noticing how a match head is wider than its base, I figured that if I laid enough matches together, I’d end up with a circle — similar to the way wedges or voussoirs come together in an arch.
First, I laid down several hundred 11-inch matches (the type used for lighting fireplaces) that I’d cut down to about 4 inches to keep the circle manageable.
But after building the ring, I realized that the image needed something more. So I added three inner rings of common household matches. The smallest are paper ones that I tore from matchbooks.
While there are four rings of matches, there are five layers of light, because on the innermost circle I used a pattern of three match heads facing out alternating with one head facing in.
Building the circles took a few days. I did this in my garage, where at least the concrete floor wouldn’t go up in flames. As with all of my images, I took safety very seriously. Fire extinguishers, protective glasses, and working a safe distance away are just the beginning. Flammables? Far, far away. Anything less wouldn’t be an experiment, it would be foolish.
When it came to shooting, there could be no mistakes. I had only one chance to capture the image, since I use 4×5-inch black-and-white film. My camera is a tripod-mounted Calumet 4×5 monorail model with a Schneider 90mm f/8 lens and a cable release.
I covered the garage windows with black plastic to block unwanted light, and thought hard about how to ignite the matches, since I didn’t want my hand to be visible. I decided to use a soldering iron, and touched its heated tip to a match head, quickly pulling away as the matches took off.
As with many of my images, it isn’t a single exposure: Each ring is a separate exposure on the same sheet of film. In the darkened garage, I opened the shutter, set to “T”, and then ignited a circle of matches. Once the circle burned itself out, I repeated the process until all five rings had been exposed.
Matches produce a lot of light. As a result, I had to underdevelop (or “pull”) the Kodak Tri-X film to prevent the highlights from losing detail.
Want to try this with digital? It might be easier, because you could set up and expose each ring separately, and then produce a digital composite in software. My advice? Set your DSLR to its lowest contrast setting, and to be sure that you capture all the detail, shoot RAW.
Caleb Charland lives in Maine. For more of his work, visit calebcharland.com.
DON’T TRY THESE YOURSELF: “Sparkler Through Propeller” (right, top) was made with two power drills facing each other. The one near the camera turns a propeller, while the other spins a lit sparkler in the opposite direction. The pattern occurs where the paths intersect. “Four Spheres with Compass, Penlight, and Drill” (right, bottom) comprises 85 separate exposures. Each line is a different angle set on a drafting compass (with penlight attached) as it rotates in a power drill.