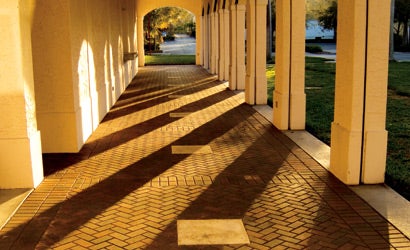
Getting In The Mood with Light and Shadows
In a new book about mood and ambience in pictures, a pro photographer explains the power of working directionally with light and shadows.

How can you take an ordinary photographic subject and make it more visually dramatic? This ongoing conundrum is the subject of a new book by photographer and educator Joseph Meehan, titled Mood, Ambience and Dramatic Effects (Kodak Books, $25) — part of Kodak’s educational book series The Art of Digital Photography. In Meehan’s volume, he explains how photographers can use technical elements such as lighting, exposure, and computer effects to enhance a picture’s ambiance, transforming the image from a simple representation into an interpretive piece of art. “It is when the photographer chooses to push beyond the point of just documenting the subject that the real power of photography as a medium for personal expression begins to emerge,” Meehan writes in his introduction.
Among the techniques that Meehan explores in depth is the deliberate use of shadows and light to create drama within a photograph. In the following excerpt from his book, Meehan explains the ins and outs of light direction. For ordering information about Joseph Meehan’s Mood, Ambience, and Dramatic Effects, visit sterlingpublishing.com. — Jack Crager
Light Direction for Dramatic Renderings
The placement of a light source relative to the position of the subject will control where shadow areas fall both on the subject’s surface and in the background and/or foreground. In the case of front lighting, the source is placed as close to the lens axis as possible, producing minimum shadow size. This position is least favorable for displaying textures. It is, however, much preferred as a beauty light since it is does not emphasize the texture and flaws of the skin. Conversely, side lighting emphasizes textures and is more likely to produce a dramatic, high-contrast rendering, especially if a small source is used. This position may require the use of fill light to bring up some shadow detail while still maintaining the dramatic look.
Placing the light behind the subject (backlighting) is a situation that raises certain problems in terms of exposure. That is, the subject is entirely in shadow formed by the light coming from behind. If the photographer wishes to maintain a lighting balance between the background and the backlit subject, a fill light must be used on the subject. The usual procedure is to add enough light to match (or be slightly less than) the background light depending on the look desired. If no fill light is used, then the exposure must be based on the weak light illuminating the front of the backlit subject. This will render the areas behind the subject overexposed, which can be one way to reduce the impact of busy backgrounds. Backlighting will usually produce some accent lighting around the subject’s outline or on any subject surface turned slightly toward the direction of the backlight, such as the side of the face.
Light Intensity
Light intensity refers to how much light is available to take the picture. Typically, intensity is measured using either the camera’s light meter or a handheld model. These readings are then expressed as a combination of aperture and shutter speed. The two main forms of light measurement are reflected light and incident light. That is, measuring the light reflected off of the subject versus measuring the incident light falling on the subject. These readings are then translated into a specific combination of f/stop and shutter speed settings to yield the desired exposure.
While the degree of light intensity is critical for determining exposure settings, knowledgeable photographers realize that the amount of light controls much more than just exposure. In particular, light intensity affects the range of possible choices in aperture and shutter speed settings. The selection of a particular aperture will determine the depth of field — how much of the picture will be in sharp focus. Shutter speed then determines how motion will be recorded in the image. Will you choose to stop motion with a fast shutter speed so that your subject appears sharp, or allow for creative motion blur with the use of a slower shutter speed? Aperture and shutter speed selections are powerful tools that can significantly affect how the subject and the overall scene will be portrayed. The next chapter explores the impact of these tools in detail.
Light Intensity and ISO
In addition to controlling choices in aperture and shutter speed, light intensity also influences the range of possible ISO settings you can use. With digital cameras, ISO sensitivity settings represent the sensor’s relative sensitivity to light. The higher ISO setting you use, the greater the amplification of the sensor, and the more sensitively it will react to light in a given scene. As with film ISO ratings, the higher the ISO you select, the less light is needed to make a correct exposure. Digital noise and other artifacts, however, tend to become more noticeable at higher ISO settings. Consequently, the lowest ISO sensitivity yields the best digital image quality the camera is capable of delivering.
ISO selection also affects aperture and shutter speed choices. For example, the need for a fast shutter speed in low light situations requires a high ISO setting. Indoor sport arenas, theaters, and other artificially illuminated settings have lower levels of light intensity compared to a typical daylight scene so, if faster shutter speeds are needed to stop indoor action, ISO ratings of 400 or higher will be required.
The four qualities of light — color, contrast, direction, and intensity — combine to present you, the photographer, with a range of options to carry out your own personal interpretation of a subject or scene.