Flash Made Easy
Taking superb photos with an accessory flash is easier than you think. Just follow our step-by-step guide.
Slip an accessory flash into your SLR’s hot-shoe, crank all your settings to auto, and you’ll immediately get better pictures than you would with your camera’s built-in flash alone. But exert just a bit more control, and you’ll take your pictures to a whole new level — no lightmeters, flash triggers, or stands required.
Without taking that extra control, you end up with those typical flash snapshots: Sure, your subjects in the foreground are properly exposed, but more than likely the background fades to black. That’s never good. Whether you lose a dramatic sky or the interior of a room totally disappears, your subjects look like they’re hanging out in a cave.
The trick to overcoming this problem is to set your camera so you know the background will look the way you want it, then let your flash fill in the foreground — without overexposing your subject.
Sound hard? It isn’t, because of a little miracle setting on your flash called TTL. TTL stands for “through-the-lens,” and it means that the flash fires a pre-flash and uses that, along with information from the camera’s meter, to figure out how much light to put out. In other words, once you set the flash to TTL, you’re free to set your camera to manual and mess around with the ISO, shutter speed, and aperture until you get the background you love — the flash will take care of the subject in the foreground with no extra work from you. (One note for old-schoolers still hanging on to the flashes from your film days: It’s time to upgrade. Get yourself a dedicated flash that works with your camera model, and make sure it’s got TTL in its name.)
The process goes like this:
1. Set your camera to manual.
2. Set your camera’s meter to evaluative mode.
3. Set your white balance to Flash, and choose an ISO, aperture, and shutter speed. (Every camera has a maximum speed that its shutter can match — a.k.a. sync — with the flash. You can set your camera slower, but no faster, than the sync speed. If you’re not sure what yours is, look it up or just use 1/125 sec to be safe.) Don’t know where to start? Try using the program, shutter- or aperture-priority modes as your guide, then dial the mode back to manual.
4. Take a picture of the background. If you like it, you’re all set. If not, change the shutter speed or aperture until you get something that looks good to you.
5. Turn on the flash. Most likely, your flash defaults to TTL. If not, find the mode button and keep hitting it until TTL comes up.
6. Fire away. Your camera’s evaluative meter will find the foreground subject, the flash will expose for it, and your background will appear just as you planned it.
Since every situation calls for slightly different settings, here are three case studies to help you out. Each photographer made decisions that worked for the scene, and each produced outstanding results.
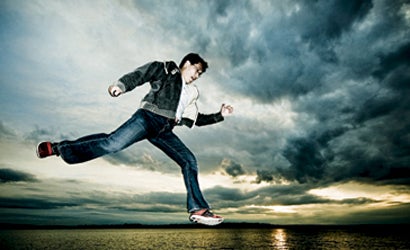
The leap
With a tripod-mounted camera and a flash in the hot-shoe, photographer Danny Ngan got our opening picture — of himself! Look at his right hand, and you can see the remote that’s triggering his shutter.
Ngan knew he wanted to freeze the action and minimize blur, so he started by setting his Nikon D70 to manual and choosing the fastest shutter speed, 1/250 sec, that would sync with his camera-mounted Nikon Speedlight SB-600.
With the camera set at a low angle, he tried several apertures until he got an exposure of the sky that looked good to him. He made sure the camera’s lightmeter was set to Matrix (Nikon’s term for evaluative metering) so that when he fired the camera, the meter would detect him as the subject and the flash would light him accordingly.
Then he leapt.
Try This Shot:****(1) Set your tripod low to the ground, mount the camera, and put the flash in the hot-shoe. (2) Set your meter to evaluative. (3) Set ISO to 200, shutter speed to 1/125 sec, and aperture to f/5.6. (4) Use a remote trigger to take a shot, and check your LCD. Adjust the aperture to get an exposure you like. (5) Turn on your flash and set it to TTL. (6) Jump!
Sophisticated flash-master Joe Sales went all-manual to get the picture at left. He even took his Canon Speedlite 580EX off the camera, using a wireless trigger to fire it.
Sound too complicated? It’s not. Sales could’ve gotten the same exposure easily by setting the camera on manual and the flash on TTL. And to fire the flash when it’s out of the hot-shoe, you don’t need wireless — just an off-camera (TTL) shoe cord.
By freeing the flash from the camera, a cord gives you better control over the angle and distance of the light while you keep the benefit of TTL and all its automatic control. Because the cord lets your gear communicate, you can point the flash from any direction without losing your camera’s TTL metering.
First, Sales had to figure out the settings for the background. He started by choosing a shutter speed of 1/20 sec, slow enough to let him twitch his Canon EOS-1D Mark II N slightly to add some blur to the background. This blur does double duty: It adds vibrance to the picture and smudges the background, which, at his f/11 aperture, would have been distractingly sharp.
He held the Speedlite in his left hand, crossing it over his right to get the dramatic side light.
Still, there was one last problem to solve. Since his subject has very fair skin, holding the flash that close, and set to TTL, would have overexposed him.
Fortunately, this had an easy solution, too. All you have to do is get your flash to put out less light. Most DSLRs let you control the output of a flash (whether pop-up or hot-shoe) with flash exposure compensation. In smaller DSLRs, you’re likely to find it as a menu item; sometimes there’s a button.
Either way, simply dial flash exposure compensation down incrementally until you like the effect you get. (If you need more power from your flash, you can dial the compensation up.)
Sales shoots a lot, so he knew right away he’d need less flash to get this shot. And with a bit of experience and the help of exceedingly smart equipment, you’ll be ready, too.
Try This Shot: (1) In the shade during the day, set your camera to manual exposure and your meter to evaluative. (2) Try ISO 200, a shutter speed of 1/20 sec, and an aperture of f/11. (3) Take a shot; adjust your aperture until the background exposure is good. (4) Tether the flash to the camera with a shoe cord, and set it to TTL. (5) Shoot. If the subject is too bright, use flash exposure compensation to dial it down.
Subtle portrait
| © Michael Soo |
On-camera flash can be just the ticket for shots where the bright, straight-on flash adds drama, but for an indoor portrait, more subtlety is often in order.
How did photographer Michael Soo get such pretty light from a flash? First, using an off-camera shoe cord, he took it off his Canon EOS 5D to change the beam’s direction. Then he bounced the light off another object to soften it. (Many flash heads not only pivot upward to bounce off the ceiling but also swivel for a side bounce, so you don’t necessarily need a cord.)
Soo chose his background carefully. The restaurant was lit, typically, with incandescent light, which is very warm (yellower) in tone. The flash produces daylight-balanced light, so it’s much cooler (bluer). If there were too much incandescent light in the background and the flash were lighting the foreground, the background would have appeared glaringly yellow in comparison with the daylight-balanced flash’s light. Soo didn’t want that effect, so he placed his subject in front of a darker area that wouldn’t compete with her.
The flip side of the underlit background was that he’d need a fair amount of exposure for it to show up. The answer: ISO 1600. This gave him a shutter speed of 1/8 sec — short enough that his model didn’t have to freeze her pose for too long.
Because the ceiling was too high to bounce the flash off, the creative photographer improvised. He draped a dinner napkin over a tall water glass, placed that ad-hoc reflector at about a 45-degree angle from his model, and pointed the flash at it.
The result: a softly lit, warm portrait that never would have worked without a flash.
Try This Shot: (1) In a dimly lit indoor scene, set your camera to manual exposure and the meter to evaluative. (2) Try ISO 1600, 1/8 sec shutter speed, and f/4. (3) Take a shot, and play with the aperture until you get a background you like. (4) Set your flash on TTL. Use a shoe cord to turn the flash away from your subject, and aim it towards a white surface like a wall or even a napkin.