Digital Toolbox: Fast & Fun Color
Punch up the colors in your photos with just three simple steps.

Sometimes there’s nothing better than a few fast moves in Adobe Photoshop to wake up a tired picture. Try these simple steps to radically dial up color, make your picture pop, or create a truly blue sky.
Click here for tutorial steps.
More of Debbie Grossman’s Photoshop tutorials can be found in the Digital Toolbox archive.
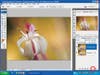
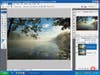
Accentuate-the-Negative-Step-1-Duplicate-the-Back
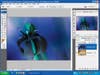
Accentuate-the-Negative-Step-2-Hit-Ctrl-Command

Accentuate-the-Negative-After

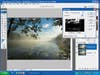
Add-Some-Pop-Step-1-Go-to-Image-Adjustments-S
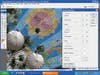
Add-Some-Pop-Step-2-Slide-the-Shadows-Amount-down
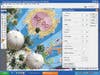
Add-Some-Pop-Step-3-Move-the-Midtone-Contrast-sli

Add-Some-Pop-After

Nothing-But-Blue-Skies-Sometimes-a-blue-sky-just
Nothing-But-Blue-Skies-Step-1-Duplicate-the-Backg
Nothing-But-Blue-Skies-Step-2-Go-to-Select-Colo
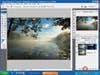
Nothing-But-Blue-Skies-Step-3-Click-the-Add-Vecto

Nothing-But-Blue-Skies-Step-4-To-add-blue-go-to

Nothing-But-Blue-Skies-After