How To: Retouching Tips for Perfect Portraits
Bring new life to the people in your pictures without going overboard.

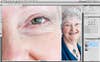
In a portraid, the eyes are often the most important feature, so make them stand out. Duplicate the Background layer, and name it “Eyes-Whites.” Grab the Dodge tool, set it to midtones and leave your Exposure set to 50%. Zoom in close, and dodge the white parts of the eyes until they are a bit brighter. If there are any red lines, use the Clone Stamp to remove them. If your subject has a lot of redness on the rims, switch to the Sponge tool, set to Desaturate at 45%, uncheck Vibrance, and take the red down.

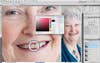
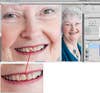
Duplicate the Eyes Color layer and name it “Teeth.” Double-click on the color swatches in the toolbar to get the Color Picker. Use the dropper to select one of the whitest tones on the new teeth as the foreground color. Create a new blank layer and change its Blend Mode to screen.
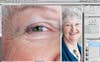
This portrait subject has near-perfect skin, but we can remove her few flaws using the Healing Brush. Make a new blank layer, and call it “Blemishes.” Grab the Spot Healing Brush, and check the box for Sample All Layers. If youhave CS5, choose Content Aware. Then, zoomed in at 100%, paint over any blemishes to remove them.
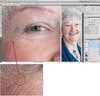
Make another new blank layer, “Wrinkles.” Switch to the regular Healing Brush and set it to Sample Current and Below. Sample a spot with smooth skin, then paint over the wrinkle to erase it. Remove wrinkles from the outside in, since lines get longer as we age. If your work looks overly smooth, fade it by going to Edit>Fade, and turn down the effect until it looks natural.