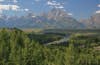
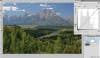
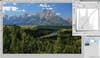
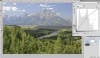
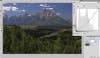
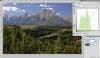
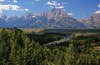
This is how the image looked before an intervention by Curves. We love the Curves tool because it’s one of the most powerful in Adobe Photoshop, and the most versatile, too. Use it to add contrast just where you want it, brighten or darken an image, and even correct color. But because it involves a graph instead of the more intuitive sliders, it can be confounding for first-time users. Curves simply graphs—and lets you correct—the tones of your image. As with the histogram, the darkest tones are represented on the left, and the brightest on the right. When viewing an RGB image, the curve line begins at the bottom left and goes along a straight diagonal to the top right. As you add points on that line and move it up or down, your image changes. The good news: The Curves tool is much harder to explain than it is to use. So, to make it a little easier to understand, here are a few of the most common curves you can implement, and what they do. Try them on your images to make them look better. Debbie GrossmanMethod 1 ADDING CONTRAST: Photoshop CS4 and CS5 show a histogram behind the curve. If your histogram doesn’t touch the edges, add contrast by moving the small black and white triangles inward to your histogram’s edge. This makes the angle of the curve line steeper. Note: Use this method only when your histogram doesn’t touch the edges. If you do it on an image with a good histogram, you’ll end up clipping your highlights and shadows. Debbie GrossmanMethod 2 ADDING CONTRAST: One of the best ways to add contrast to an image is to create an S-curve. It’s so named because of its subtle S shape, formed by lifting the highlights portion of the curve and lowering the shadow portion. To make one, click on the upper quarter of the curve and drag it up until your highlights look bright enough. Then click on the lower quarter and drag it down until your shadows look dark enough. Debbie GrossmanMethod 3 BRIGHTENING: If your image is too dark, you can use Curves to brighten it. Here’s an exaggerated example: Grab the midpoint of your curve and lift it up. The whole image brightens. The great thing about using Curves for this? Your black and white points don’t change, so you won’t clip highlights or shadows. Debbie GrossmanMethod 4 DARKENING: To darken an image, just do the opposite of what you did to brighten it. Grab the curve by the center point, and bring it downward. Debbie GrossmanMethod 5 FIX COLOR: In addition to fixing issues of brightness, darkness, and contrast, Curves lets you manipulate color. Add or subtract red, green, or blue from your image by using the pulldown menu to select the color you want to change, then manipulate that color’s curve. For a warmer version of your image, pull down the blue curve to make the image look more yellow. To make the image more magenta, pull down the green. Dan BracagliaThe final image was improved using both contrast methods along with Curves for color correction. Debbie Grossman