Tips From A Pro: Create Inspired Nature Photography
Five tips to shake up your style this summer


A physicist by training and vocation, Chris Tennant brings a scientific mind-set to his landscape photography, yet he composes his images like an artist. In his photo practice, Tennant often uses novel methods to add unusual flair to his nature images. Here he shares five key tips that will help you keep things visually interesting in the field.
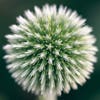
1. Get in Close Even if your subject matter isn’t unusual, you can add drama with an extreme close-up, as Tennant did with a globe thistle bloom (left) found in a botanical garden. “The idea is to make something small look imposing by getting very close to the subject,” he explains. He used a 100mm f/2.8 Canon EF macro lens on his Canon EOS 5D Mark II. “The macro forces you to look at common objects in a completely different way,” he says. “It’s a liberating way of seeing them. Just walking around a backyard or a garden, it can open up a whole new world of possibilities.”
While this shot has a circular distortion that almost looks like a fisheye effect, “there’s no fisheye lens involved,” Tennant says. “It’s just that I’m very close and shooting a round, spherical flower with a shallow depth of field.” The latter was for both aesthetic and practical reasons. “If you’re shooting that close to something with a hand-held camera,” he says, “you need a fast shutter speed [1/200 sec in this case], so you need to shoot pretty wide open—this is f/3.5—which in turn gives you the shallow depth of field.”
This seeming depth limitation can be useful in close-up shots, says Tennant. “It allows you to point the viewer to a specific location where you want the focal point to be, and it creates a lot of interesting elements you can work with on the edges.”
Such experimentation can liven up specimens found anywhere, as with Tennant’s macro flower shot below. “I was walking around in my parents’ backyard in upstate New York, just getting very close to things and looking at them in a different way,” he recalls, adding that you don’t necessarily need a macro lens for close-up magic. “There have been times I’ve bought a bouquet of flowers at the store, and just setting those up can provide hours of material as well.”
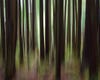
2. Blur It Up When done right, camera movement can lend a dash of artistry to otherwise stagnant subjects. “You can present a more abstract or surreal version of a scene, where you’re using the composition and the colors or shapes almost as brushes,” Tennant says. He took the image above “in a forest with very regularly spaced trees, with some foliage on the bottom. By getting a longer exposure [1/3 sec], and quickly panning the camera vertically, you get this ethereal effect.”
Prepare to shoot plenty of exposures, though. He notes that this keeper was one of several dozen snaps he took at the location in northern Oregon. “You’re not sure what you’ll get, and that’s part of the fun,” he says. “Each shot, depending on how I’m moving, is going to be different.”
You can also create abstract art with a sequential composite, as in the shot at right. “I made use of a camera feature that’s becoming more common: multiple exposures,” Tennant says. “You take five or six frames and the camera can automatically blend them. Here I looked down on these flowers and centered on the bloom in the middle, took a picture, rotated the camera just a bit, took another, rotated it, and did that a few times to create that motion.”
But as with abstract music, such randomness needs a modicum of design to work. “You need a contrast in color or in shape. Otherwise it’s just going to look like a blurred blob,” Tennant says. “In the shot on top, there’s the dark trees versus the light background and the green foliage. In the one on the bottom, I tried to contrast the green leaves, the white flowers, and the blue flowers. If it’s all one uniform color, it just looks messy.” Instead, he made this image look psychedelic. No special substances involved, though—“just high on life,” he adds with a laugh.
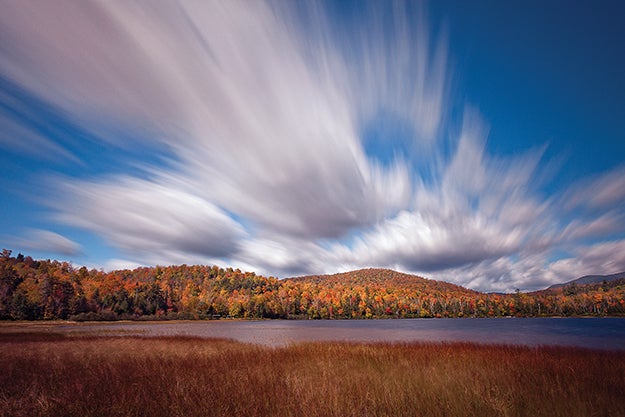
3. Stretch the Time Another way to add arresting effects to images is with long exposures, as in these two contrasting shots. “With the cloud image I hadn’t anticipated doing a long exposure because it was a bright afternoon, and that means that there’s a danger of blowing your picture out with too much light,” Tennant recalls. “But then I saw how fast the clouds were moving, and I realized that the direction they were moving, toward me, would make a really dynamic image.”
To block much of the daylight, Tennant used the 10-stop B+W 77mm 3.0 ND 110 neutral-density filter, which afforded him a 60-second exposure at f/18. “With no filter, if I metered the scene, the camera would say the shutter speed should be 1/100 [sec]. That’s about as slow as I could go,” he says. “A neutral-density filter, if you hold it up, you can barely see through it. It’s very dark so it attenuates the light coming into the sensor.”
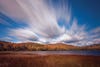
In similar light, Tennant used the same filter for the seaside shot above. But here, his 90-second exposure achieves the opposite effect: The moving water appears frozen. “The long exposure basically eliminates any motion in the water,” Tennant says, “so you get this surreal, smooth, glassy-looking surface. When you first see it, you might wonder what you’re looking at for a moment.” He heightened the mystery by converting the color image file to black-and-white in post.
“For nighttime long exposures, of course, you use no [ND] filter,” Tennant says. “It’s really fun to experiment with star trails, but that’s a whole different ball of wax: Your exposures might go on for several minutes. In any case, a tripod and a remote shutter trigger are key—keep your hands off the camera as much as possible. And of course it’s important to have movement in the scene.”
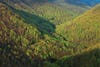
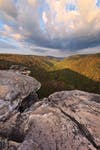
4. Try a Tele In combination with lens choices, the frame itself is a powerful tool. These two images were captured from the exact same spot, perched at the top of Lindy Point in Blackwater Falls State Park in West Virginia. “The vertical picture is the larger view of the scene, and then above is the zoomed-in portion,” Tennant explains.
“I wanted an alternate view but I’m technically not cropping the same shot,” he’s quick to add. “If I cropped the lower image and blew it up to the proportion of the upper one, it would probably be a pretty poor-quality image because I’d be grabbing such a tiny part of the frame.”
Instead, Tennant changed lenses and zoomed in. For the wider shot he used a 16–35mm f/2.8L II Canon EF ultrawide-angle lens; for the detail of the trees he switched to a 24–105mm f/4L zoom, fully extended to the telephoto end of the range. He used both lenses on his tripod-mounted 5D Mark II at similar exposures, but the different focal perspectives make the two photographs look as if they came from unrelated locations.
“I think of it as kind of majoring the minors or looking at a piece rather than the whole scene,” Tennant says. “It creates a different aesthetic. Sometimes it takes a little more thought to figure out what to exclude. If I want a tighter composition that’s also interesting, what do I need to leave out of the frame?”
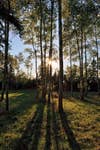
5. Let the Sunshine In While your Photo 101 textbook probably advises against it, “shooting into the sun can be very useful,” Tennant says. “It’s also very tricky.” To succeed, make sure the sunlight is at least partially obscured by objects and/or its direction. “You don’t want to shoot straight into high-noon sun,” Tennant says. “It’s not good for you or your camera. Go for the edges of the day, either sunrise or sunset, when the sun is low on the horizon.”
He photographed the scene at right in late afternoon light in New York’s Adirondack State Park. “There’s just a little bit of sun peeking through to let you know it’s there, and to create that sunburst effect, which can add a nice touch to compositions,” Tennant says. “This light is warm and inviting. And it’s generally what the light is doing to the landscape around you that makes it ideal.”
Shooting in the other direction with the sun at your back, the forest would still look lovely. “But imagine that scene without the focal point of the sunburst—it would lack a little something,” he says. “It draws your eye to the image.” For shots like this, Tennant uses no filter—he even removes his customary circular polarizer. “Shooting into the sun, it’s better not to have any filter, because it can produce flare,” he says. “The more surfaces that the sun is going through, in your lens elements and filters, the more it creates those little flares and yellow spots in different parts of the image that can be distracting.”
The brightness of the sunburst called for both a fast shutter speed (1/200 sec) and a small aperture (f/22). “You might get a similar effect at f/11,” Tennant says, “but the idea in stopping it down so much is that’s when you get the interesting sunburst refractions. It has to do with the way the aperture blades in the lens work. And you just don’t get the rays coming out of that circle, that sunburst, when you’re shooting wide open.” Spoken like a true scientist—and true artist.
