Software Workshop: Using Anthropic’s PortraitPro For Fast Retouching
Quickly touch up your portraits with this software
The need for portrait retouching is practically a given, even if your subject is nearly flawless and your photographic talents outstanding. But making your clients—or family and friends—look their best can be time-consuming. Anthropics’ PortraitPro, recently updated to version 12, is an efficient, easy-to-use application that can make retouching quick and, when used skillfully, bring out the best in your portrait subjects. With presets or sliders (the latter offer more control), you can eliminate skin imperfections, enhance your subject’s features, adjust lighting, and even sculpt facial structure and change eye color. Moderation is key, though—in the end, you want your subject to look natural. Several editions of PortraitPro are available, all of which provide extensive retouching tools. This tutorial shows the Studio Edition.

Quick Tip Before you begin, go to PortraitPro > Preferences. Make sure the boxes for Don’t Save Over Original and Automatically Find Faces are checked. Check the box to have the program add the “_pp” suffix to saved images to identify the ones you’ve worked on. Review the other options and choose the ones that best fit your workflow.

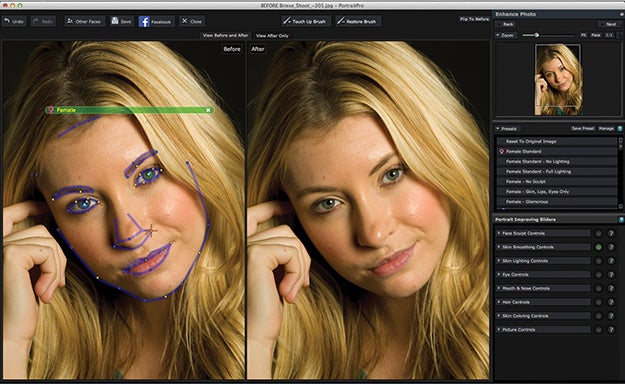
Step 1 Define your subject. In the Control Panel, click Open Image and select a photo. Then click the button that best matches the age range and gender of your subject. Make sure View Before and After is selected so you can compare the two as you work. Unless you want to use the default preset as a starting point, go to Presets and click Reset to Original Image.
Step 2 Adjust outlines and points. The software automatically identifies key facial features. To adjust outlines, move the mouse into the Before view. Click and drag the yellow squares and outlines to more accurately fit the subject’s features. Pay close attention to the corners and centers. Note that you may need to modify outline positions as you retouch.

Step 3 Tweak facial features. There’s no set order for making adjustments, but we usually start with the details, such as the mouth, eyes, and nose. For instance: Under Portrait Improving Sliders, click Face Sculpt Controls > Mouth Shape. Move the sliders until you like the expression. We added a slight smile and adjusted this model’s upper lip. Click the Face Sculpt Controls arrow to close that section, then switch to Mouth & Nose Controls. Increase lip saturation, darkness, and hue, then add shine with the Moisten Lips slider. Make other adjustments as needed.
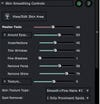
Step 4 Smooth the skin. Click the Skin Smoothing Controls > View/Edit Skin area. To mask the area of skin you want to adjust, first get the right brush size. Then select Extend or Cut Back to increase or decrease coverage as you paint the skin area you want to include or exclude. Watch the edges to avoid blurring details. Click OK to close the masking tools, then choose Skin Texture Type and Spot Removal options from the drop-down menus. Adjust characteristics via the sliders. But don’t overdo it!
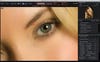
Step 5 Touch up as needed. If skin smoothing went too far in some areas—or missed a few spots—stay in Skin Smoothing mode to make repairs. Switch to View After Only > 1:1. Then click the Touch Up Brush in the upper toolbar. Use the Navigator to scroll around and find anything that Skin Smoothing missed, such as stray hairs or imperfections. Then brush over the affected area. Use the Restore Brush to bring back some of the original skin texture where it’s needed.

Final Step Save your work. When you’re ready, save your image or save the session. The former (use Save As or Save JPEG/TIFF/PNG) will save the image in a standard file format. The latter saves a PortraitPro file as a session, which maintains the outlines, point positions, and slider values so you can continue working on the image when you reopen it. If you’re unsure, save the image as a Session first, then choose Save JPEG/TIFF/PNG.