How To: Photograph During Bright Midday Sun
Turn a lighting faux pas into an element that adds punch to your photo.


Midday Sun Photography
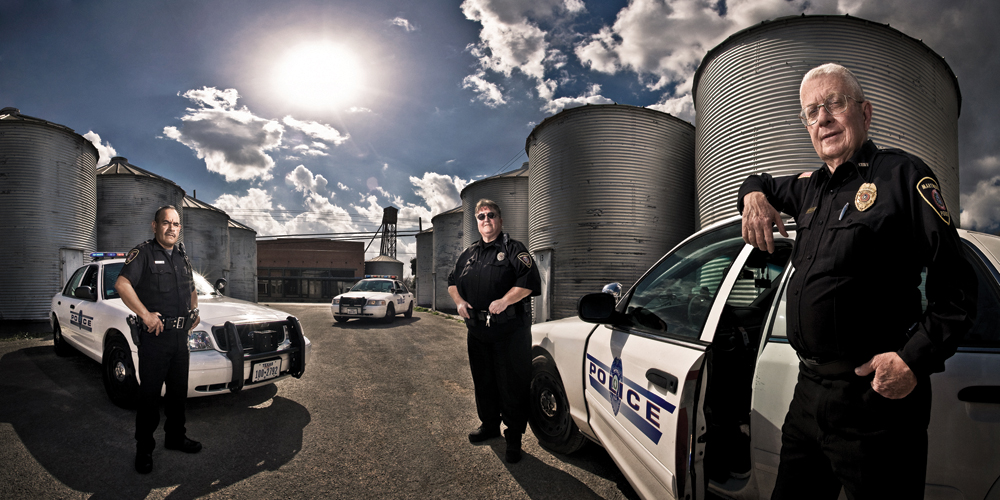
To add punch and power to this stitched, panoramic portrait of a small-town Texas police squad, Patrick Cavan Brown committed what is generally considered a lighting faux pas: He shot with the bright midday sun high and almost dead-center.
“I loved the way it looked and was determined to build my photograph around it,” explains the Asheville, NC-based pro photographer. “Not only is the sun beautiful, but it adds spectacular depth.”
Okay, we thought, but what about the deadly problems caused by shooting directly into the sun, such as washedout and desaturated color, missing-in-action subject detail, and comet-shaped lens aberrations? Brown has the right techniques—and equipment—to overcome those pitfalls:
Balancing sun- and strobe light.
“I knew when I saw the shadows created by full sunlight, that if I wanted to fill them in with my Canon Speedlites, the strobes would need to be powerful, plentiful, and close,” says Brown.
He used the four Speedlites direct and undiffused at or near their maximum power settings, so their specular effect would mimic sunlight. Their output was bright enough that the photographer could underexpose the scene by 2 stops, adding weight to the sky and shadows.
Controlling flare with careful lens selection.
Aiming a lens directly into the sun creates image-degrading flare that essentially fogs the sensor, eroding sharpness and detail. It can also cause comatic aberration (coma)—a comet-shaped flaring along the image edges. Because of their design and special coatings, some lenses are better at controlling flare and coma.
Brown started with a Canon 24–70mm f/2.8L lens for the four vertical images that went into this panorama. “That lens handled flare terribly, though, so I switched to my much older Canon 17–35mm f/2.8L, which proved far superior,” he recalls.
Polarizing to boost color and sharpness.
“The circular polarizing filter helped me shoot into the sun by darkening and maintaining color in the sky and detail in the clouds,” he says. “But it also acted as a neutraldensity filter, cutting light transmission through to the image sensor by 2 full stops.”
The dimming effect helped Brown capture a sharper photo, too. The reason? Instead of shooting at or near the minimum aperture on his lens, which introduces softness due to diffraction, he could set f/11—the sharpest aperture on his lens.
The diminished light transmission also let the photographer crank up his Speedlites to their maximum output without blowing out highlights, making it easier for him to balance strobe and bright sunlight.
To see Brown’s behind-the-scenes, time-lapse photography of this and other shoots, visit patrickcavanbrown.com.

Midday Sun Photography


