Recognizing good light for nature photography
Key tips for adjusting your approach to make the most of natural light.
It is often said that light is the lifeblood of photography. What exactly does that mean? Aside from the obvious fact that without illumination there would be no image, the quality and characteristics of light greatly determine the visual impact that a photograph will have with a viewer. Light, for better or worse, can turn an expertly composed scene into something bland and boring—or transform the ordinary into the extraordinary and magical.
For the novice, determining the difference between good and bad light can be confusing. There really is no objective scale for “good” and “bad,” only various degrees of accommodating light for different photographic situations. The key to mastering light is knowing how to match the available natural light to the appropriate scene, subject, or situation.
To help illuminate this process, let’s focus on three basic attributes of light: intensity, color, and direction.
The Brightness Factor
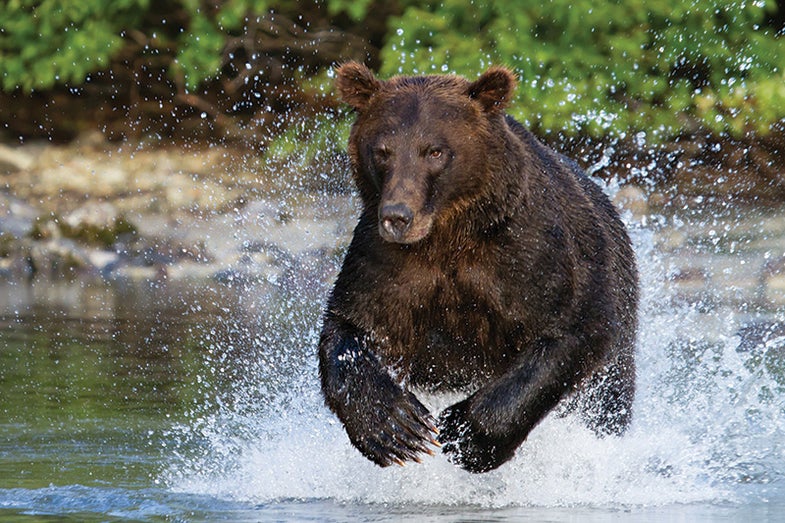
Intensity refers to the volume or amount of light the scene or subject receives from the sun, the primary light source for outdoor photography. Light of high intensity is most closely associated with the bright sun at midday, when many photographers put their cameras away and take their naps.
Pejoratively referred to as harsh or even idle light, the bright midday sun is usable as long as the entire subject or scene is evenly illuminated, avoiding distracting shadows and bright highlights (as seen in my photo of a charging bear). Working with natural reflectors—such as the surface of a lake—can fill in the darker shadows and make for a more balanced exposure.
Light of low intensity is soft and diffused, ideal for revealing important details in intimate landscapes and macro photos. Cloudy and overcast skies create these conditions, and a bright, overcast, midday sky is the best scenario. Soft light evenly illuminates the scene, and its tonal range is compressed. Waterfalls and stream scenes are ideal in cloudy, low-intensity light, as long as the featureless white skies are omitted from the composition.
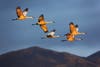
Bounced light and glow are forms of soft light reflected from either clouds or some other surface, such as buildings or canyon walls. Glow occurs when the sole source of light reflects from the sky, usually during the twilight hours immediately before sunrise and after sunset (as in the picture of cranes in flight). Depending on whether there are clouds, the light can turn colorful shades of pink, red, or gold. Glow and bounced light are similar to overcast light in that it is soft and creates muted shadows and highlights.
Chiaroscuro (an Italian term meaning “light-dark”) describes the interplay of both direct light and shadows across the landscape—essentially variations in light intensity within a given scene. This type of lighting has often been employed by master artists to help create a sense of depth in their paintings. Partly cloudy days, with mottled sunlight cast across the landscape, create this condition, which can be utilized for a distinctive textured effect.
Powerful Hues
The light’s color can have strong implications for the impact of an image. The color temperature—its coolness or warmth—can be “corrected” by the white balance setting either in the digital camera (if shooting JPEGs) or on your computer during the processing and conversion of RAW files. But don’t be too hasty in removing these useful color shifts.
Cool light is most common during the “blue hour”—about an hour before sunrise and an hour after sunset—and in shade on bright days. Twilight blues add a moody, meloncholy feeling to an image (as in the photo of the blue mountains), while a snow-covered hillside or icy glacier can be rendered cool to give the psychological feeling of physical coldness.

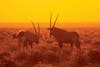
As long as there are no clouds blocking the sun, the “golden hour” can flood a scene with a low-angled, warm glow both flattering to subjects and pleasing to the eyes (as in the shot of the grazing antelopes). Viewers tend to respond more favorably to warm images than cool ones.
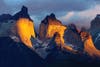
The light near sunrise or sunset may provide the opportunity to include both warm and cool light in the same image. Look for blue tones in the shadows that contrast nicely with the warm yellows and oranges from the available sunlight. You can use color contrasts—such as the combination of blue and yellow in the Torres del Paine photo—to render an image much more dynamic and captivating than a strictly warm or cool scene.
Pointing the Way
There are basically three variations to consider with light direction: front light, sidelight, and backlight. Front lighting occurs when the sun is directly behind you, the photographer. If your shadow is pointing at or near your subject, you can be sure you are getting full front light. While this is relatively easy to manage—as the scene or subject is evenly illuminated and there are no shadows to worry about—the results can be boring and predictable, with little drama, and the subject often appears flat or two-dimensional.
Sidelighting—the effect of the sun illuminating the scene at about a 90-degree angle—is perfect for emphasizing texture, depth, or patterns. Sidelight can create the illusion of three-dimensional depth by creating separation between different elements in the scene. For example, a sand dune, where the ripples and texture in the sand are important elements in the image, is best captured with strong sidelighting.
Backlit scenes or subjects create numerous photographic difficulties—which is why beginners tend to avoid them—but they can also offer visual rewards. Backlighting can create highly dramatic effects, provided a little care is taken in the process. Subjects with translucent materials—such as grasses, fall foliage, or animal fur—can come alive with a gorgeous backlit glow or rim light.
One of the difficulties photographers encounter when using backlight is exposure. If your subject is placed in front of a strong light source, the general tendency of any camera’s metering system is to render it as underexposed. Unless you actually intend to create a silhouette, adding 1 or 2 stops of light will preserve important details in the subject.
If the sun’s rays strike the front element of the lens when attempting a backlit scene, the results may include nasty flare, ghosting, or light fogging. A lens hood can help if the sun’s rays are at the right angle, but it will be of little use when shooting directly into the sun. Try shielding the lens from any direct sunlight with your hand, a hat, or a book, as long as it doesn’t interfere with the image. Otherwise, try positioning the sun behind a tree or other obstruction, if the composition allows for it.
The challenge is to adjust your approach to the situation at hand. Once you learn how to manage variances in the intensity, color, and direction of natural light, the world is your canvas.
South Carolina–based nature and travel photographer Richard Bernabe has written many photo books and leads workshops around the world.