Software Workshop: Smartphone Processing with Snapseed
Combine high-quality camera capture with the ease of processing and sharing with a smartphone
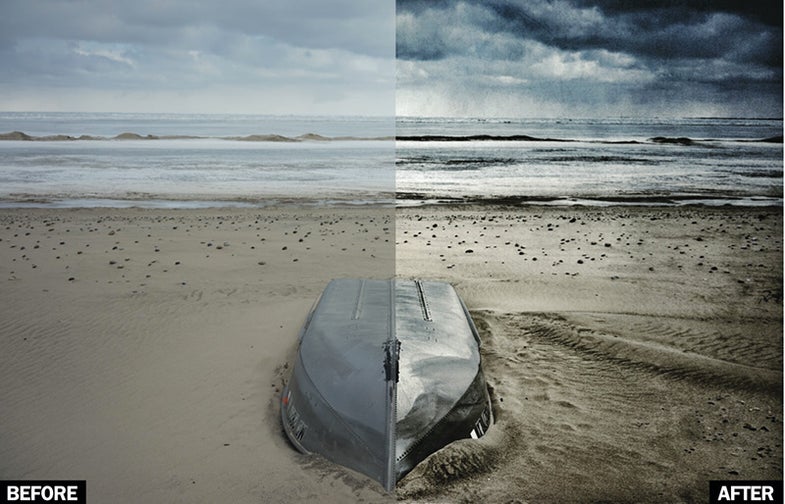

Eismann shot this beach scene with a Sony a7R, then edited it on her iPhone in Snapseed before sharing it.
From kids to professional photographers, everyone is snapping more and more images around the clock with smartphones and immediately sharing them via Instagram, Facebook, Imgur, or Tumblr. It’s fun, it’s easy, but in some cases, it just isn’t satisfying. Why? Smartphones’ built-in cameras work really well, but not with high-contrast, low-light, or fast-action scenes.
But with the recent develop-ment of cameras offering wireless connectivity, you can take advantage of the best your “real” camera has to offer—a larger sensor, higher bit-depth, better and interchangeable lenses, fabulous low-light performance, and high-speed shooting. It’s easy to transfer your high-quality photographs to your smartphone for creative processing and instant sharing.

Step 1
To transfer files from a Sony camera to an Apple or Android phone, make sure that the Sony PlayMemories Mobile app is installed on the phone. Turn on the camera and access the wireless controls via the camera control menu, and select Send to Smartphone. Then use the phone’s network settings to log into the camera’s wireless network. In the camera menu you can select the image(s) on the camera, but I find it much easier to use the Select on Smartphone option to access a thumbnail grid of all the images on the camera memory card. Check the small square checkbox in the upper left corner of the images you want to copy to the phone and tap Copy.

Step 2
Now that the images are in your phone’s picture folder or image library, the fun can begin! In this example, I used my go-to image-processing app, Snapseed, to enhance and interpret the file. To open images from your phone into Snapseed, either navigate from the Snapseed interface to the Photo Library or start in the Photo Library and copy and paste the
image into Snapseed.

Step 3
In Snapseed, select the processing type from the 15 icons along the bottom or side of the screen. After you have entered a specific enhancement module, click on the image and move up or down to access the module-specific controls and swipe left or right to adjust the settings. To apply a setting, click on the checkmark on the lower right corner; to cancel, click on the X on the lower left hand corner; to see an image with and without the enhancement, click on the mountain icon in the upper right-hand corner. (See Step 4.) Best of all, after accepting a module-specific change, to see an absolute before-and-after version, press and hold on the image to see how your processing is improving it.

Step 4
Enhance the image to improve tonality and color and to crop as needed. First, use Auto Correct for contrast and color, which I often reduce by half. Then use Tune Image to adjust tonality with the Ambience control, in which a move to the right increases moodiness, tonality, and saturation, while a move to the left boosts brightness and contrast. Fine-tune the overall image with Tune Image > Brightness, Saturation, and Shadows controls.
Step 5
Interpret the image with color, texture, softening and frames. To shape the image and tonal depth, use either Details > Structure to enhance texture or Drama > Drama 1 or 2 or Dark 1 or 2 to add an HDR (high dynamic range) effect without softening the image. With both of these controls, always reduce the default strength to avoid creating strong haloing or undesired artifacts. The Vintage model will let you shift color and add texture.** Use Center Focus to add a light or dark vignette, edge blurs, and center brightness, and go to Frames to add (you guessed it) a Frame. **
In Frames select the desired frame and tap the frame icon to flip the frame edges. Click on the Control Gear and use Format to enlarge or reduce the size of the frame and Colorized to add or remove a tint of the light frame areas.
Snapseed offers many more controls, including Black & White, Selective Adjustments, HDR Scape, and Retrolux; you can apply as few or as many enhancements as you want. Of course, you can also experiment with other apps to further interpret the image, but no amount of great processing can rescue a weak photo.

Final Step
We create images to explore the world and, very importantly, share them with friends, family, and colleagues. You can share the processed image directly from Snapseed to any standard social media site such as Facebook, Google+, or Twitter. With your phone you always have a camera and a darkroom in your pocket, but with the combination of wireless connections from higher-quality cameras to phone, you gain the benefit of better lenses, larger sensors, and higher resolution. It’s a match made in digital heaven!