How-To: Shoot an #IceBucketChallenge Speedlite Portrait Photo
Get a cool shot for a great cause
If you’ve been on any social media network at all in the past few weeks, you’re almost certainly familiar with the Ice Bucket Challenge. For the unfamiliar, it’s a viral social media campaign that challenges people to raise money to help fund research to cure ALS. You have to make a video while you dump a bucket of ice water on your own head, then call out some friends who have 24 hours to then complete the challenge themselves. If you do it, you’re on the hook for a small donation ($10-$25). If you opt out, you’re on the hook for $100.

I am an extremely handsome man
It’s fun and it serves a great cause, but since I’m a photographer, I thought a portrait might fit my personality better than a video. So, I busted out a few lights and made myself a few portraits, then made a donation. I had a surprising number of people message me to ask how I did it, so I figured a tutorial was in order. While I’m not officially challenging any of you, making a donation certainly would’t hurt. And feel free to share your videos and photos in the comments.
Location
Since we were going to be throwing water all over the place, it was clear that we needed to be outside, so I simply went out into my yard at roughly 6:30 in the evening. You wouldn’t guess by the dark black in the background, but the sun was still well above the horizon when we shot this.

Setting up the shot
I marked a spot in the grass where the subject needed to stand, that way I didn’t need to move the lights or adjust their power once they were in place. I decided to use my Canon 7D with a 70-200mm lens because it would allow me to get pretty far away from all that splattering water.
Pre-flash exposure
I wanted to make the background as dark as possible, and use a very narrow aperture in order to make sure all the water splashing around the frame would be in focus. So, I started at F/11 with a shutter speed of 1/200th sec, which is the fastest my flashes will go without going into high-speed sync. At ISO 100, this made the background pretty much black, so we were already good to go.
Adding flashes
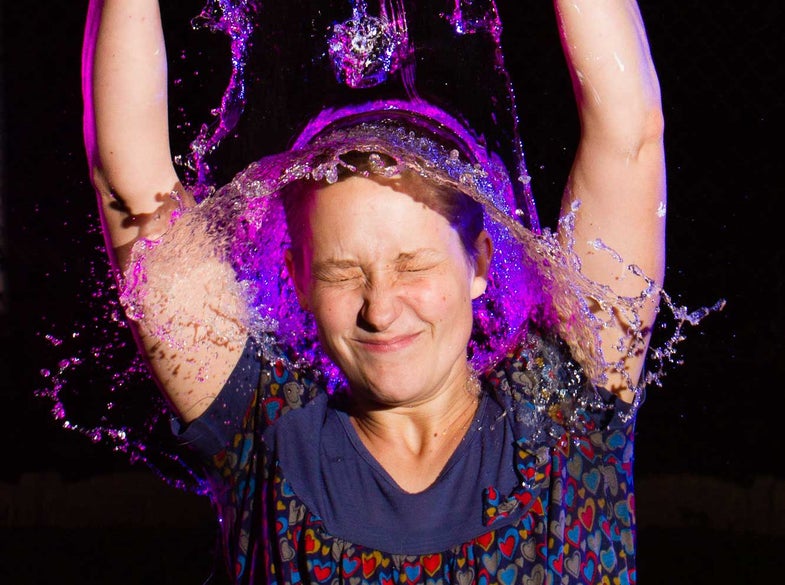
I positioned a Canon 580 EX slightly to camera right as the main light with no modifier. I left the flash head zoomed out to 24mm so it would cover all of the water in addition to the subject. Then, I placed two flashes (a canon 580 EX and a Canon 420 EX) behind the subject. Each rear flash was between five and six feet behind the subject and about 3.5-feet to either side. That gave us enough room that the flashes wouldn’t get splashed and we wouldn’t need to crank the power level on the flashes too hard.
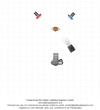
The rear flash to camera left has a purple gel placed over it, while the less-powerful flash to camera right has a blue gel taped onto it. The gels aren’t necessary, but I really wanted the images to stand-out to people who might be scrolling quickly through their social media feeds. The blast of color helps with that. But, the effect would still be very cool without it.
After a little tweaking, I ended up keeping the power level of each flash at just over half-power. With fresh batteries, it let me get a few pops off during each pour to minimize cold, we do-overs.
Getting the shot
The timing was one of the trickiest things about the whole process. Getting a great splash required precise timing. For the self-dumping shots, it wasn’t that difficult, but coordinating with a dedicated pourer for the kid shots too more finagling. Counting down from three helped, and shooting with both eyes open helped as well. Framing things a little looser and cropping in later also came in handy.
There’s a lot of action happening in the scene, but our subject remains static, which means taking autofocus out of the equation all together is a good idea. You don’t want the AF locking onto an errant water droplet and dragging the focus away from the person taking the challenge. You can lock the AF on the person’s face before they start the water dumping motion, or, use manual focus from the start and just maintain your distance from the subject. Since I was at F/11, I had quite a bit of leeway anyway.

Editing
I was intentionally using hard light because I wanted a lot of contrast and very clearly defined edges and shadows on the water droplets. Because of this, adding even a bit more contrast during processing made the effect even more pronounced. I also added a small amount of clarity in Lightroom for the same reason.
There were still a few visible details left in the background of the image due to spill from the flashes, so I did some simple burning using the Lightroom paintbrush tool.
Other options to explore
Just because I decided to go crazy with the lights doesn’t mean it’s the only way to do it. In fact, there are a lot of other ways to get a great picture with water splatter. Here are a few things to remember when setting up:
- Keep your shutter speed as fast as you can if you don’t plan on using a flash. Even if that means cranking up the ISO. 1/500th even seemed a little slow when I was experimenting with it. Getting up over 1/1000th seems ideal.
- This is one of the rare occasions where using an on-camera flash works totally fine. It will help you freeze the action and because water will be obscuring the face a lot of the time, the shortfalls of the harsh light will actually work in your favor for once.
- Picking a plain background (or using flash and keeping your ambient exposure very dark) will help the water stand out from the background. Leaves and other busy patters make the droplets harder for the eye to pick out.
- Using a light source from behind your subject helps accentuate the water. It doesn’t have to be a flash, either. You can use a lamp, or even the sun if you want to. The trick here is that you’ll need to keep your shutter speed fast even though you’re using a flash, otherwise you’ll get blur.
- Give yourself enough depth for field so you can keep most of the water in focus. The sharp droplets really do draw the eye. When they get blurry, the effect isn’t as pronounced. Of course, you may like that better, so it’s really up to you.
- Remember that water is bad for camera gear so long lenses are your friend. Just be sure to back up enough to leave room in the frame to catch all the splashes.

Oh, and if you’re doing this specifically for the #icebucketchallenge, then be sure to donate!
