How To: Plan Your Night Photography For Perfect Star Trails
There's a lot to think about when planning a photo of the night sky, but the dramatic results are always worth it
As the image sensors in digital cameras continue to improve, night photography is becoming increasingly popular and much more accessible. It’s now possible to shoot in a complete lack of light without the need for a pro-grade camera. Star trails, an exciting sub-genre of night photography, takes already long exposures and stretches them into hours to capture the stars as the Earth rotates throughout the night. There are two approaches to shooting star trails: you can use a single long exposure with a wide aperture lens and a low ISO or stack multiple long exposures using settings more common in night photography. Although this article will primarily discuss the multiple exposure method, there are many tips that apply to both approaches.

Night Photography Tips
Location
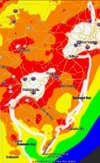
As with most photography, planning your shot is a key to its success. In addition to the normal factors, like weather, you’ll need to take a few other items in to consideration. When choosing the location of your shoot, you’ll want to consult a light pollution map (see below) to help find a suitable area. As you get further away from light polluted skies, you’ll be able to capture more stars in your frame and ultimately create a more exciting final image.
Once you have a general location selected, you can use resources like Google Maps to help find more specific areas that may have something interesting in your foreground.
Moon Phase
Before deciding on this next element, you’ll next need to visualize how you want your final image to appear. For the darkest skies possible, you’ll be shooting near or during the New Moon phase. With a lack of natural or artificial light, your foreground may show up as a silhouette.
If your intention is to have the star trails appear over a well-lit landscape, you’ll want to shoot while the Moon is near quarter lit. If you shoot during a Full Moon, the landscape will appear very bright and many of the stars will be washed out. There is not a right or wrong decision when it comes to these options, it’s all personal preference dependent on your desired results.
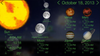
The Moon phase, as well as its rise and set time, can be found on most weather websites. Alternatively, you can also use a mobile astronomy app on your smart phone, such as StarWalk, PhotoPills, or Mobile Observatory.
Cardinal Direction
This next factor can make or break an image. It certainly will make planning your shot a little more difficult, but it can lead to spectacular results. Depending on which direction your camera is facing when you shoot, the stars will create different patterns in the sky over the course of the night. Once you have a better understanding of this, you can use the patterns the stars will create to help build a stronger composition.
Quite often, the elements surrounding you will dictate which direction you’re able to face while shooting. Shooting in any direction that faces a larger city in the distance will often result in portions of your image having less stars than others. This unevenness can throw off the balance of the images and ruin hours of work.
Let’s take a look at how facing your camera in different directions will yield different results.
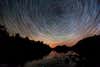
Placing Polaris, the North Star, in your frame will create the more popular circular pattern. Stars closer to Polaris will appear to move less, so a higher number of exposures will help yield more exciting results. This is a great starting point if you have never photographed star trails. The eye-catching circular pattern is a bit easier to frame and also slightly more forgiving when it comes to planning your composition.
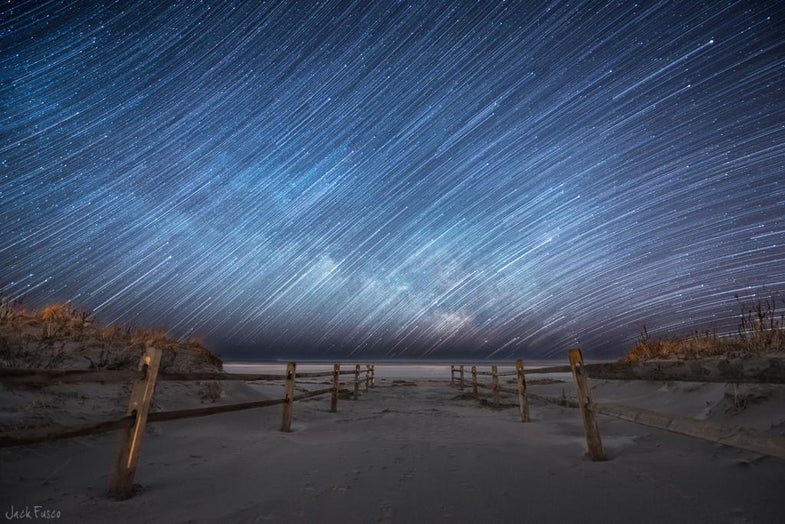
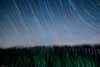
Placing the ecliptic (an imaginary line on which the planets travel along) in your frame while facing South / East will result in the stars traveling in three different directions. Along the ecliptic, the stars will have a very straight, horizontal path across your photo. On either side of the ecliptic, the stars will appear to curve away, towards either pole, North or South. The image below shows the ecliptic slightly off center to place the Milky Way closer to the opening of the pathway. This orientation can be slightly more difficult as an incorrectly placed ecliptic will result in awkwardly balanced star trails.

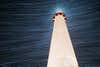
Facing South, in my opinion, creates some of the most difficult trail patterns to successfully incorporate in to your shot. Over time, the trails will form somewhat of a wall of stars. While difficult, shooting near dark skies can certainly aid in creating a unique and appealing image. In the example below, I decided to use this pattern to help highlight the Cape May Lighthouse.
Facing West / Northwest, as seen in this photo, will product similar results to shooting East / Northeast.
Shoot Duration
After you have your composition planned, one final and very important factor will need to be decided. The amount of time you spending shooting your star trails can create vastly different results. Depending on the vision you have for your final image, you may find yourself shooting anywhere from 20 minutes to an entire night in an effort to come home with one image. Shorter star trails are often shot while the Moon is present and the landscape is well-lit. Since there are less visible stars during this time, those that do appear will serve as more of a subtle compliment to the Moonlit foreground instead of the main draw to the image. On the other hand, longer star trails will often immediately stand out and if they are accompanied with the right foreground will really elevate an image.
To help illustrate this point, I’ve taken individual exposures and stacked the images to create the star trails at 15 minute intervals. This will give you a better idea of the impact of shooting for different lengths of times will achieve.
25 Seconds: 1 Exposure

15 Minutes – 36 Exposures
30 Minutes: 72 Exposures
45 Minutes: 108 Exposures
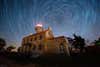
60 Minutes: 144 Exposures
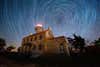
75 Minutes: 180 Exposures
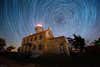
90 Minutes: 216 Exposures
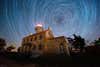
There is nothing wrong with the length of the star trails in any of the images above; they simply show that more time spent shooting can lead to more dramatic results.
All of these factors can play an important role when planning a successful shoot. When they’re all taken in to consideration and planned for accordingly, they can help ensure you come home with an image to be proud to show the world.
EXTRA TIPS
- Star trails can often take a few hundred photos to create your final shot. With this in mind, plan accordingly when packing memory cards. It’s always better to have extra then to run out part way through the night.
- Make sure your batteries are fully charged and always bring extra! Temperatures are often colder at night and can drain batteries quicker than normal.
- If possible, bring a second camera to shoot single images with. When you’re traveling, it can be difficult to give your trails the proper time as it may be taking away from time you could possibly be obtaining additional images.
Jack Fusco is a photographer based in New Jersey. You can see more of his work on his site and follow him on Facebook. He also teaches photography workshops if you want to learn more about night photography.