How to: Using Backlight to Photograph Glassware
Lighting tricks for glamorizing glass
For two solid weeks in 2012, Taka Kawachi, a product specialist who works out of a studio in Nyack, NY, shot nothing but glassware for a major department store chain. Juice, highball, and shot glasses, tumblers, stemware of every size and shape, and, yes, pilsner glasses and beer mugs. If he wasn’t a master of lighting glass at the project’s outset, he certainly was by its end.
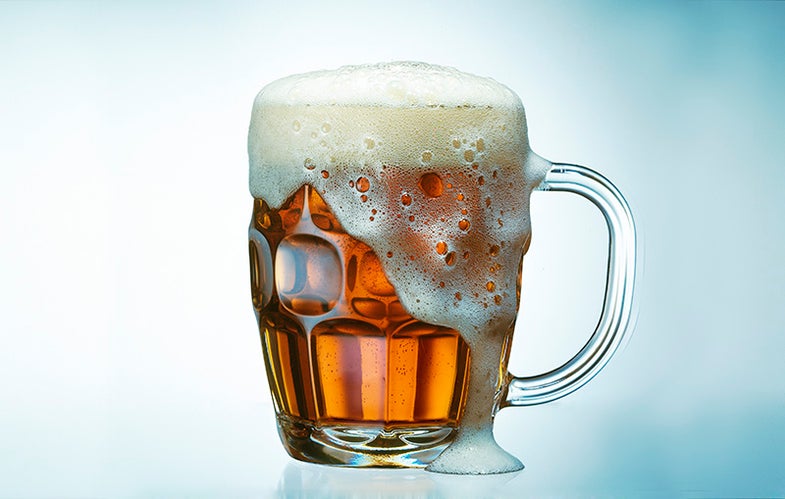
To light this frothy stein, Kawachi said his challenges were threefold: He wanted to highlight the mug’s transparency while exaggerating the amber glow of its contents; to capture the concave texturing of the mug’s surface; and to bring out the mug’s outer edges to define its contours. Here’s how this still-life pro handled each of these tasks.
• Highlighting transparency: Kawachi used the classic technique of backlighting the glass. This prevented unwanted reflections from forming on the front of the mug, which would have compromised the transparency of the glass and desaturated the attractive amber glow of the lager.
• Capturing surface detail: While he wanted to minimize surface reflections, Kawachi didn’t want to eliminate them completely. By placing a relatively weak, diffused white light source to the left of his subject, the photographer introduced faint white reflections on the mug’s front surfaces. They subtly convey its indentations.
• Defining contours: To etch the mug’s handle and surface ribbing, Kawachi flanked the glass with black. To the left and right sides he placed large black flags, and he worked in a completely darkened studio. Both strategies created strong black lines that helped exaggerate texture and the mug’s shape.
Taka Kawachi housed two Profoto strobe heads in homemade softboxes (A) to side- and backlight his subject. Both sources were further diffused through sheets of translucent Plexiglas (B). For a stronger, contrastier light for the beer’s foamy white head, Kawachi top-lit the mug with a third, undiffused Profoto head (C). Two black flags (D) outlined select glass surfaces, and a large, white V-card (E) provided subtle fill lighting to the right side of the mug. To support his subject, Kawachi used an expensive panel of “water” glass (F), an unusually pure form of glass whose bubble-, ripple-, and color-free characteristics can make it relatively invisible to the camera. Why DIY softboxes? “Commercially available softboxes are designed for portraits and usually give off very flat, even light,” says Kawachi. “For products, I need something with more contrast.” He gets it by lining the interior of his foamcore softboxes with aluminum foil.
Illustration: Kris Holland/Mafic Studios