Behind the Shot: Peter Schafrick’s Spinning Paint Photo
Find inspiration in the play of babes
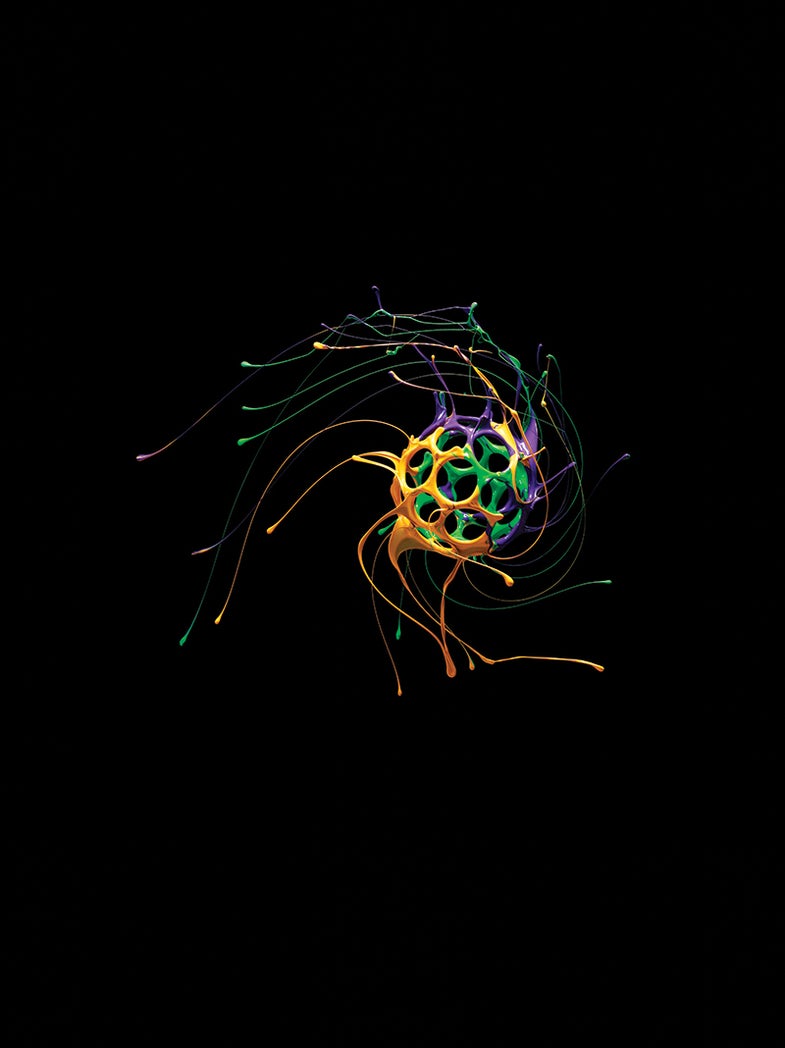
You never know when or where inspiration will strike. For Peter Schafrick, it was a hot and sultry afternoon last July in his very own backyard. The Toronto product whiz (schafrick.com) is known as a specialist in poured, splashed, and thrown liquids, so it falls to reason that he would have been observing the water while watching his two young children play in a back yard wading pool.
As the kids hurled toys back and forth, the photographer noticed how an airborne plastic ball threw water in intricately formed tendrils. That moment inspired a long and involved period of experimentation that resulted in the image to the left.
To get the shot, Schafrick faced two distinct challenges.
• Spinning the prop. His first task was to set his prop—the plastic ball—spinning, and he started by attaching it to the shaft of a rotary motor. “Because the motor simply accelerated, though, it gave me only a limited way to control how the liquid flew away from the object,” he remembers. So, working with a prop maker, he devised a manually spinning device. It allowed better control of the speed and momentum of the ball’s rotation, which made the variously sized, elegantly arced tendrils possible.
• Freezing the action. This required a very short flash duration. Short flash durations are achieved by setting strobes to minimum power, but this meant less light, larger apertures, and a loss of depth of field. To solve this, Schafrick added low power strobes, but this introduced another problem: All the flash heads had to fire simultaneously. Using their [optical] cells to sync the packs meant one pack fired and it triggered the others. “Since they didn’t actually fire simultaneously, motion blur resulted. The only way to ensure simultaneous firing was to sync with a flash trigger like my PocketWizard Plus II. Another way to prevent motion blur is to have all the packs fire at the same output,” Schafrick explains.
STEP 1
Gather your gear and props. Almost any DSLR that accepts a wireless flash trigger will work, and you want strobes that allow manual flash control so you can set low power settings for short flash durations. Paints can be off-the-shelf latex, and should be of bold and contrasting colors.
STEP 2
Find or build a spinning mechanism. The “spinster,” as Schafrick calls it, will attach to your prop with a shaft, and should give you variable control of spin speed. You will also need some means of “hiding” your device, such as behind black seamless.
STEP 3
Prep your set and prop. Hang plastic sheeting over a plastic wading pool. The sheeting will protect the lights and studio, while the pool will catch drips. For protection, cover your camera and lens in plastic and use a UV filter on the lens. An inexpensive underwater housing will also do. To apply the paint, carefully dip your prop’s top and bottom halves separately into contrasting colors of paint, before attaching it to your rotary device.
STEP 4
Make your exposure. Turn any room lights out, open the camera shutter, start the rotary device, fire the strobe, and close the shutter. Clean your prop and repeat.
FINAL STEP
Experiment like crazy. Spin your prop at various speeds, and, if necessary, adjust the viscosity of the paints until you get a look you like.