How-To: Abstract Bubble Photography
Backlight bubbles to emphasize their crisp edges
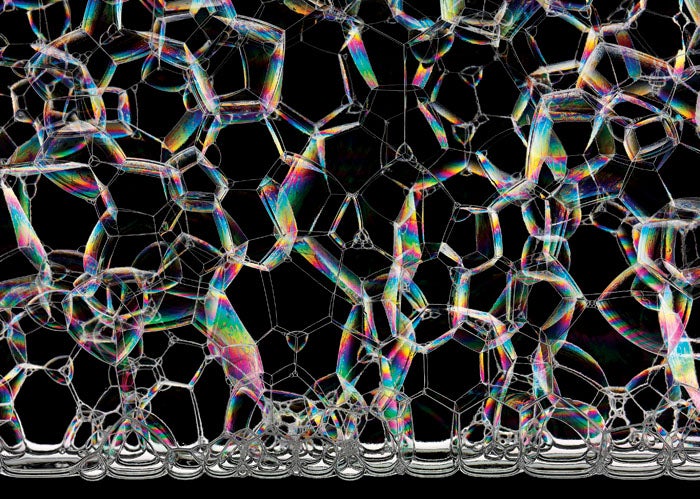
The work of New York studio pro Satoshi is well known to Pop Photo readers—his killer product shots grace “The Year’s Biggest Deals” in September’s print issue (On newsstands now!). But with the photo above, we present another side of this lord of lighting: his ability to capture liquid in its many forms.
Bubbles have always fascinated Satoshi, and for this project he wanted a distinctly architectural look.“I knew not to front-light the bubbles,” the photographer explains. “It would have created busy highlights, drawing attention to the bubbles’ surfaces, not to their crisp edges.”
Instead, he chose a form of backlighting typically used for glass products such as cosmetic packaging and glassware. “It’s especially good for subjects that have crisp edges to define and a minimum of midtone detail to record. This type of lighting from behind gives you maximum control over edge highlights,” Satoshi says. The setup caption below explains how.
Photographing bubbles is a specialized art. Satoshi offers these tips for meeting its unique challenges:
● REFINE THE BUBBLE SOLUTION. Start with a child’s soapy bubble liquid. Its oiliness will produce the signature rainbow-like sheen in this photo. By adding glycerin, you can extend the life of the bubbles, but glycerin’s viscosity tends to produce uniformly large bubbles. For variety in bubble size, thin the soap and glycerin solution with tap water.
● CHOOSE THE RIGHT CONTAINER. A narrow blowing chamber produces interesting polygon shapes instead of more common smooth, convex bubbles.
● FORM THE BUBBLES. Use a plastic straw; connect several if one is too short. To fine-tune bubble shape and distribution, alternate short puffs with longer continuous blowing as you move the straw through the liquid in a zigzag pattern.
Kris Holland/Mafic Studios
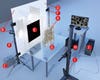
To emphatically highlight just the edges of the bubbles in a rectangular flower vase or bubble chamber (A), Satoshi placed four Broncolor 1600 Watt-second strobe heads (B) powered by two Broncolor powerpacks (C) behind a large 1/8-inch thick sheet of translucent Plexiglas** (D)**. (Only two of the heads are visible here.)He positioned the strobes above, below, and to the left and right of a sheet of matte-black flocking paper** (E)**, sized slightly larger than the bubble chamber and taped to the Plexi. He suspended the Plexiglas with clamps and lightstands (F) and set the chamber on a glass-topped table (G). His camera was a Sinar P3 (H) with a Sinar 75H digital back and Rodenstock 120mm f/5.6 Macro, which he mounted on a camera stand** (I)** and shot tethered to a nearby computer (J). To light the bubbles evenly, Satoshi played with the positioning of the lights around the black flocking paper, and he adjusted the relative distances of lights, Plexiglas, and vase. The four heads were all set to the same output.