Software Workshop: What’s New in Adobe Lightroom 5?
Explore the exciting new tools in the free beta of Adobe's Photoshop Lightroom 5
Debbie Grossman
The Lightroom 5 Beta has been available for some time now, but the official version is now ready for sale. It costs the same $149 ($79 if you’re upgrading), but comes with a whole pile of new functions and fixes. Here’s a look at what’s new so you can best decide whether you should make the leap.
Among the best new features in the Develop module are three that make retouching easier and more efficient: The Upright Lens Correction tool can automatically level the horizon and minimize vertical distortion; you can use the Visualize Spots setting to find and then quickly fix dots caused by dust on the sensor; and, in a long-anticipated move, Adobe has given the clone/heal tool the ability to be painted on to fix irregular, non-circular areas. (Unfortunately this isn’t pressure-sensitive for now.)
Download the free public beta at labs.adobe.com to try these tools for yourself.
Step 1
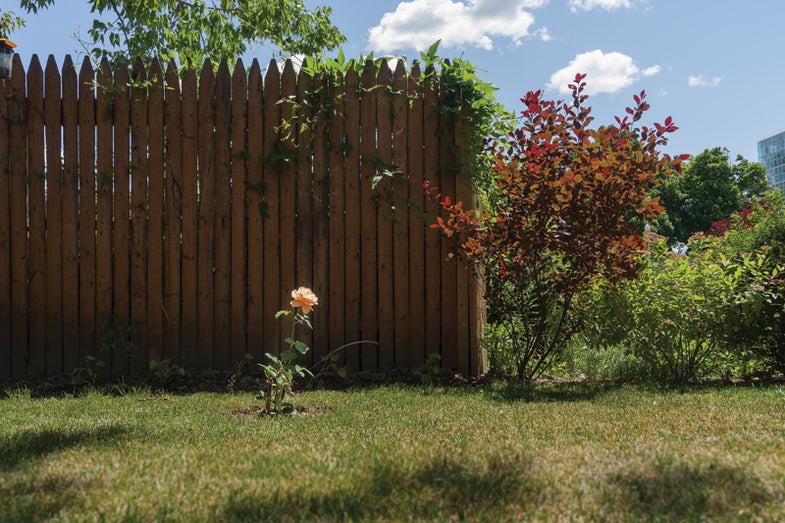
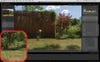
At first glance, Lightroom 5 looks very similar to Lightroom 4. You’ll only notice the changes as you begin to process your images. This flower photo is far too high in contrast—unfortunately, it was taken in bright midday sun. The image has other problems, too. There were dust spots on the camera’s sensor (visible in the sky), the perspective and level is skewed, and the flower doesn’t stand out enough as a subject. Start by addressing the exposure and lowering the overall contrast and fixing the white balance. These sliders work the same way as in LR4
Step 2
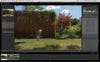
Corrections for both lens and perspective distortion keep getting better. One of the best new features in the Lightroom 5 beta is the Upright Lens Correction tool. **Check the boxes to Enable Profile Corrections and Remove Chromatic Aberration—the tool works best when those are turned on. **
_Start with Auto _
_Click Auto to level the horizon and fix Vertical distortion all at once. It seems to work very well automatically, but if you need to, fine-tune the fix by going to the Manual tab and adjusting its sliders._
Step 3
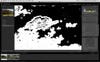
When dust gets on your sensor, it makes dots on your images. Removing them is easy, but sometimes spots you can hardly see on your display will show up when you print. Lightroom 5 can help you find and eliminate them. Choose Clone/Heal, and you’ll see a new menu item below your image. Check the box for Visualize Spots. Now the specks in the top-right corner of the image are much more clear. Use the Healing tool to remove them, and uncheck the Visualize Spots box to check your work.
Step 4
With every new iteration of Lightroom, it seems there are more retouching tools that allow you to avoid Photoshop proper. LR5 introduces one that users have been hoping for: a cloning and healing brush that lets you actually paint over an area rather than just clicking a spot. Paint over the branch, then drag to select your source point.
Step 5
Another new tool among the selective adjustments is the Radial Filter, which allows you to select and apply adjustments to a circlular or oval-shaped area. It’s a great way to draw attention to a given region of your image. To bring out the flower, use the Radial tool to select it. Check the Invert Mask box to work on the thing you circled, rather than the area outside. Up the Shadows and Clarity to make the rose pop.
Radial Filter Tricks
This filter can be useful for quickly selecting a region when you need to fix the white balance in mixed-lighting scenes. Use it with Sharpness to add blur to everything outside your selection. Add multiple circles to duplicate an effect in more than one area. And, yes, you can desaturate the whole image surrounding what is circled—but we hope you will do so sparingly.
Final Step

Now for some finishing touches. Grab the Graduated Filter tool and set it to Sharpness. Crank it down and click and drag up from the bottom of the image to add some blur to the foreground and further draw focus to the flower. Hit the H key to hide the tool and see its effect. Finally, use the Adjustment Brush to add a bit more saturation to the blossom.