Software Workshop: Convert A Photo To Black-and-White
Photographer Chris Clor takes you behind the scenes in his digital darkroom as he transforms an image from humdrum color to stunning black-and-white.

Chris Clor’s b&w photographs are stunning, but often begin as humdrum color pictures. Want to convert a color shot? We got Clor to share his secrets so you can try it, too.
Step 1: Choose & Convert
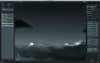
When picking a photo to transform, Clor looks for images that can be easily manipulated, in which the colors differ enough to be shifted independently. For example, he likes foliage with yellows and greens that aren’t matched in color elsewhere in the frame. He also prefers a blue sky that can be easily darkened. Then he opens his RAW file using Photoshop CS5’s built-in Adobe Camera Raw converter. Clor keeps the image flat, not clipping highlights or shadows. Then it’s on to Photoshop.
Step 2: Turn It B&W
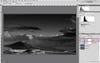
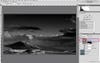
Photoshop’s built-in Black & White tool works best on an Adjustment Layer.
Duping the background layer is Clor’s next step and it should be yours, as well. Start your retouching on the duplicated layer; he’ll often get rid of an errant telephone pole or a sensor spot he missed in ACR. For this shot, Clor couldn’t help but capture the corner of a roof in the bottom left of the photo (you can see it in Step 1). So he cropped it out.
Then it’s time for black-and-white conversion, which Clor does simply with Photoshop’s built-in tool on an Adjustment Layer. His trick for using it efficiently? Somewhat counterintuitively, he does not use it to create contrast or drama, which can produce banding later. Instead he nudges the sliders to emphasize the difference in tones. Here, he pushed the yellows, which made up most of the tones of the foliage, and the reds, which brightened the tones of the shore and visible soil.
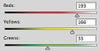
Adjust The Conversion_ As you gain experience, you’ll know which sliders to move, and how much to push them._
Step 3: Add Contrast
Use a Levels Adjustment Layer to add contrast.
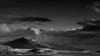
Next, he creates a Levels Adjustment Layer, which he uses to reveal the depth and beauty that was rendered invisible in the image’s low-contrast form. Clor isn’t afraid of a little shadow clipping, either, though he is careful not to take it too far. Here, he was going for what he calls an “ominous presence”—he wanted the shadow areas of the mountain to go dark. The highlights are clipped slightly, too, but since the clipped areas are so small, he didn’t worry about losing detail.
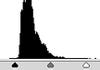
Levels Adjustment_ Drag the sliders inward to add contrast. A little bit of clipping ensures that you’ll have true black and white._
Step 4: Sharpen

A mask adds sharpness only where it’s needed.
One of Clor’s favorite sharpening techniques, which he applies to areas of detail but not to skies, is the High Pass filter. To make one, duplicate the Background Layer and drag it up above the Levels Adjustment Layer. Then go to Filter > Other > High Pass. Clor sets the Radius fairly low. After clicking OK, change the layer’s blend mode to Overlay. Then, to add your sharpening selectively, add a mask, fill it with black, and then paint with white to brush in sharpness where you need it.
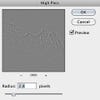
Add a High Pass Filter_ When in the High Pass filter’s dialogue box, set a low radius. Here, Clor chose 2.8 pixels._
Step 5: Dodge and Burn
Dodging and burning gets painted in on its own layer.
Clor’s dodge and burn method is another classic Photoshop technique and a killer way to make subtle, nondestructive adjustments to darkness and lightness. Here, he used it to reduce the atmospheric haze on the mountain and to clarify the difference between values; his main focus was on the side of the mountain where the light was falling. To try his technique, go to Layer > New Layer. In the dialogue box that comes up, change the blend mode to Overlay and check the box for Fill with Overlay-neutral color (50% gray). Name the layer Dodge & Burn, and click OK. From here, dodging and burning works similarly to painting on a mask: Paint with black to darken and white to lighten. Clor keeps his brush set to a very low opacity (around 6 to 10%) so that he can work slowly and build up brightness and darkness where the image needs it.

Tonal Shifts_ Set the blend mode while making a new layer (left). Check out Clor’s adjustments in this detail of his dodge and burn layer (right)._
Step 6: Lose the Noise
When his image is nearly final, Clor creates a composite layer of his adjustments, then opens the file in Topaz’s DeNoise 5 plug-in. He likes it because of the filter’s debanding component, which assures smooth transitions between tones. Whether the image is ultimately heading for print or not, he prints a proof and, based on it, makes a few final tweaks to his composite layer. Even without the plug-in, Clor’s process hints at how simple making a great b&w can be.