Software Workshop: How To Edit Video in Adobe Lightroom 4
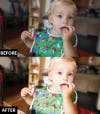
Fix exposure, tonality and color the easy way, using Lightroom 4

That’s why we like the video editing functions in Adobe Photoshop Lightroom 4—they’re perfect for when you want to make color and tonal adjustments to videos using the tools that you already know. And while you can’t use Lightroom 4 to cut together even a short film, the program is great for making single video clips look beautiful for sharing or adding to slideshows, or for processing before you import them into other video-editing software.
Since Lightroom is mainly a photo-editing program, its video tools are fairly limited. You won’t find, for example, any features for editing or modifying sound, and you can directly adjust the look of your video clips only through the Quick Develop panel in Library mode.
But if you want to use Lightroom’s real tools on your clip, there’s a workaround. Here’s how, using just a few extra steps, to make your video look just right.
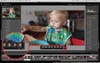
Step 1
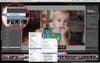
To start editing, navigate to a clip in Library Mode. (To search only for videos, in the Collections Panel click on the Smart Collection named Video Files—you’ll see all the videos you’ve ever added to your Lightroom catalog.) Type E on your keyboard to see your clip in Loupe view. Then choose the little sprocket symbol to see the trimmable view of your clip.
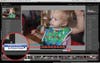
Step 2
Drag the playhead (the line that indicates where exactly you are in your clip) to a frame that represents the clip’s color and tone. Then click on the rectangular screen symbol and choose Capture Frame. Note that you won’t see the frame if you’re in the Previous Import folder.
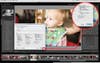
Step 3
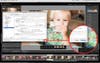
Here’s where the magic happens: You can change white balance, add contrast or vibrance, go black-and-white, or even adjust curves. Work your still the way you’d work any other RAW file. (Not all of the tools work. Because video is a time-based medium, you can’t make adjustments such as noise reduction or spot removal that would affect images differently from frame to frame.) Head over to the Presets panel and click the plus sign (circled) to create a preset for your video. It’s okay to leave most of the boxes checked—Lightroom will apply only what is possible when you use the preset.
Step 4
Select your video clip, and right click (or Ctrl + click on a Mac) on it. Choose Develop Settings > Presets and pick the preset you just made. Lightroom will apply all the edits from your still frame to your whole video.
Final Step
Position the playhead where you want it to start, then drag the clip’s left end to the right; it will automatically stop where you put the playhead. Then do the same thing to mark the clip’s end. Finally, share it. Hit the Export button, then scroll down to the Video parameters. To shrink for sharing, choose H.264 and change Quality according to LR’s guidelines. If the clip is headed, say, for Facebook, choose Medium. Note: If you use Publish Services to share, you’ll need to adjust the quality settings before upload. If a clip is too big, Facebook will reject it.