Tips For Better Indoor Photos Using Available Light
Dutch molecular biologist Erik van Hannen captured the warmth, mood and appeal of an Utrecht museum library with a handful of photographic techniques
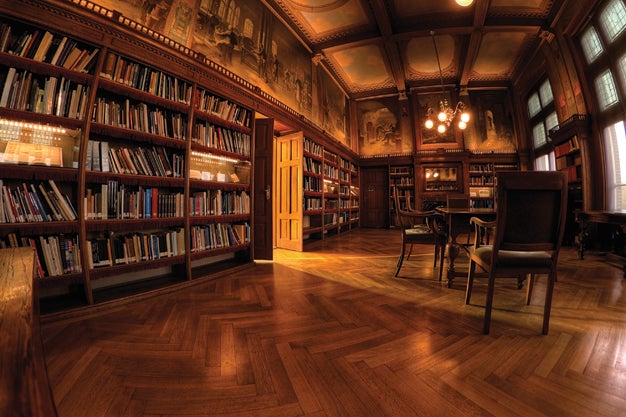
Sometimes a picture of a room is only that—simply a depiction of an enclosed space, without character. When Erik van Hannen, a Dutch molecular biologist, walked into this Utrecht museum library, he knew that a straightforward depiction wouldn’t be enough to do this space justice. He wanted to capture its warmth, mood and appeal. “I had visited the museum with my two children, and while they were busy exploring, so was I,” he says. “I ended up in this library, and was shocked. It was beautiful.”
ENTER THIS MONTH’S PHOTO CHALLENGE: INDOOR PHOTOS WITH AVAILABLE LIGHT
But van Hannen didn’t have a camera with him that day, so he returned the next week, ready to shoot. “Tripods weren’t allowed, so I went early hoping that no one would be in the library and that I would find an appropriate tripod substitute.” He got lucky, planting his camera on a small table to stabilize it.
A handful of photographic techniques helped accentuate the room’s character and color:
•Choosing the best lens. An 8mm fisheye captured the entire room and all of its classic detail.
•Getting the right camera angle. Using a low table to support the camera introduced a nonstandard point of view, which added weight and presence to the space.
•Adjusting the lighting for drama. Van Hannen experimented with the library doors, opening and closing them until he found a flow of light that created the sense of drama he wanted.
• HDR imaging. By combining over-, under-, and normally exposed images in postprocessing, van Hannen was able to hold detail in the brightest and darkest areas of the room, and to tweak color balance to bring out all the wood’s warmth.
Step 1
Find an appropriate interior. Look for grand rooms that are well lit and not mobbed with people. Museums, post offices, mansions, and estates that are open to the public can work. Contemporary interiors are just as viable as classic ones. If your room is subject to variations in lighting across the course of a day, determine what time looks best.
Step 2
Pick your angle. “Make test photographs of the room from all of its corners to see which angle is most flattering to the space,” says van Hannen. You can move decorative elements like tables and chairs to better effect, and open or close drapes and doors. Low camera angles show off a room well, but aim the camera directly into the space: Tilting up or down can create perspective distortion.
Step 3
Set the exposure. To get as much of the room as you can in sharp focus, set the smallest aperture possible. This will probably result in a slow enough shutter speed to require some form of stabilization to prevent blur from camera movement. Be prepared.
Final Step
Shoot, then tweak. If you will be producing an HDR composite, as van Hannen did, make your exposures by autobracketing in the aperture-priority mode. Start the sequence with a remote trigger or your camera’s self-timer to prevent having to touch the shutter button. Later, in software, add warmth, contrast, and sharpness. “If you shoot with a fisheye as I did, check to see how the scene looks ‘defished’ by a perspective correction tool,” van Hannen says.