Low-Light Photography: An Introduction
We talk to four pros who thrive in the shadows, creating blazingly brilliant images
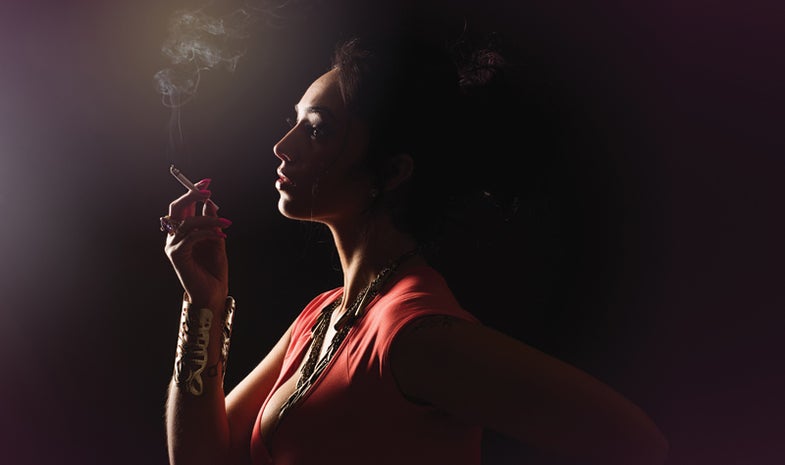
Jorge Moreno, Jr. created a mysterious, shadowed portrait in a garage studio by reining in his lighting to minimize spill. He housed a Nikon SB-900 Speedlight (used at minimum power) in a 28-inch Westcott Apollo soft box, and shot with a Nikon D300 at 1/200 sec at f/5.6, ISO 125. Photo Jorge Moreno Jr..
Maybe it’s human nature, but photographers often fear darkness. For many of us, it’s associated with photographic failure: obscured subjects, blur from movement and inaccurate focus, and the inability to see while shooting. Overcoming that fear and conquering darkness has helped the four photographers featured here to create dark images that are boldly streaked with brilliance. Here are their secrets.
“Shadows communicate a sense of place just as powerfully as any brightly lit location can,” says Cameron Davidson (camerondavidson.com), a northern Virginia-based pro who leaned out of a helicopter to shoot the office building on the next page. “I like shooting in dusky light, along the edges of darkness.”
By suggesting depth, he goes on, darkness adds dimension to a scene or shaping to a face or figure. The color black in the frame also directs a viewer’s attention to what’s important. Even more advantageous? Its ability to conceal what is not.
“To hold blacks in the studio, you have to choose light modifiers that won’t spray light around,” says Jorge Moreno Jr. (jmorenophoto.com). For this type of low-key look, he uses one of two lighting setups: either a 60-inch umbrella or as small a soft box as possible. If used correctly, both can produce minimal spill that could turn black shadows gray. With the umbrella, he achieves this by not expanding it to its full 60-inches, but by opening it just slightly to focus the strobe light solely on his model.
“Once I’ve determined my lighting setup, the next step is to suppress the impact of any ambient light,” says Moreno. This means using his camera’s fastest flash sync speed and the smallest aperture possible for correct exposure, usually 1/250 sec and f/7.0.
“To minimize spill, I start at my strobe’s lowest power setting and work my way up to the optimum exposure,” he says. “If I can’t eliminate ambient light completely, I dial up the strobe power so I can use an aperture small enough to prevent ambient light from reaching the sensor. I also keep my subject [and lights] far from the background, in order to hold a strong black back there.”
Low-Light Locations
For New Yorker Michael Shane (www.michaelbshane.com), who photographed the space shuttle Enterprise for online publication The Verge, success comes from choosing his subjects and camera angles wisely. He avoids scenes that require deep depths of field; working at minimum aperture for front-to-back sharpness can be difficult in low light, especially when shooting handheld.
As he circled the space shuttle in the gloomy exhibition space at the Intrepid Sea, Air and Space Museum, he settled on the angle you see here. “I was cognizant of the fact that the shuttle’s most interesting part from this angle, the landing gear, was [on a single plane] close to my camera,” he recalls. “That meant I was able to shoot at my lens’ fastest aperture, f/2.8, and get a sharp subject.” Moral? Think twice before attempting subjects that require shooting at (or near) f/22.
Gear in the Shadows
“When you’re shooting in low light, it’s also important to know how your gear will perform,” says Shane.
Because working in the dark is inherently difficult—you can’t see well, after all—it’s important to be completely familiar with your equipment and its control layout. Also know its capabilities. For example, pretest to determine the highest ISO that will produce satisfactory resolution and noise levels. “For this space shuttle shot, I knew from long-time experience with Canon’s EOS 5D Mark II how far I was willing to push my ISO in order to get a file that wasn’t too noisy,” he says.
Similarly, Davidson cautions, “It’s important to pretest lenses for infinity focus. Some systems have focus problems— either back or forward focus—that can lead to softness, especially in low light.”
If you focus on distant subjects by manually setting the focusing ring to infinity, because it’s too dark for autofocus, “make sure you know where infinity focus is on your lenses. It’s not always at the infinity setting.”
Managing color temperature is another low-light issue. Available-light color temps can vary widely after dark—sodium or mercury vapor, tungsten, halogen, even daylight bounced back from the moon. “So shooting RAW in mixed light is essential,” says Davidson. It lets you fine-tune white balance later in software, without the clipping that’s common with JPEG capture.
There is another way to deal with widely divergent color or color temperatures. Do as Steve Landeros (www.stevelanderosphotography.com) does: convert to black-and-white.
High contrast and wide dynamic ranges are also often a factor. A source such as street lighting can be many times brighter than the surrounding shadows. In such cases, Michael Shane recommends establishing “a close, personal relationship with an image’s histogram. Examine your subject and its histogram, and decide whether highlights or shadows can be clipped, and, if so, by how much. Figure into your calculations what will be salvageable later by highlight or shadow recovery.”
If you’re not able to hold the necessary highlight and shadow detail, consider a multiple-exposure HDR capture.
For landscape photographers such as Landeros, the Golden Hours during sunrise and sunset offer desirable lighting. At that time, however, because light is constantly changing, you can’t use long shutter speeds with confidence that the exposure you determine when the shutter opens will still be accurate when it closes. “I often make exposures of between 10 and 15 minutes,” says Landeros.
“To see how much the light changes during exposure, I take meter readings using either an external lightmeter or the meter in a backup camera. For sunsets, I usually end up adding about 25 percent to my starting exposure.”
He has another technique for making (seemingly) low-light photography easy: He shoots in broad daylight. The technique is commonly used by cinematographers and is called “day for night.” In Landeros’ Mendocino County seascape above, he shot late in the afternoon and used three neutral density filters so that the light striking his sensor was as dim as moonlight. This gave him the look of night, with all the conveniences of working in relative daylight.
Landeros also has an interesting technique for stabilizing his camera during long exposures. “When I’m shooting a beach scene like this, I use a quality tripod and sand. Once I’ve found my composition, I shove my tripod legs as far into the sand as possible,” he says.
Indeed, one of the primary challenges in low-light photography is holding the camera still for the long exposures. For his building photographs(see our gallery for an example), Davidson used an unusual handheld support: a Kenyon Admiral KS-8 gyro stabilizer ($4,000, direct). Used by airborne photographers—aviator Davidson shot the building from a TwinStar helicopter—and cinematographers shooting from moving vehicles, the gyro stabilizer is about the size of a Classic Nerf football (though much heavier) and it attaches to a camera’s tripod socket, where its spinning gyroscope isolates the handheld camera from external movement. When tripods won’t work, either because they’re not permitted or you need the freedom of handheld operation, Davidson suggests renting a stabilizer from places like Kenyon-Labs (ken-lab.com), which offers them for about $200 to $300 a week.
When not shooting in the clouds, Davidson opts for a “heavy-duty Gitzo tripod for its stability and build. I wrap a 10-pound Matthews Boa Bag sand bag ($37, street) around its legs. During long exposures, I also avoid touching or holding the tripod, and I always use a remote cable release and mirror lock-up,” he concludes.
If you find yourself in low light without a tripod? Turn yourself into one. “For the space shuttle image, I took extra care to steady my camera by pressing my back against a wall, and sitting on the ground to create a low center of gravity,” says Shane. Seated, you’re less likely to sway than standing.
Is your camera inherently noisy at high ISOs? Avoid subjects and locations that won’t allow tripod use for lower, noise-free ISOs. Fast glass is also essential. As Davidson puts it: “If you’re going to attempt shooting in darkness, it will cost you. Cheap or slow lenses are a no-go. Better to rent something fast than waste your time in the dark with substandard glass.”
Getting the Shot
Tools and Tech: Recent aids for better results in low light.
• EASIER HDR COMPOSITING—For high-contrast nighttime cityscapes with bright highlights and dim shadows, HDR capture and compositing software can help. Try plug-ins like Photomatix or Nik HDR Efex Pro.
• BETTER NOISE REDUCTION—For taming noise in high-ISO images, try Nik Dfine 2.0, PictureCode’s Noise Ninja, and Imagenonic’s Noiseware.
• SONY’S HANDHELD TWILIGHT MODE—Included in more recent Sony cameras, this tool was specifically designed for low light, combining noise reduction and HDR.
Best Cameras in the Dark: In Pop Photo tests, these cameras produced the least noise at high ISOs.
• BEST: Canon EOS 5D Mark III
• ALMOST THERE: Canon G1X and EOS Rebel 4Ti, Nikon D4, Sony NEX-7
• RUNNERS UP: Canon 60D, EOS Rebel 3Ti; Nikon D800, V1; Olympus OM-D, Olympus Pen E-PL3 and E-P3; Pentax K-r; and Sony Alpha NEX-C
Fastest Glass:Highly specialized lenses for low-light shooting.
• Canon EF 50mm f/1.2L ($1,619 street). Tested here in 2007, it was proclaimed the fastest normal AF lens on the planet.
• Canon EF 85mm f/1.2L II ($2,199, street). The world’s fastest lens in the moderate tele range.
• Leica 50mm f/0.95 Noctilux-M ($10,995, street). This manual-focus-only lens ran the Pop Photo gauntlet in 2009 and every aperture (at our benchmark magnification) produced A+ SQF numbers. That’s rare.
Best Accessories: Besides tripods and stabilized lenses, try…
• Remote camera triggers help you avoid having to press a shutter release and jar the camera. Examples: PocketWizard Plus III, MicroSync II, simple cable release.
• Neutral-density filters for shooting low-ISO “day for night” images. Examples: Schneider True-Match Vari-ND filter, Singh-Ray Vari-N-Duo Polarizer and ND filter.
• Gimbal-style camera supports that give extra stability with the freedom of handholding. Examples: Glidecam HD2000, Steadicam Merlin 2, VariZoom FlowPod.
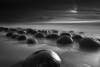
Shooting at sunset, Steve Landeros added a moonlit gloom to this seascape by mounting no fewer than three ND filters on his Canon EF 17–40mm f/4L lens. Photo: Steve Landeros
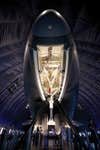
Michael Shane covered the unveiling of the space shuttle Enterprise aboard the Intrepid Sea, Air, and Space Museum in New York last July for The Verge (www.theverge.com). Shooting with a Canon EOS 5D Mark II and 16–35mm f/2.8L Canon zoom, he managed to hold detail in both the bright highlights and inky shadows. The two he describes as being “about 10,000 stops apart.” Exposure: 1/80 sec at f/2.8, ISO 1000. Photo: Michael Shane
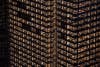
Shooting from a helicopter, Cameron Davidson scored this dusky New York scene using a Nikon D3s. His lens was the 70–200mm f/2.8 VR II, which he set to f/3.5, exposing for 1/500 sec at a noise–free ISO 6400. Taken handheld in a vibrating TwinStar copter, the image is sharp because Cameron mounted the camera on a $4,000 gyro stabilizer. Photo: Cameron Davidson

Jorge Moreno, Jr. created a mysterious, shadowed portrait in a garage studio by reining in his lighting to minimize spill. He housed a Nikon SB-900 Speedlight (used at minimum power) in a 28-inch Westcott Apollo soft box, and shot with a Nikon D300 at 1/200 sec at f/5.6, ISO 125. Photo Jorge Moreno Jr.