12 things you didn’t know your DSLR could do
Your camera may be smarter than you think.
We may earn revenue from the products available on this page and participate in affiliate programs. Learn more ›
Your digital SLR (even if it’s a budget “entry-level” model) is a picture-making powerhouse. And sure, you know all about the still and video capture, burst shooting, tracking autofocus, and smart metering.
But your camera likely has additional capabilities you may not know about—features that can improve your photos and make for a more enjoyable shooting experience. You may be surprised at the clever elves lurking in your camera body.
Now for our standard weasel words: Not every camera will have all of these tricks onboard, and older models will have fewer of them than newer models. The best way to find out the deep capabilities of your camera is to read the instruction manual—backwards. Some of the most interesting stuff gets buried in appendixes or custom-function tables in the back of the book. Also read the manuals for any software included with your DSLR: Some features end up there instead of the camera manual. Happy hunting!
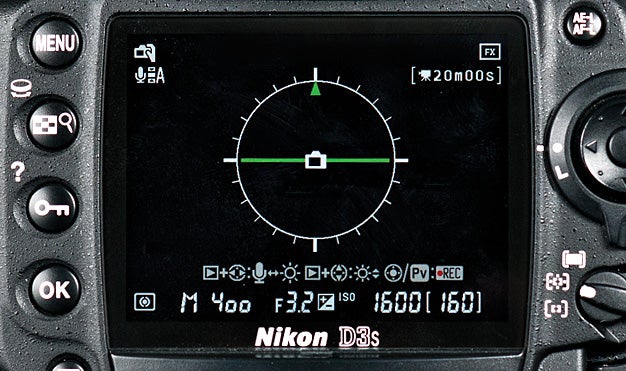
1. Keep the horizon horizontal with an in-camera leveling guide

Even experienced landscape photographers occasionally find their horizons tilting in shots, especially when the actual horizon is uneven to begin with. Ditto for architectural shots. And while you can always straighten things out later in image editing, you will lose some of the frame edges when doing so. Enter the in-camera level, which has a great advantage over tripod and hot-shoe levels: You can see the indicator in the viewfinder, allowing you to compose and level simultaneously.
Some cameras also have a level for the pitch axis (up/down tilt). This proves useful for squaring the camera with buildings or other structures, thus avoid keystoning (also called toppling perspective).
Tip: We’ve found in-camera levels particularly useful for handheld shooting. Photographers take plenty of landscape and cityscape pictures without a tripod, after all, and these are the shots that most often end up tilted—particularly the verticals. The in-camera level lets you get it right with very little fuss.
2. Go from RAW to cooked with in-the-camera processing
You don’t need image-editing programs to process RAW files if you have one of the many DSLRs that allow RAW-to-JPEG conversion, with image editing, right in the camera. (Most current Canon, Nikon, Olympus, and Pentax models have this ability.) Before your conversion, you can make many standard image edits, such as white balance, highlight and shadow adjustment, saturation, contrast, cropping, JPEG profile, and so on.
Cameras increasingly allow for more elaborate fixes and modifications, too, such the miniature effect or perspective correction in shots of buildings. The great part is that the processing leaves the RAW file untouched, so you can make multiple versions of the same image.
Tip: Want to travel light for a day or weekend trip? Leave the notebook computer at home and take some extra memory cards. Shoot in RAW, and convert your favorite shots during down time or while on the plane/train/bus.
3. View your pictures remotely with tethered shooting
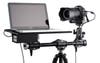
Tethered shooting isn’t limited to high-end DSLRs. You can use a computer (or TV) for playback with any DSLR that has a video-out terminal, which is virtually all of them. Playback on a big screen is a boon for studio portrait shooting or tabletop still-life work—any static situation where detail is critical.
Even better, many current DSLRs (most Canons and Nikons, and Sony Alpha 700, 850, and 900 models) allow true tethered shooting: You operate the camera using the computer, which displays a live view on the screen. (Software for this is bundled with Canons and Sonys; Nikon shooters need Nikon Camera Control Pro 2, $145, street. Or try Adobe Lightroom 3 or Apple Aperture 3; both have built-in tethering for Canon and Nikon.)
Tip: With a long cable, you can use a tethered camera for wildlife shooting in your backyard.
4. Zap dust with software using dust mapping
Yes, your sensor shakes to remove dust, and you carefully use a blower to loosen dust from the glass plate in front of the sensor, but you may still get persistent dust spots in your photos. Many cameras allow you to map the dust spots and rid your images of them later in software.
The mapping entails photographing a blank white surface; the manufacturer’s image-editing file uses the data to fill in the dust spots by interpolation.
Tip: Continue to exercise due diligence against dirt. Change lenses carefully, and never leave a camera body or rear lens element uncapped.
5. Get steadier long exposures with combined mirror lockup and self-timer

Even on a tripod, your DSLR can shake due to mirror slap—the vibration caused when the mirror flips up and down—so you should lock the mirror up for long exposures. It can also shake if you trip the shutter with your hand on the camera, so you should fire with a remote or the self-timer. But did you know you could stop both shakes with one control? Mirror lockup with a 2-second delayed release is found on most DSLRs in a self-timer menu or drive-mode selection.
Tip: You can use the lockup/delayed release without a tripod. Rest the camera on a steady surface, or prop your elbows on a steady surface with the camera held firmly against your face. Take a breath, trip the shutter, and hold still until the mirror drops back down.
6. Perfect your optics with lens correction
Readers of our lens tests know that there is no such thing as a perfect lens. Even top-notch optics can produce distortion, light falloff, and soft images at some apertures. A growing number of DSLRs have built-in fixes to correct for distortion (barrel and pincushion) and corner vignetting. Some can even counteract chromatic aberration, which robs images of sharpness and causes color fringing; in some cameras, this function is part of the RAW conversion menu.
Watch out: In some cases, this function works only with the camera maker’s own lenses, not with independent optics.
Tip: The lens correction option may be the default setting in some cameras. If so, you can turn it off in a setup menu. Why would you? The distortion correction can cut off some of the frame edge—or you may just want the distortion.
7. Take notes without a notebook, by using voice memos
This feature allows you to record a voice clip and embed it in the image file. It eliminates the need for a notepad or handheld device for recording the stuff that doesn’t get into the EXIF data: Names of people and places, how you got to the location, hair-raising happenings, etc. (While this capability is now limited to mostly higher-end DSLRs, we suspect it will eventually migrate downwards, as most DSLRs now have built-in mics for video recording.)
Tip Use the voice clip to record info for future reference: “Come back when mist is predicted” or “Get here early for the eastern light on the mountain.
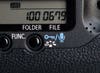
8. Take a time-lapse sequence using the interval timer
Curiously, you used to see on-board interval timers more often in compact cameras than in DSLRs, which usually required a separate controller to make the camera shoot automatically at regular intervals. But times are changing, and more and more DSLRs include built-in intervalometers.
Creating time-lapse videos from still shots is popular these days, and some cameras will even bundle shots into a video clip for you—no video editing software needed.
Tip:Make sure your camera’s battery is fully charged before making a long sequence, or consider using an AC adaptor.
9. Go wild and crazy (or, better yet, subtle and sophisticated) with filter effects

We all know these imaging effects are in there, and yes, we have called some of them cheesy and over-the-top (witness the Pentax K-5’s cross-processing effect). But you know what? They’re fun, and can be useful, too. Filters such as fisheye effect and miniature effect can add zing to city scenes when you don’t have the right lens to do it for you; soft focus can help challenged complexions; pastel or watercolor effects can tone down harsh midday light. And remember, if you shoot RAW + JPEG, you’re not stuck with the rendition—it’s applied only to the JPEG.
Tip: Preview what a monochrome rendition will look like by setting JPEG capture to b&w, then use filters such as red, green, or yellow to alter tonality.
10. Try another kind of flash memory: TTL flash-exposure lock
Just as cameras have an exposure lock setting that lets you set exposure for one area of the scene and then recompose, many DSLRs have flash-exposure lock. You should use it similarly: When a person or other important subject will be positioned at the edge of the frame, use the lock to preset flash exposure for the subject (it uses a preflash), then recompose.
Tip Flash exposure lock works with accessory TTL flash units—on- or off-camera—as well as the built-in unit.
11. Customize images with JPEG profiles

Every camera maker has a different term for them, such as Picture Styles (Canon) or Picture Controls (Nikon), with setting names such as Neutral or Vivid. But we call them JPEG profiles: the specific settings (saturation, sharpness, contrast, etc.) that the camera applies to a JPEG. You can tweak each parameter individually and save them as custom profiles. A few cameras even let you save a profile to a memory card, then transfer it to another camera.
Tip: Shoot only in RAW? The manufacturer’s conversion software bundled with the camera will usually allow you to apply a profile during processing on the computer.
12. Dig out shadow detail with dynamic-range extenders
Again, camera makers have different names for them (Nikon: D-Lighting; Sony: D-Range optimizer) but the idea is the same: gain up the shadows without boosting the highlights. (This is separate from the HDR function found on some cameras.) As with many other picture adjustments, these shadow-highlight optimizers can also be applied later with the manufacturer’s RAW software.
Tip: Don’t overdo it. We’ve found that some dynamic-range boosters,if applied excessively, can also increase noise in the shadows.