An Introduction to HDR Photography
If you thought high-dynamic range imaging was just for garnish sunsets and implausibly lit interiors, think again
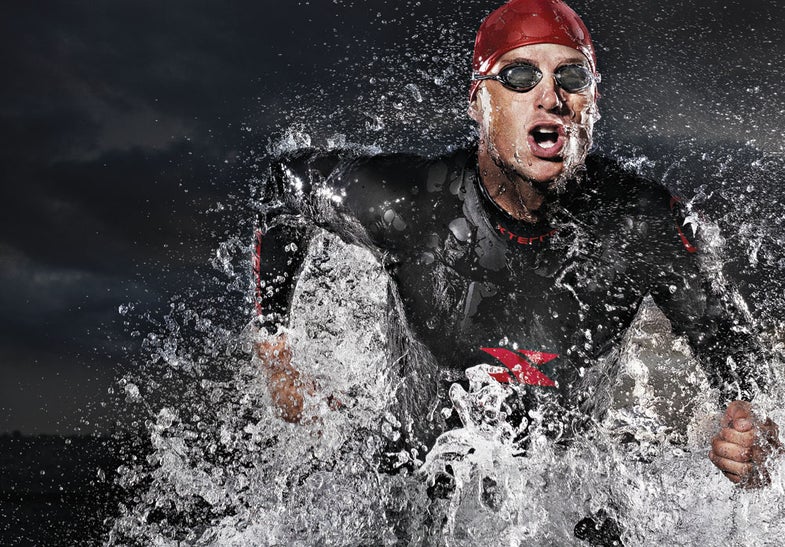
Skillful lighting is at the core of Tadder's style. Here he used a four- light setup, Profoto packs, and a PhaseOne system synced at 1/1600 sec to freeze the action. Multiple layers and lots of post-processing got the HDr look.
Long before high-dynamic-range (HDR) imaging entered the lexicon, photographers such as Gustave LeGray and Ansel Adams searched for ways to create images with a wider gamut of tones to better represent what is seen with the naked eye.
Even though we’ve moved from film and chemicals to digital darkroom, photographers continue to experiment with a variety of tools and techniques to pull the most detail and tonal range from their images. While photographic and lighting skills remain at the core of any image- making, digital HDR also relies heavily on post-capture work.
For processing multiple exposures—or even single frames— some photographers work manually in Adobe Photoshop alone; others depend on one or more of a growing coterie of HDR software; still others use a little bit of both. Cameras from smartphones to DSLRs now offer some form of HDR processing built in. But the best, most subtle HDR images still take a lot of work.
The Professional Edge
Architecture and food photographer Andy Ryan first used HDR techniques in 2004, before commercial HDR software was available. He was shooting a building with deep shadows and bright highlights that he wanted to render “as a person would see it if they were actually there,” he says. “I had a lighting problem to solve, and I saw the chance to do it digitally.”
By shooting several frames at different exposures (a practice called bracketing) and combining them, he could depict details in both the shadows and highlights.
Applying HDR techniques to his food photography lets him use the best lighting and camera angle for the overall shot while emphasizing particular flavor points and textures that would otherwise have been lost.
Until recently, Ryan shunned HDR software, instead making manual adjustments in Photoshop for a realistic look. When he tried the latest version of Photomatix Pro, though, he found it “vastly improved.” Today, he uses it to “do the heavy lifting” before moving to Photoshop for final adjustments, sometimes using the Photomatix image as an additional layer with other bracketed shots.
Advertising photographer Tim Tadder, who developed his first print in the darkroom at age 12, likens HDR to traditional printing techniques. “We use so much dodging and burning and adjustment layers that it’s just like Ansel Adams did in the darkroom,” he says. “Only we use Photoshop.”
Like Ryan, Tadder developed his style before the advent of HDR software and prefers to work in Photoshop—sometimes using 15 to 30 adjustment layers. He also uses extensive lighting to ensure that he starts off with as much dynamic range as possible.
Tadder sometimes employs a multiple-image approach using HDR software to put together a background or other components of a scene, which he composites into the final image. But the ads he produces for clients such as Bud Light, Coke, Pepsi, and the NFL often include people in motion, making it difficult, if not impossible, to bracket. “I don’t really do HDR by traditional standards,” he says, adding that while his clients may be familiar with HDR, they “don’t care how it’s accomplished.” Indeed, the best HDR images call no attention to how they’re made. Says Ryan, “My use of HDR techniques has always been in service of creating realistic images, those that appear true to the human eye’s dynamic range.”
Improving Skills
In 2009, according to Photoshop Senior Product Manager Bryan O’Neil Hughes, a web search for HDR tutorials netted 295,000 hits. A Google search today? Some 3,540,000 hits, with photographer Trey Ratcliff’s www.StuckInCustoms.com atop the list.
Ratcliff, whose site offers tutorials, advice, and lots of images, started Stuck In Customs as an “experiment in visualization.” Trained in computer programming, he took up HDR about five years ago using the limited algorithms and freeware applications available at the time, then shared what he’d learned online. He posts a new image every day, and his site gets over 175,000 photo views daily.
Like many pros, Ratcliff isn’t satisfied with fully automated HDR, particularly when it comes to skies and skin tones. He calls Photomatix “the first step in the odyssey,” adding, “If Photomatix is the alpha, then the omega is Photoshop.”
He explains, “The problem with HDR algorithms is they’re limited. They don’t do what your eyes do in terms of texture and contrast. They’re really good on part of the photo, but about 30 percent is a disaster. It’s a common mistake— to take the image right out of post-processing” and call it done. “You have to bridge the gap between the algorithm and reality, and do that clean-up in Photoshop.”
The Easy Route
Still, many people want to skip postprocessing entirely. That’s why a growing number of cameras, primarily aimed at consumers, include HDR modes. Pentax’s K7 was the first DSLR to offer an HDR mode that automatically captured and blended three bracketed shots. Sony has integrated multi-shot HDR into a number of its DSLRs, ILCs, and compacts. And this year Nikon released its first HDR-equipped DSLR, the 5100. Others offer HDR-like looks: Olympus’s Dramatic Tone effect filter and Casio’s HDR-Art effect, for example. Then there are smartphones, popular with pro photographers and snap-happy amateurs alike.{C}{C}{C}
Photographer, author, and HDR workshop instructor Tony Sweet is well known for his DSLR and iPhone HDR images. The iPhone is his constant companion and the perfect device for spontaneous shots, he says. But its camera has limitations in quality (“an inherently soft lens”) and technology (minimal bracketing), so he uses its HDR mode on “scenes where the dynamic range is not extreme.” He uses True HDR processing software on the iPhone; for print, he also tweaks it slightly (e.g., contrast, sharpness) on the computer.
Sweet considers the iPhone a “great creative tool” and has noticed that HDR shooters “arequickly moving” to the Apple device, though not abandoning DSLRs. He shoots most of his HDR images with the iPhone, but uses his DSLR for his “serious” HDR work, where file size is critical.
But as HDR has become more accessible, the potential for abuse has grown exponentially. All too many HDR photos have exagger- ated and crunchy details as well as punchy, psychedelic colors—a far cry from the basic HDR tenet of expanding tonal range. Refer- ences to Velvet Elvis and other such descriptors abound. With more in-camera HDR, as well as new apps, we’ll probably see an increase in images that mix the good with the bad and the ugly.
But some day, perhaps, a single capture will reproduce the same highlight-to-shadow ratio we see with our eyes. As Adobe’s Hughes says, “If HDR is done right, it just looks like a good exposure.”
Essential Tools to Help You Get the Look
While you can create a faux HDR image with a single shot, the ideal is to capture multiple bracketed frames. You’ll need…
HARDWARE:
A camera with auto bracketing (3 to 9 frames), or you can manually adjust exposure between shots. To extend a DSLR’s capabilities, try Promote Control ($329; www.promotesystems.com).
A tripod to keep frames aligned.
SOFTWARE:
Adobe CS5
Versions back to CS2 will do, but CS5 has easier and more extensive tools.
NIk HDR Efex Pro
Plug-in.
PhotoMatix
Comes in several different versions: Pro, Light, Plug-in for Aperture, Tone Mapping Plug-in for Photoshop
Unified Color
32 Float, HDR expose, HDR express
BOOKS:

For this motorcycle shot, ratcliff used a Nikon D3X to bracket five frames from –2 to +2 eV. HDr “helped bring out the texture and let the micro- contrast pop in an interesting way,” he says.

A more familiar subject for HDr, this night scene also combines five frames (–2 to +2 eV) shot with a Nikon D3X. ratcliff feels long exposures doa”bitofa disservice to the true light,” but he used HDr here to “help bring out the real light that your eyes experience.”

Shooting with a Nikon D3X, Sweet bracketed five shots (–2 to +2 eV) for this tonemapped image he processed in Nik HDr efex Pro.
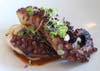
four bracketed shots combined to emphasize the ten- tacles, with the oils and moisture represent- ing the octopus’s main flavor profiles. ryan captured the images with a Hasselblad H3DII-39 and an HTS 1.5 tilt/shift adapter.
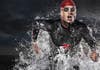
Skillful lighting is at the core of Tadder’s style. Here he used a four- light setup, Profoto packs, and a PhaseOne system synced at 1/1600 sec to freeze the action. Multiple layers and lots of post-processing got the HDr look.