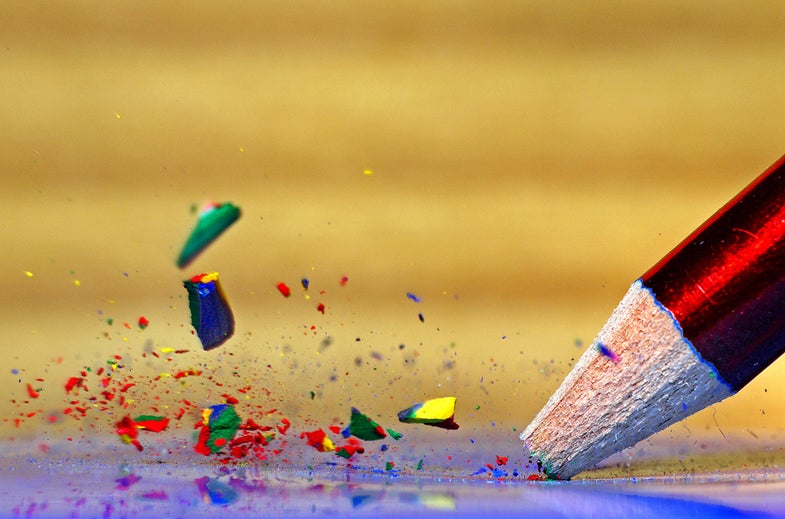

Photographers tend to think visually, but instead it was sound that inspired Mark Watson, an enthusiast who lives in Nottingham, England, to capture this shattering picture. (See more of his work at flickr.com/photos/kalimistuk.) “I got the idea,” he explains, “after breaking a pencil point and hearing the lead hit the opposite wall. Pencils are pretty loud, I thought. Loud enough to activate an audio flash trigger.” High-speed flash photography requires specialized equipment, but luckily for Watson, who’s currently unemployed, it wasn’t expensive. His action-freezing gear included:
- Makezine high Speed photography Kit ($120, direct; makezine.com/flashkit). This comes with a flash and flash trigger that can be activated by either sound or light.
- American DJ Snap Shot II Strobe light ($60, street). Watson chose this disco favorite for its bright output and short flash durations—perfect for capturing motion sharply.
- Raynox Dcr-250 Super Macro lens ($57, street). Cheaper than an actual macro lens, this filterlike close-up tool snaps onto lenses that have 52–67mm filter threads to deliver eye-popping 2.5:1 subject magnification
Step 1: Build your set. Pick a neutral background and a platform that contrasts with your pencil’s color.
Step 2: Test the flash trigger. Place your flash close in and set the dimmest output possible. With the flash trigger, microphone, and strobe connected and on, snap off pencil points to test the trigger. If the flash doesn’t fire, increase the mic’s sensitivity until it does.
Step 3: Determine flash delay. the flash trigger allows for a delay between the pencil break and flash firing—Watson’s was about 90 milliseconds. to find yours, mount the camera on a tripod and set a 2 sec shutter speed in the manual exposure mode. Prefocus on the subject’s mark. turn off the room lights and work by dim light coming from the next room. start at 90 milliseconds, fire the shutter, and break a pencil point to trigger the flash. If your photo doesn’t capture the shards in midair, adjust the flash delay until you catch them flying.
Step 4: Fine-tune exposure. adjust flash distance (keep the power level low) to achieve proper exposure with a midrange aperture such as f/11. Wider apertures provide too little depth of field; smaller ones can require a brighter flash with longer, image-softening durations. With the right exposure, you’re good to go.
Final Step: Clean up your files. In an image editor, crop any vignetting produced by the macro lens, adjust contrast, sharpen, and boost color.